{% columns %}
{% column %}
{% endcolumn %}
{% column %}
### Ready To Get Started?
Find everything you need to begin working with Pay.io solutions and APIs, step-by-step.
Let's go!
{% endcolumn %}
{% endcolumns %}
{% columns %}
{% column %}
### Why Pay.io
Built for businesses that never stop moving.
* **Secure by design** - Built with strong security standards to protect your data.
* **Global reach** - Local payments and currencies that scale with you.
* **Developer-friendly** - Clean APIs and docs for fast integrations.
* **Always on** - 24/7 monitoring and dedicated support.
Contact Our Sales Team
{% endcolumn %}
{% column %}
{% endcolumn %}
{% endcolumns %}
# Service Level Agreement (SLA) for Pay.io during Beta Program
### **1. Overview**
Pay.io provides a **Payment as a Service (PaaS)** orchestration platform designed for high-performance digital commerce operations. As an **Instructional Orchestrator**, we provide the technical infrastructure to manage your digital asset flows.
During the **Early Access phase**, Pay.io operates with **limited support available strictly during defined business hours**, and the SLA described below applies to:
**Business Hours (Early Access):**\
Monday–Friday, 09:00–18:00 EET, excluding public holidays observed in Estonia.
***
### **2. Service Availability**
We commit to providing a stable and resilient environment for your global operations.
* **Uptime Target:** Pay.io targets a monthly uptime of **99.8%** for the Merchant Console, CashierUI, and Payment Gateway API; excluding downtime resulting from scheduled maintenance and force majeure events.
* **Real-Time Monitoring:** We employ 24/7 automated monitoring to detect and resolve potential issues before they impact your business. Human response and troubleshooting shall be provided only during Business Hours in this Early Access phase.
* **Maintenance Windows:** All scheduled maintenance will be communicated via Slack Channel or email. Clients are notified at least **48 hours** in advance.
* **Degraded Service Definition:** If a third-party partner (e.g., Boomfi) experiences an outage, Pay.io is considered in a **"Degraded State"** but not "Down"; the Instructional Layer remains capable of processing internal data and non-impacted provider requests.
***
### **3. Support & Response Times**
Pay.io provides support based on the following incidents severity levels.
All response and resolution times below apply only during Business Hours.
Incidents reported outside Business Hours will be queued and treated as received at the start of the next Business Hour window, unless otherwise explicitly agreed.
| **Priority** | **Incident Definition** | **Initial Response Time** | **Resolution Target Time** |
| ----------------- | ------------------------------------------- | ------------------------------------ | -------------------------------------------------- |
| **Critical (P1)** | Complete service outage or security threat. | **30 minutes** | Within 4 Hours (Immediate escalation) |
| **High (P2)** | Major degradation of key platform features. | **2 hours** (during Business Hours) | Within 8 Business Hours |
| **Normal (P3)** | Minor bugs or individual account issues. | **4 hours** (during Business Hours) | Within 2 Business Days |
| **Low (P4)** | Feature requests and general inquiries. | **24 hours** (during Business Hours) | Depends on priority and capacity (Time might vary) |
***
### **4. Customer Service SLA**
Pay.io is committed to providing support and technical guidance, adhering to industry practices, including:
* **Multi-Channel Support:** Clients can reach the Pay.io team via Slack.
* **First Contact Resolution:** Pay.io aims to resolve technical inquiries, such as configuration questions or interface navigation during the first interaction whenever possible.
* **Escalation Process:** Unresolved technical issues or potential platform bugs will be escalated to the Engineering Manager and the DevOps team within **24 hours** of the initial report.
* **Slack channel**: Primary communication channel to report and escalate issues with Pay.io team.
***
### **5. Customer Responsibilities**
To ensure effective support, clients must:
* Provide accurate incident details when reporting issues.
* Use designated communication channels for support requests.
* Ensure the **Webhook Listener** is operational to receive transaction updates.
***
### **6. Exclusions & Limitations**
Pay.io shall not be liable for performance failures caused by systems outside its direct control:
* **Third-Party Outages:** Downtime caused by Boomfi or AWS (unless such downtime is demonstrably caused by a Pay.io misconfiguration).
* **Blockchain Latency:** Network congestion, high gas fees, or delays in block finality.
* **Client/Merchant Inaction:** Failure of the Merchant to provide a **Passkey signature** for cold-wallet withdrawals or transfers.
* **Internet Issues:** Problems inherent in the use of the public internet and external electronic communications.
***
### **7. Modification & Termination**
Pay.io reserves the right to update this SLA at any time, particularly as the service moves from **Early Access** to **General Availability (GA)**. Any material changes to the SLA will be communicated in advance where reasonably possible.
# On-Ramping: Buying Crypto with Fiat
Enable users to buy crypto with fiat currencies
To make depositing as frictionless as possible, Pay.io offers On-Ramping functionality.
{% hint style="info" %}
**What is On-Ramping?**
**On-Ramping** is the process of **exchanging** **fiat** **money** (traditional currencies like EUR, USD, or GBP) for **cryptocurrency**.
{% endhint %}
In the context of **Pay.io**, we provide **functionality** for your **players** to **purchase** **crypto** **directly** using their credit cards, debit cards, or services like Apple Pay, and have those funds automatically deposited into their casino wallet as a standard deposit.
This drastically **lowers** the **barrier** **to** **entry** for users who do not already hold cryptocurrency or are unfamiliar with managing external wallets.
#### How Does It Work? — The User Flow
From the player's perspective, buying crypto is seamlessly integrated into your existing Cashier UI.
1. **Initiation**: The user navigates to your Cashier UI and clicks a custom “Buy Crypto” button (which your frontend will need to provide).
2. **Wallet Detection**: Our system automatically picks up the user's generated wallet address for the transaction from Pay.io data.
3. **The Iframe Modal**: An iframe opens, displaying the on ramp provider's modal. The available cryptocurrencies and networks shown here are directly mapped from the [**assets** you have enabled in your Hot Wallet within the Merchant Console](/assets/asset-management-add-edit-disable).
4. **Payment and KYC**: The user selects their preferred fiat payment method (options like Visa, Mastercard, or Apple Pay will vary depending on their geographical location).
* **First-time users** will be prompted to complete a quick KYC (Know Your Customer) verification within the widget before purchasing.
5. **Completion**: Once successful, the purchased crypto is routed to the user's wallet, and the funds will appear on your casino interface just like a regular crypto deposit.
{% hint style="info" %}
Note that the on ramp provider's modal may display both "**Buy**" and "**Sell**" tabs. \
Please note that **Pay.io** currently only **supports** the **BUY** **option**. Users should not attempt to use the "Sell" functionality through this specific iframe.
{% endhint %}
#### Integration Flow
{% hint style="success" %}
**See full guide** on how to implement the on-ramping functionality in our [**API Reference guides**](/api-reference/user-payment-api/add-on-ramping-to-your-site)**.**
{% endhint %}
The integration relies on a single backend API call to generate a unique URL, which is then rendered on your frontend within an iframe.
```mermaid
sequenceDiagram
participant User as End User
participant Frontend as Merchant Cashier UI
participant Backend as Merchant Backend
participant PayIO as Pay.io API
participant Provider as Onramp Provider
User->>Frontend: Clicks "Buy Crypto" button
Frontend->>Backend: Request onramp session
Backend->>PayIO: POST /v1/user/payments
PayIO-->>Backend: Returns secure URL (link)
Backend-->>Frontend: Passes URL to UI
Frontend->>Frontend: Renders URL inside iFrame
User->>Provider: Completes KYC & buys crypto via Fiat
Provider-->>PayIO: Executes crypto transfer to user wallet
PayIO-->>Frontend: Balance updated (Standard Deposit)
```
{% hint style="success" %}
**See full guide** on how to implement the on-ramping functionality in our [**API Reference guides**](/api-reference/user-payment-api/add-on-ramping-to-your-site)**.**
{% endhint %}
# What is Pay.io?
Pay.io is a specialised **B2B Platform as a Service (PaaS)** designed specifically for the **iGaming** industry.
Our platform experience provides a secure, comprehensive **technology** **layer** for **managing operations around cryptocurrency payments**. We combine a robust technical gateway service (Payment as a Service) with intuitive user products to streamline how operators handle digital assets.
### How It Works?
The **Pay.io** platform consists of **three** core **products** working in unison:
**The Merchant Console (Backoffice experience)**
This is your command centre. Designed for B2B clients, the Merchant Console is a secure dashboard that gives you direct control over your funds and user activity.
* **Purpose**: To empower merchants with self-service tools, reducing the need to contact support for daily operations.
* **Function**: Use it to configure wallets, set security parameters, monitor transaction flows, and manage team permissions.
**The Cashier UI (Embeddable frontend widget)**
This is what your players see. The Cashier UI is an intuitive interface designed to process end-user transactions.
* **Purpose**: To drive conversion rates and customer satisfaction through a frictionless payment experience.
* **Function**: It allows players to deposit and withdraw funds quickly using various cryptocurrency options.
**The Payment Gateway (Service)**
The underlying technical infrastructure that securely processes all transactions between the Cashier UI, the Merchant Console, and the blockchain.
***
### Key Features
Pay.io is built to reduce operational overhead while ensuring compliance and security.
* **Wallet Management:** Configure both a Hot Wallet (for operational liquidity) and a Treasury Wallet. You can set automated withdrawal parameters and security rules to protect your assets.
* **Transaction Management**: A comprehensive view of all deposits and withdrawals. You can filter and track activity to facilitate daily reconciliation.
* **Cashier Experience**: Support for multiple cryptocurrencies (and FIAT currencies) with easy transaction tracking for the end-user.
* **Robust API**: A simple, well-documented API supporting the entire product suite, enabling seamless integration across the Merchant Console and Cashier UI while giving your technical teams the flexibility to build custom workflows.
# What is the Merchant Console?
Centralised Control for Your Digital Asset Operations
The **Merchant Console** is a part of core Pay.io offering for B2B iGaming operators to monitor and manage their payment gateway layer. Through Merchant Console we provide opportunity to control your cryptocurrency wallets, see and approve user transactions as well as monitor merchant transactions as highlights.
This web-based product is designed to give B2B iGaming operators full autonomy over their cryptocurrency flows. Instead of relying on external support for every configuration change or top-up, the console puts the control back in your hands.
It can even serve as a central hub where your finance, operations, and technical teams can collaborate to manage wallets, monitor real-time transaction flows, and generate the detailed reports needed for accurate reconciliation.
#### Why use the Merchant Console?
We built this platform to solve the operational inefficiencies that slow down crypto-native businesses. What do we target?
1. **Operational autonomy** by allowing you to manage your own Hot and Treasury wallets, set your own limits, and configure assets without relying on Pay.io support.
2. **Faster reaction times** as you can receive instant alerts for low balances or large withdrawals, allowing you to react to critical events immediately.
3. **Simplified reconciliation** through a unified view of all user and merchant activity makes end-of-month reporting and auditing effortless.
#### Key Capabilities
**Advanced Wallet Management**
Manage your treasury with a focus on security and liquidity.
* Hot Wallets and Treasury Wallets - seamless views for your operational funds (Hot Wallets) and treasury holdings.
* [Asset Configuration](/assets/asset-management-add-edit-disable) - Enable or disable specific cryptocurrencies and stablecoins based on your business needs.
* Automated Security - [Configure Sweep Settings](/assets/setting-up-sweeps-and-alerts) to automatically move excess funds to treasury storage and set Low Balance Alerts to maintain liquidity.
* [Auto-Approval Rules](/assets/user-withdrawal-limits) - Define specific value limits (e.g., specific daily quotas). Withdrawals under this limit are processed instantly; anything over is flagged for manual review.
**Transaction Oversight**
Gain total visibility into money movement with three dedicated views:
* User Transactions - Monitor real-time deposits and payouts with advanced filtering (by hash, user ID, or status).
* Withdrawal Requests - A dedicated queue for high-value withdrawals that require your approval based on your security settings.
* Merchant Transactions - Track internal treasury movements between your own Hot and Treasury wallets.
**Reporting and Reconciliation**
* Custom Reports - Generate detailed CSV reports filtered by date, asset, or transaction type.
* Audit-Ready Data - Every report includes full datasets (timestamps, network fees, hashes) to ensure 100% accurate reconciliation for your finance team.
**Developer Integration**
Built for scale and automation as **all key functionalities** are **covered** by public **API** **endpoints** which are thoroughly documented for easy adoption. In addition, you can:
* Generate and revoke API keys securely to integrate Pay.io with your platform.
* Webhooks - Configure event subscriptions to receive real-time updates on deposits, withdrawals, and status changes.
#### Supported Assets
The Merchant Console currently supports configuration for multiple major tokens and networks. See the full list under [List of Available Assets](/assets/asset-management-add-edit-disable/list-of-available-assets).
# What is the Cashier UI?
Embed a Seamless Crypto Payment Experience for Your Players
The **Cashier UI** is a secure, pre-built payment interface designed to be embedded directly into your website or application.
While the [Merchant Console](/learn-the-basics/what-is-the-merchant-console) gives you control over the backend, the **Cashier UI** handles the front-end complexity. Delivered as a simple **iFrame**, it provides your players with a polished, intuitive way to **deposit** and **withdraw** cryptocurrencies without ever leaving your site. It eliminates the need for you to build complex crypto payment infrastructure from scratch, reducing technical risk and speeding up your time-to-market.
***
#### Why use the Cashier UI?
We built this product to bridge the gap between complex blockchain technology and everyday user experience. To ensure
1. **Maximised conversion** of player engagement as a clean, guided interface reduces user error and friction, directly increasing deposit success rates.
2. **Plug-and-Play Integration** gets your payment interface up and running quickly with a simple HTML embed code. No need to maintain your own node infrastructure or wallet connectors.
3. **Trust and Security** as we offer a professional, consistent payment experience that builds player confidence, powered by Pay.io’s secure underlying gateway.
***
#### Key Capabilities
**Frictionless Deposits for Players**
We offer flexible ways for users to fund their accounts, catering to both crypto-natives and beginners.
* Manual Deposits - Users can select their preferred asset and network to generate a unique QR code and wallet address. They simply scan or copy the address to send funds from their personal wallet.
* Direct Connect (via MESH) - For a smoother experience, players can connect their external exchange accounts (like Coinbase or Binance) and wallets (like Metamask) directly within the UI. This allows autofilling deposit details, reducing the risk of copying the wrong address.
* Real-Time Status - Players receive immediate visual feedback on their transaction status, so they never have to guess if their funds have arrived.
**Secure Withdrawals for Players**
Give your players quick access to their winnings with a safe, controlled withdrawal flow.
* Simple Payouts - Players simply select their asset, enter the destination wallet address, and specify the amount.
* Transparent Fees - The UI clearly displays for users the full amount. Withdrawal and gas fees are covered by Pay.io.
* Automated Validation - The system automatically checks amounts against minimum and maximum limits to prevent invalid requests.
**Transaction History**
Keep your players informed with a complete log of their financial activity.
* Recent Activity - A "Last 5 Transactions" snapshot gives users immediate visibility into their recent movements.
* Full History - Players can access a comprehensive list of all past deposits and withdrawals, filterable by date and transaction type.
* Deep Dive Details - Clicking on any transaction reveals granular details, including the blockchain hash, timestamps, and network status, allowing users to self-verify their transfers.
#### Supported Assets
The Cashier UI supports a wide range of popular cryptocurrencies and stablecoins to suit your player base. The assets will be the same ones defined in the Merchant Console from a wide range of options. See the full list in [List of Available Assets](/assets/asset-management-add-edit-disable/list-of-available-assets).
#### Getting Started for Developers
Integrating the Cashier UI is designed to be as **low-lift** as possible for your engineering team.
Delivered as a secure, sandboxed iFrame, the product can be implemented by simply embedding the provided HTML code snippet directly into your payment page. Because the UI assumes the user is already authenticated on your platform, the hand-off is seamless and requires no additional login steps for the end-user.
# How to Get Started?
Thank you for your interest in Pay.io. You are taking the first step towards a unified platform ecosystem that **delivers** **instant** **control** and **compliant** crypto **payments** **management technology**.
We have designed our onboarding process to be as thorough and secure as our platform, ensuring we meet the specific needs of CTOs, CFOs, and Compliance Officers in the iGaming sector.
Please follow the steps below to begin your journey.
{% stepper %}
{% step %}
### Request Early Access
Navigate to the [Pay.io website](https://www.pay.io) and click the **“Get Early Access”** button. You will be asked to provide key professional details, so we'll know whom to contact.
Please complete the Captcha verification and agree to our Terms and Conditions to submit your request.
{% hint style="info" %}
During the Beta Program, please be aware that [Service Level Agreement (SLA) ](/service-level-agreement-sla-for-pay.io-during-beta-program)is applied.
{% endhint %}
{% endstep %}
{% step %}
### Discovery Consultation
Once your request is received, our Sales Team will contact you shortly. During this consultation, we will introduce you to the platform's core components - [**the Merchant Console**](/learn-the-basics/what-is-the-merchant-console) and [**Cashier UI**](/learn-the-basics/what-is-the-cashier-ui) - and discuss how our solution can specifically address your operational challenges.
{% endstep %}
{% step %}
### Account Provisioning
To get started, our team will configure a dedicated environment for you. We will generate your initial login credentials and send them to you securely via email. Follow along the [Creating an Account ](/getting-started/creating-an-account)guide to assist you in this step.
{% endstep %}
{% step %}
### Compliance Verification (KYB & AML)
As a compliant B2B platform, we adhere to strict regulatory standards. We will guide you through our **Know Your Business (KYB)** and **Anti-Money Laundering (AML)** verification processes. This ensures a secure environment for all clients.
{% endstep %}
{% endstepper %}
#### What’s Next?
Once you have received your credentials, you are ready to log in and begin configuring your workspace. See [Creating an Account](/getting-started/creating-an-account) for a step-by-step walkthrough of your first login.
# Creating an Account
Now that our team has provisioned your environment, you can proceed with the initial login and security configuration.
Follow these steps to activate your account and secure your access.
#### The Setup Flow
{% stepper %}
{% step %}
#### Initial Log In
Navigate to the Pay.io login page. Enter the temporary email address and password provided to you by your Pay.io Account Manager or Sales Representative, then click Login.
{% endstep %}
{% step %}
#### Configure Two-Factor Authentication (2FA)
To ensure the security of your treasury and compliance data, we require 2FA for all accounts. You will be prompted to link a mobile authenticator app.
* We support standard applications such as Google Authenticator, Microsoft Authenticator, and FreeOTP.
* Scan the QR code displayed on the screen with your chosen app to generate your code.
{% hint style="info" %}
Need help? For detailed instructions on this specific step, please refer to our guide on [Setting Up 2FA](/getting-started/setting-up-2fa-two-factor-authentication).
{% endhint %}
{% endstep %}
{% step %}
#### Update Your Password
For security purposes, you must replace the temporary credentials immediately. You will be prompted to create a new, unique password. Please ensure it meets our security complexity requirements.
{% endstep %}
{% step %}
#### Verify Your Email Address
Once your password is updated, the system will automatically send a verification email to the address you used to log in.
* Check your email inbox for a message from Pay.io.
* Click the verification link contained within the email.
* This link will redirect you back to the platform, landing you directly in your Account Settings.
{% endstep %}
{% endstepper %}
You are now ready to start [onboarding](/getting-started/onboarding-process)! :rocket:
# Onboarding Process
Once your account has been successfully created, you will need to log in to [Pay.io](https://console.pay.io) to complete a short onboarding and configure your merchant environment.
This process ensures your organisation details are correct and allows you to select the **assets** you wish to transact with. This will be done in the **Onboarding >** **Merchant Information** section of Pay.io platform after you've logged in for the first time.
### Setting up Merchant Information
{% stepper %}
{% step %}
#### Organisation Details
To set up the Merchant Information, you'll need to submit your:
* Organisation Email
* Organisation Name
* Phone Number
* Country
* Default Currency (Fiat)
{% endstep %}
{% step %}
#### Enabling Assets
Next up, you'll have to choose which Assets your Merchant Console's Hot Wallet will support.
Assets refer to the specific cryptocurrencies and stablecoins that your merchant account is configured to transact with. Pay.io currently supports the following networks and tokens:
* Bitcoin (BTC)
* Ethereum (ETH)
* Solana (SOL)
* Tether (USDT)
* USD Coin (USDC)
* TON (TON)
* TRON (TRX)
{% hint style="info" %}
See full list of available assets with supported networks in [List of Available Assets](/assets/asset-management-add-edit-disable/list-of-available-assets).
{% endhint %}
1. To add new assets, click on the **“+ Add your first assets” button** and from the pop-over select the correct cryptocurrency and/or stablecoin by ticking the checkboxes. Then click **“Add assets”.**
2. For each selected asset, you can **specify** a **corresponding** **network**. As some assets are available in **multiple** networks, **“All” option** is also available.
3. Once the networks are assigned, click **“Add assets”** once again. The assets are now **configured**. You'll be able to update and add further assets after the onboarding steps are completed.
{% endstep %}
{% step %}
#### Terms of Use Agreement
To finalise the setup, please review the legal agreements that govern the use of the Pay.io platform. You'll need to read and agree to:
* [Terms and Conditions ](https://www.pay.io/terms-of-use)
* [Privacy Policy](https://www.pay.io/privacy-policy)
{% endstep %}
{% endstepper %}
# Setting up 2FA - Two-Factor Authentication
Security is paramount when managing treasury funds and compliance data. To protect your Pay.io account from unauthorised access, we require Two-Factor Authentication (2FA). This adds a second layer of defence by requiring a time-sensitive code from your mobile device in addition to your password.
This guide uses Google Authenticator as an example, though the steps are similar for other supported apps like Microsoft Authenticator or FreeOTP.
***
### Prerequisites
Before proceeding on the Pay.io platform, please ensure you have the authenticator app installed on your mobile device:
* iOS Users: Download "Google Authenticator" from the Apple App Store.
* Android Users: Download "Google Authenticator" from the Google Play Store.
***
### Configuration Steps
{% stepper %}
{% step %}
#### Initiate 2FA Setup
During your initial account setup, the Pay.io platform will display a specific QR Code on your screen.
{% endstep %}
{% step %}
#### Open the Authenticator App
Open the Authenticator App Launch the Google Authenticator app on your mobile device.
2.1 Tap the + (Plus) icon, usually located at the bottom right of the screen.
2.2 Select Scan a QR code.
{% endstep %}
{% step %}
#### Link Your Device
Point your mobile device’s camera at the QR code displayed on your computer screen. The app will automatically scan the code and add your Pay.io account to its list.
{% endstep %}
{% step %}
#### Enter the Verification Code
Once scanned, the app will generate a 6-digit code that changes every 30 seconds.
4.1 Locate the code labelled Pay.io (or the email address associated with your account) within the app.
4.2 Enter this 6-digit code into the Verification Code field on the Pay.io screen.
4.3 Click Verify or Enable.
{% endstep %}
{% step %}
#### Confirmation
You will see a success message confirming that 2FA is now active. You will now be required to open your app and enter a new code each time you log in.
{% endstep %}
{% endstepper %}
# Asset Management (Add, Edit, Disable)
### What are Assets?
The Pay.io Merchant Console allows you to transact with a wide variety of digital currencies. To help you manage your treasury strategy effectively, these assets are generally categorised into two primary types: Cryptocurrencies and Stablecoins.
{% hint style="info" %}
See full list of available assets with supported networks in [List of Available Assets](/assets/asset-management-add-edit-disable/list-of-available-assets).
{% endhint %}
#### Cryptocurrencies (Native Coins)
These are the native assets of major blockchain networks. They are typically used by players who hold specific crypto portfolios and prefer to bet or transact without converting to fiat-pegged tokens.
These assets are subject to market volatility. Their value against your base currency (e.g., EUR or USD) can fluctuate based on market supply and demand. When managing these assets in your Hot Wallet, you may need to adjust your Auto-Approval limits more frequently to account for significant price changes. Alternatively, the merchant admin can [set limits in Fiat with automatic FX rates](/assets/user-withdrawal-limits) to maintain limits independently of market fluctuations for cryptocurrencies.
* Supported Assets:
* Bitcoin (BTC)
* Ethereum (ETH)
* Solana (SOL)
* TON (The Open Network)
* TRX (Tron)
#### Stablecoins
Stablecoins are digital tokens designed to maintain a consistent value by being pegged to a fiat currency, most commonly the US Dollar. These assets offer the speed and security of blockchain transactions without the price volatility. They are ideal for operators who want to minimise exchange rate risk during the deposit and withdrawal process.
Stablecoins are often available across multiple networks (e.g., USDT on Ethereum, Tron, and Polygon). This allows you to choose networks with lower gas fees or faster confirmation times for your players.
* Supported Assets:
* Dai (DAI)
* Tether (USDT)
* USD Coin (USDC)
***
## Adding new Assets
{% stepper %}
{% step %}
To add a new asset, navigate to **Hot Wallet** page. You should see a similar view with existing assets chosen during your onboarding.
{% endstep %}
{% step %}
Locate the **“+Add new asset”** button at the top right corner of the table view and click it.
{% endstep %}
{% step %}
In the new pop-over, select the cryptocurrency asset you wish to **add** **by** **ticking** **the** **box** at the end of the row. The box must appear with a green check mark as shown for already selected assets. Now, click the **“Add assets”** button.
You may need to scroll a bit as there are many options.
If you don't see the asset you wish to add, please contact your account manager.
{% endstep %}
{% step %}
After choosing the asset, you can specify which **corresponding** **network**(s) you wish to have the asset available in.
{% hint style="info" %}
Learn more about what are asset networks and which to choose in [Asset Networks](/assets/asset-management-add-edit-disable/asset-networks).
{% endhint %}
{% endstep %}
{% step %}
After ticking all needed networks, you can see them available under the asset. To finish, click on **“Add assets”** button.
{% endstep %}
{% step %}
You can see the newly added asset in your Hot wallet table view. Now you can continue to make a deposit or edit the asset.
{% endstep %}
{% endstepper %}
***
## Editing an Asset
Once the asset has been added (in hot-wallet), and the corresponding Treasury-wallet has been created for it, then the Hot-wallet asset can be configured.
Once the preliminary assets have been added to your Hot Wallet through onboarding, a corresponding Treasury Wallet needs to be created. If both of these actions have been completed, then the Hot Wallet assets can be configured.
You'll be able to edit and configure assets from the “Actions” column. You'll be able to:
* Edit [Sweep and Alert Configuration for Crypto](/assets/setting-up-sweeps-and-alerts#setting-up-sweeps-and-alerts)
* Edit [Sweep and Alert Configuration for Fiat](/assets/setting-up-sweeps-and-alerts#setting-up-sweeps-and-alerts)
* Edit [User Withdrawal Configuration for Crypto](/assets/user-withdrawal-limits#expand-the-user-withdrawal-configuration-section)
* Edit [User Withdrawal Configuration for Fiat](/assets/user-withdrawal-limits#expand-the-user-withdrawal-configuration-section)
Each of those will be done for the **selected asset**. Editing multiple assets at once is currently not possible.
***
## Disabling an Asset
Disabling an asset will remove its availability in the Payment Gateway and Cashier UI.
You can disable an asset only once it has been configured and enabled.
{% stepper %}
{% step %}
To disable an asset, go to **Hot Wallet** page, find the asset you wish to disable and **click** on the **toggle** under the **Actions** menu.
{% endstep %}
{% step %}
A pop-up will appear, where you can confirm by clicking the **“Disable”** button if you wish to disable the asset. Once the asset is disabled, it will appear with a new status (“disabled”) and the toggle will appear gray.
{% endstep %}
{% endstepper %}
# Asset Networks
The Infrastructure Behind Your Transactions
In the Pay.io ecosystem, an Asset Network refers to the specific blockchain infrastructure used to process a cryptocurrency transaction. While an "Asset" is the currency itself (like USDT or Ethereum), the "Network" is the road that currency travels on.
{% hint style="success" %}
See the list of supported assets and networks in [List of Available Assets](/assets/asset-management-add-edit-disable/list-of-available-assets).
{% endhint %}
#### Single-Network vs. Multi-Network Assets
* Native Assets are cryptocurrencies that exist on their own dedicated blockchain. For example, Bitcoin (BTC) is always traded on the Bitcoin Mainnet, and Solana (SOL) is traded on the Solana Mainnet.
* Multi-Network Assets are stablecoins like USDT and USDC. They are unique because they can exist on multiple different blockchains. For example, a user can choose to send USDT using the Ethereum network (ERC-20), the Tron network (TRC-20), or the Polygon network. The value of the coin is the same, but the speed and cost of the transaction depend on the network chosen.
### Why Does Network Selection Matter?
When configuring assets in the Merchant Console or depositing via the Cashier UI, selecting the correct network is critical for two reasons:
* Fees and speed\
Different networks have different congestion levels. We support multiple networks (such as Polygon, Arbitrum, and Base) to offer users flexibility on transaction costs (gas fees) and processing speeds.
* Compatibility\
A deposit must be sent to a wallet address that matches the specific network. Sending funds to the wrong network type can result in lost assets.
# List of Available Assets
| Asset | Asset type | Supported Networks |
| ------------------- | -------------- | ---------------------------------------------------------------------------------------------------------------- |
| Ethereum (ETH) | Cryptocurrency |
Ethereum
Arbitrum
Base Chain
|
| Bitcoin (BTC) | Cryptocurrency | Bitcoin |
| TON Coin (TON) | Cryptocurrency | The Open Network |
| Polygon (POL/MATIC) | Cryptocurrency |
|
# Hot Wallet
Managing Your Daily Operational Liquidity
In Pay.io, we offer **a two-wallet system** — **Hot Wallet** and **Treasury Wallet**.
* **Hot Wallet** contains your assets with active deposited funds. This is what is used to operate your Cashier UI and Payment Gateway to support user's withdrawals and gather their deposits as well as support floats. Hot Wallets can have **sweeps to Treasury Wallet**, with special configurations for **withdrawal limits** and **balance alerts**.
* **Treasury Wallet** acts as a “safe vault”, where the funds from your Hot Wallet are sent or swept to. **This wallet is in your custody, not Pay.io's**. You can always transfer funds from Treasury Wallet to your Hot Wallet.
Your Hot Wallet is the engine of your daily transaction flows. It is designed to hold the active deposited funds required to operate your Cashier UI, process user withdrawals, and gather incoming deposits.
### What's In My Hot Wallet
Hot Wallet view after first log-in
The Hot Wallet interface allows you to perform three primary operational tasks:
* **Deposit funds** by manually depositing any supported asset currency directly into your Hot Wallet to ensure you have enough float to cover user payouts. Read [how to make a deposit](/assets/making-a-deposit).
* **Make transfer to Treasury Wallet** as you can move funds out of your Hot Wallet and into your secure Treasury Wallet. Because the Treasury Wallet is under your direct custody, this action is vital for protecting your profits and sustaining safe liquidity levels. Read [how to make a transfer](/assets/treasury-wallet/transfer-from-hot-wallet-to-treasury-wallet).
* **Monitor Operational Float** by using the Hot Wallet dashboard, which provides a high-level view of your total wallet balances. The detailed table view breaks down all existing assets, so you always know exactly what funds are available. See more about[ managing an operational float](/assets/float-set-up-and-maintenance).
### Asset Overviews
The main table in the Hot Wallet dashboard gives you a granular, row-by-row overview of every asset you hold. For each asset, you can view:
| Asset information | Description |
| ---------------------- | --------------------------------------------------------------------------------------------------------------------------------------------------------------------------------------------------------------------------------------------------------------------------------------------------------------------------------------------------------------------------------------------------------------------------------------------------------------------------------------------------------------------------------------------------------------------------------------------------------------------------------------------------------------------------------------------------------------------------------------------------------------------- |
| Asset | Asset displayed with its base network, showcasing the specific cryptocurrency (e.g., ETH) and the blockchain it resides on (e.g., Ethereum). |
| Holdings | Holding amount is displayed with the exact token balance, alongside an estimated corresponding value in a fiat currency (usually USD) for easier accounting. |
| Retained Balance | The target amount of funds to keep in the Hot Wallet. This reflects the maximum retained balance amount you defined when setting up your [Sweep configurations](/assets/setting-up-sweeps-and-alerts#setting-up-sweeps-and-alerts). |
| Minimum Balance Alert | The threshold at which the system will notify you that operational funds are running low, this is also defined when setting up your [Sweep configurations](/assets/setting-up-sweeps-and-alerts#setting-up-sweeps-and-alerts). |
| Hot Wallet Address | The unique blockchain address used to receive funds for this specific asset. |
| User Withdrawal Limits | A quick view of your active Auto-Approval limits and Daily Quotas for user withdrawals which you set up in [User Withdrawal Limits](/assets/user-withdrawal-limits). |
| Status |
The current operational state of the asset. Possible values:
ENABLED: A connection exists to a configured Treasury Wallet, and the asset is fully operational for users.
DISABLED: The asset has been turned offforusers in the Cashier UI and Payment Gateway (withdrawals and deposits can't be made for this asset by the users). In the Merchant Console, you'll still see the asset as it is configured in Hot Wallet, and also a Treasury Wallet exist for it.
TREASURY WALLET REQUIRED: You cannot use this asset yet. A connection to a Treasury Wallet must be set up before this asset can process funds.
|
### Asset Management
Using the "Actions" menu at the end of the asset table, you can easily Add, Edit, or Disable assets as your business needs evolve. Under the "Edit" button, you'll be able to [set up sweeps and low balance alerts](/assets/setting-up-sweeps-and-alerts) as well as [user withdrawal limits](/assets/user-withdrawal-limits). Click on the links to learn more about how to do so.
# Making a Deposit
Depositing funds into your Hot Wallet is one of the most important first steps when getting started with Pay.io. \
\
Your [Hot Wallet ](/assets/hot-wallet)acts as the engine of your day-to-day operations, without a positive balance, your players will be unable to withdraw via the Cashier UI, and the Payment Gateway will not have the liquidity it needs to function. The players/users will be able to make their deposits.
Each asset and network combination you have configured must carry a positive balance to remain active. This guide walks you through **how to complete your first deposit**.
***
#### Prerequisites
* Your assets and networks have been configured in the Hot Wallet. See [Asset Management](https://docs.pay.io/assets/asset-management-add-edit-disable) for guidance.
* You have access to an external wallet or exchange from which you will be sending funds.
#### Making a Deposit
{% stepper %}
{% step %}
### **Navigate to the Hot Wallet Page**
From the left-hand navigation, go to the **Hot Wallet** page. Here you will see an overview of all your configured assets and their current balances.
Click the **"Deposit"** button to begin.
{% endstep %}
{% step %}
### **Select Your Asset and Network**
A modal window will appear. Use the dropdowns to select:
* **Asset** is the cryptocurrency or stablecoin you wish to deposit (e.g., USDT, BTC, ETH).
* **Network** is the blockchain network over which the funds will be sent (e.g., Tron, Ethereum, Polygon).
{% hint style="info" %}
Ensure that the deposit asset and network combination is available. See [Asset Networks](https://docs.pay.io/assets/asset-management-add-edit-disable/asset-networks) for all possible combinations and ensure the combination needed has been added to your assets.
{% endhint %}
{% endstep %}
{% step %}
### **Scan the QR Code or Copy the Wallet Address**
Once you have selected your asset and network, a unique QR code will be displayed alongside your Hot Wallet receiving address.
From your external wallet or exchange, either:
* **Scan the QR code** with your device to auto-populate the destination address, or
* **Copy the wallet address** manually and paste it into your sending platform.
{% hint style="warning" %}
**Before sending, verify the following:**
* The receiving address displayed beneath the QR code matches your Hot Wallet address exactly.
* The asset you are sending matches the asset selected in the previous step.
* The network you are sending on matches the network you selected.
Sending funds using the wrong asset or network may result in **permanent, unrecoverable loss of funds**.
{% endhint %}
{% endstep %}
{% step %}
### **Confirm the Deposit on Your Device**
Complete the transaction from your external wallet or exchange. Once the transfer has been broadcast to the blockchain and the required number of network confirmations have been reached, the funds will appear in your Hot Wallet balance automatically.
{% hint style="info" %}
**Confirmation times vary by network.**
If your funds do not appear immediately, allow a few minutes for the transaction to be confirmed on-chain. You can track the status using the transaction hash on the relevant block explorer.
{% endhint %}
{% endstep %}
{% endstepper %}
***
#### What's Next?
With a positive balance in your Hot Wallet, you are ready to start processing player transactions. We recommend reviewing the following:
* [Setting up Sweeps and Alerts](/assets/setting-up-sweeps-and-alerts) to automate the movement of excess funds to your Treasury Wallet for safekeeping.
* [User Withdrawal Limits](/assets/user-withdrawal-limits) to configure auto-approval rules to streamline the withdrawal flow for your players.
* [Float Set-Up and Maintenance](/assets/float-set-up-and-maintenance) to understand how to keep your Hot Wallet adequately funded over time.
# Float Set Up and Maintenance
Your **operational float** is the balance held in your [Hot Wallet ](/assets/hot-wallet)that powers all day-to-day player activity from deposits, withdrawals, to payment gateway operations. Without sufficient liquidity per asset and network, players will be unable to transact, and your platform's payout capability will be disrupted. **Maintaining a healthy float is a key and ongoing operational responsibility**.
***
#### Why Float Management Matters
**Each** **asset** and **network** combination you have **enabled** **requires** its own **positive balance**. A float that is too low will stall player withdrawals. A float that is unnecessarily high exposes excess funds to operational risk. The goal is to strike the right balance by keeping enough liquidity for smooth daily operations whilst automatically securing surplus funds in your [Treasury Wallet](/assets/treasury-wallet).
Pay.io gives you four tools to manage this effectively.
***
### Setting Up and Maintaining Your Float
{% stepper %}
{% step %}
### **Fund the Float**
Begin by depositing sufficient liquidity into your [Hot Wallet](/assets/hot-wallet) to cover your expected daily payout volume. This should be **done per asset and per network** — each combination operates independently.
Navigate to the **Hot Wallet** page and click the **“Make a deposit”** button for each asset you wish to fund.
{% hint style="info" %}
**Not yet made your first deposit? See** [**Making a Deposit**](https://docs.pay.io/assets/making-a-deposit) **for a full walkthrough**
{% endhint %}
As a starting point, consider your average daily withdrawal volume per asset and ensure your float comfortably covers peak periods. You can always top up manually at any time.
{% endstep %}
{% step %}
### **Set Up Sweeps**
Once your float is funded, [configure a **Sweep** threshold for each asset](/assets/setting-up-sweeps-and-alerts). Sweeps automatically transfer any balance that exceeds your defined maximum from the Hot Wallet to your Treasury Wallet, keeping your operational exposure low and your profits secured.
Navigate to **Hot Wallet**, click the "**Edit"** icon under the "**Actions"** menu for the relevant asset, and configure your **Maximum Retained Balance**. Any amount above this threshold will be swept to your Treasury Wallet automatically.
{% hint style="info" %}
Your [**Treasury Wallet**](/assets/treasury-wallet) is held under your own custody, not Pay.io's. Funds swept there are fully secured and can be transferred back to the Hot Wallet at any time.
{% endhint %}
{% endstep %}
{% step %}
### **Set Up a Minimum Balance Alert**
In the same modal, you can define the minimum balance each asset must hold in your Hot Wallet. When the balance falls below this threshold, Pay.io will trigger an email alert so you can act before payouts are affected. The email alerts are sent out once an hour.
This is configured in the same **Edit Asset** modal, under the **Minimum Balance Alert** field.
{% hint style="info" %}
Set your minimum balance alert comfortably above zero. A threshold that is too low may leave insufficient time to top up before player withdrawals begin to fail.
{% endhint %}
{% endstep %}
{% step %}
### **Enable Email Notifications**
To ensure your team is notified in real time when a low balance alert is triggered, each team member must enable email notifications in their account settings.
Navigate to **Account Details → Notification Settings** and enable the **Low Balance Alert** notification. This ensures the right people in your team are informed when the float requires a manual top-up, keeping your operations running without interruption.
{% endstep %}
{% endstepper %}
***
#### What's Next?
* [Making a Deposit](https://docs.pay.io/assets/making-a-deposit) to top up your Hot Wallet balance manually.
* [Setting up Sweeps and Alerts ](/assets/setting-up-sweeps-and-alerts)to full configuration guide for sweep thresholds and balance alerts.
* [Transfers to Treasury Wallet](/assets/treasury-wallet/transfer-from-hot-wallet-to-treasury-wallet) to move funds manually to your Treasury Wallet when needed.
# Setting up Sweeps and Alerts
### **What are Sweeps?**
**Sweeps** in cryptocurrency and wallets system refer to a **process** of **automatically** **transferring** **cryptocurrency** from **one** **wallet** to **another** based on predefined rules or configurations. This includes setting thresholds or triggers that, once met, initiate the transfer of funds. Sweeps are a good tool to use to consolidate assets for security purposes or to automate the management of funds to ensure optimal liquidity.
In the case of Pay.io, we offer **a two-wallet system** — **Hot Wallet** and **Treasury Wallet**.
* **Hot Wallet** contains your assets with active deposited funds. This is what is used to operate your Cashier UI and Payment Gateway to support withdrawals, gather deposits and support floats. Hot Wallets can have **sweeps to Treasury Wallet**, with special configurations for **withdrawal limits** and **balance alerts**.
* **Treasury Wallet** acts as a “safe vault”, where the funds from your Hot Wallet are sent or swept to. **This wallet is in your custody, not Pay.io's**. You can always transfer funds from Treasury Wallet to your Hot Wallet.
### **Setting up Sweeps and Alerts**
As the Hot Wallet can keep liquidity all the time, it is important to protect it by setting up sweeps. Sweeps are set up asset by asset, and the established configurations for an asset are global. This means that all the users in your account will see the same configurations for an asset.
#### **Prerequisites**
* Ensure that your **assets** have been **set up** and **configured**.
* The **first** **deposits** have been **made,** meaning **operational float has been established through your first deposit.**
#### Configuration
{% stepper %}
{% step %}
#### Go to the Hot Wallet Page
**Navigate** to **Hot Wallet** page from the left-hand navigation and **choose** the **asset** for which you wish to set up sweeps logic for.
Click on the “Edit” icon under the “Actions” menu at the end of the table row.
You'll be able to set a different sweep configuration and alert for each asset.
{% endstep %}
{% step %}
#### Specify Your Transaction Type
In the pop-up, select the preferred **transaction** **type** — either **crypto** or **fiat**.
This will also determine the view you'll see for the following steps.
{% hint style="info" %}
**How Fiat and Crypto types differ from each other?**
When configuring **limits** for your **Hot Wallet**, such as auto-approvals or sweeps, you can choose to set your thresholds in either Crypto or Fiat.
* Setting limits in Crypto means the system will always use the exact token amount you specify (for example, 5 BTC). Because crypto prices are constantly moving, the real-world value of this limit will fluctuate with the market.
* Setting limits in Fiat means the system uses live conversion rates to maintain a specific currency value (for example, € 10,000). This shields your operational limits from market volatility, making your treasury budgeting much more predictable.
**You can switch between these two options at any time. The system will always apply your most recently saved configuration.**
{% endhint %}
{% endstep %}
{% step %}
#### Configuration Steps for Crypto Type
1. For crypto, you'll be able to edit the **maximum retained balance** in the asset currency. This is the **maximum** **balance** that will be **left** in the **Hot Wallet** **address**. Any **amount** that **exceeds** this amount, **will** be **automatically** **transferred** (“swept”) to your **Treasury** Wallet.
2. In this window, you can also configure the **minimum balance alert** in your asset currency. This alert will be **sent** when the **balance** of the Hot Wallet address **falls** **below** the **specified** **amount**. \
\
Alerts are sent as **emails** **once (1)** an **hour** if the balance falls below the set limit. The email will come **ONLY** if the balance of the asset is **lower** than the **set** **limit**. The balance can often fluctuate if deposits are made to the hot wallet by Cashier UI users.
3. To enable the alert, ensure that the **toggle** under Custody Address is **green**.
4. The “Custody Address” field is automatically populated with your Treasury Wallet address, to which configured sweeps will transfer the assets.
5. To finalise setting the configuration, click on “Save Changes”.
{% endstep %}
{% step %}
#### Configuration Steps for Fiat Type
1. For Fiat, you'll be able to edit the **maximum retained balance** in the asset currency. This is the **maximum** **balance** that will be **left** in the **Hot Wallet** **address**. Any **amount** that **exceeds** this amount, **will** be **automatically** **transferred** (“swept”) to your **Treasury** Wallet.
2. In this window, you can also configure the **minimum balance alert** in your asset currency. This alert will be **sent** when the **balance** of the Hot Wallet address **falls** **below** the **specified** **amount**.
3. To enable the alert, ensure that the **toggle** under Custody Address is **green**.
4. The “Custody Address” field is automatically populated with your Treasury Wallet address, to which configured sweeps will transfer the assets.
5. To finalise setting the configuration, click on “Save Changes”.
{% endstep %}
{% endstepper %}
# User Withdrawal Limits
Configure withdrawal amounts and auto approvals
In the [**Merchant Console**](/learn-the-basics/what-is-the-merchant-console), you have full control over how much users can withdraw at once. To balance a seamless player experience with robust treasury security, you can set specific withdrawal limits and configure auto-approval rules.
**By default, all withdrawals require manual approval**. However, you can automate this process by setting a maximum auto-approve amount, an optional daily withdrawal quota, and toggling the auto-approval feature on or off.
{% stepper %}
{% step %}
#### Open Asset Edit Modal
**Navigate** to **Hot Wallet** page from the left-hand navigation and **choose** the **asset** for which you wish to set up sweeps logic for.
For this, click on the “Edit” icon under the “Actions” menu at the end of the table row.
You'll be able to set a different sweep configuration and alert for each asset.
{% endstep %}
{% step %}
#### Select Asset Input Type
In the pop-up, select the preferred **transaction's input** **type** — either **crypto** or **fiat**.
This will also determine the view you'll see for the following steps.
{% hint style="info" %}
**How Fiat and Crypto types differ from each other?**
When configuring **limits** for your **Hot Wallet**, such as auto-approvals or sweeps, you can choose to set your thresholds in either Crypto or Fiat.
* Setting limits in Crypto means the system will always use the exact token amount you specify (for example, 5 BTC). Because crypto prices are constantly moving, the real-world value of this limit will fluctuate with the market.
* Setting limits in Fiat means the system uses live conversion rates to maintain a specific currency value (for example, € 10,000). This shields your operational limits from market volatility, making your treasury budgeting much more predictable.
**You can switch between these two options at any time. The system will always apply your most recently saved configuration.**
{% endhint %}
{% endstep %}
{% step %}
### Expand the User Withdrawal Configuration section
Here, you will define the rules for automation:
User Withdrawal Limits inside Edit Asset modal for Crypto option
### Maximum Auto-Approve Amount
If the auto-approval flow is enabled, you can set the maximum value for a ***single*** transaction. Any withdrawal request below this amount will process instantly; anything above it will be held for manual review.
**Default limit**
* Max auto-approval limits: **10 USD**
### Daily Withdrawal Quota
This is the total combined amount a user can withdraw automatically within a 24-hour period across all transactions for this asset. Once a user hits this daily cap, any further withdrawal requests will require manual approval, regardless of how small the individual transaction is.
**Default limit**
* Max daily quota limit: **10 USD**
{% hint style="info" %}
Ensure your **Daily Quota** is always **equal** to **or** **greater** than your **Maximum Auto-Approve** amount for succesful approval flows.
{% endhint %}
{% endstep %}
{% step %}
### Enable/Disable Auto Approvals
Finally, activate your rules using the toggle switch at the bottom of the section.
* To **Enable**: Click the toggle button so it turns green. Your auto-approve limits are now active.
* To **Disable**: Leave the toggle grey (it will read *“Auto-approve is disabled”*). All withdrawal requests for this asset will require manual approval.
{% hint style="warning" %}
If **auto-approval** is turned **off,** all **transactions** will go to **manual** **review**, regardless of the limits you set above.
{% endhint %}
**Click** the green “**Save Changes**” button at the bottom right of the modal to **apply** your **configuration**.
{% endstep %}
{% endstepper %}
# Swapping Assets
The **Swap** feature lets you convert one cryptocurrency or stablecoin into another directly from your **Hot Wallet** — without withdrawing funds to an external exchange. Use it to rebalance your operational liquidity when player withdrawal demand does not match the currencies you hold (for example, your balance is concentrated in USDC whilst players are withdrawing USDT), or to convert volatile assets into stablecoins.
#### Why Use It?
* **Stay on the platform** so there isn't a need for withdrawing to an external exchange, trading, and transferring back. One action, inside the Merchant Console.
* **Fewer fees, less waiting** as you can avoid the multiple network fees and round-trip delays of moving funds between platforms.
* **Full transparency** as the exchange rate, network fee, and platform fee are all displayed before you confirm.
* **Rate certainty when you need it** as you can choose between a floating rate for the best market price, or lock in a fixed rate for a guaranteed output amount.
#### Who Can Swap?
Swap actions are governed by your team's roles and permissions:
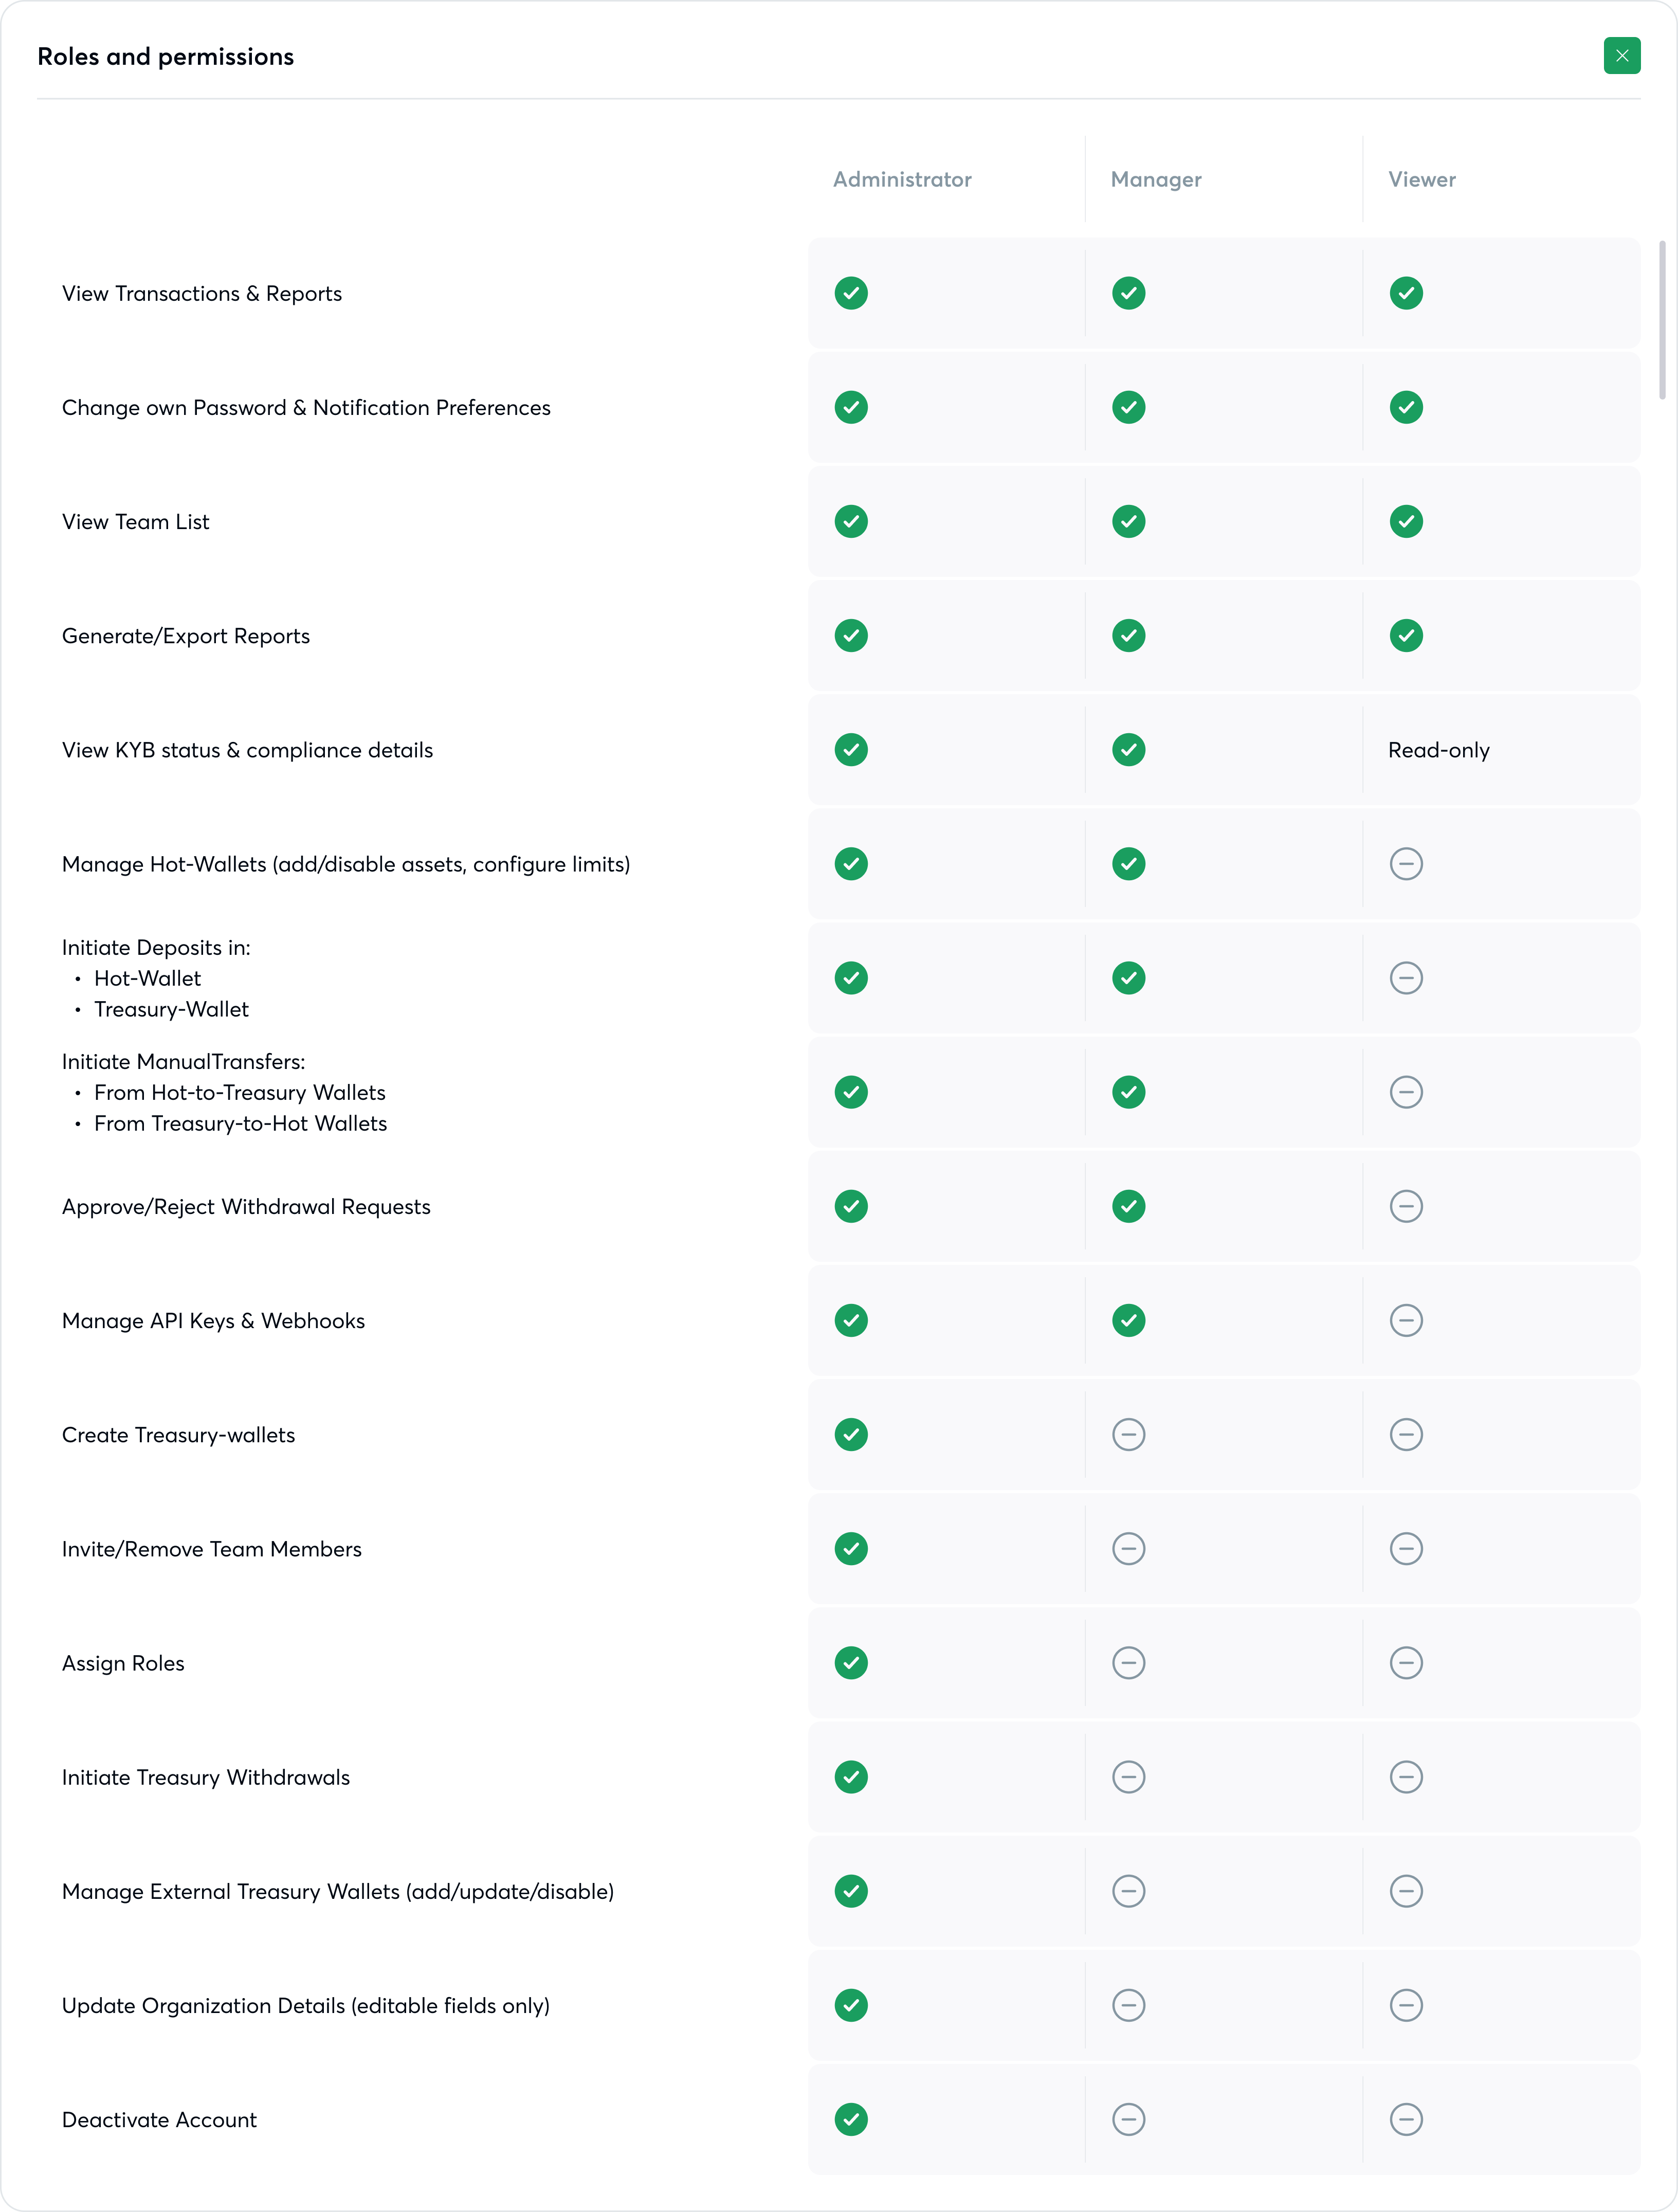
| Action | Administrator | Manager | Viewer |
| --------------------------- | ------------- | ------- | ------ |
| Initiate a swap | ✔ | ✔ | — |
| View swap history | ✔ | ✔ | ✔ |
| Export swaps in CSV reports | ✔ | ✔ | ✔ |
See [Team Management (Roles and Permissions)](/account-settings/team-management-roles-and-permissions) for the full matrix.
#### Accessing the Swap Widget
From the left-hand navigation, go to **Assets → Hot Wallet** and click the **Swap** button, alongside the existing **Deposit** and **Transfer to Treasury Wallet** actions.
{% hint style="info" %}
**Swap button greyed out?** \
\
Swaps require at least one valid currency pair — a currency you hold a balance in, plus a different currency configured in your dashboard.
If you only have one currency configured, add more to your dashboard to enable swapping. See Asset Management (Add, Edit, Disable).
{% endhint %}
#### Available Currency Pairs
The swap widget is context-aware and only shows you pairs you can actually use:
* **You Send** — lists only the currencies you currently hold a balance in within your Hot Wallet.
* **You Get** — lists the currencies configured in your dashboard, excluding the currency you selected to send. You can search by coin name, ticker, or network.
Each pair has a **minimum and maximum swap amount**. If your entered amount falls outside these limits, the widget displays the boundary value so you can adjust.
#### Floating Rate vs Fixed Rate
Rate Type
How It Works
Best For
Floating rate
You receive the best market rate at the moment of execution. The final output amount may vary slightly from the estimate.
Most swaps, especially stablecoin-to-stablecoin rebalancing.
Fixed rate
The output amount is locked and guaranteed, regardless of price movement during execution. A countdown shows how long the quote remains valid.
Larger swaps of volatile assets, where rate certainty matters.
{% hint style="info" %}
If a fixed rate is not available for your selected pair, the option is shown in a disabled state — you can still proceed with a floating rate swap.
{% endhint %}
#### Fees
Before you confirm a swap, the widget displays:
* **Network fee** as the on-chain cost of the swap, shown in crypto.
* **Platform fee** as Pay.io's processing fee, shown in crypto. Pay.io covers the on-chain gas for dispatching your funds; this is included in the platform fee.
The USD equivalent is displayed for the send and receive amounts. Fees are always expressed in crypto.
#### Executing a Swap
{% stepper %}
{% step %}
**Open the Swap Widget**
From **Assets → Hot Wallet**, click **Swap**.
{% endstep %}
{% step %}
**Select the Currency to Send**
Under **You Send**, choose the asset you want to convert. Only currencies with an available Hot Wallet balance are listed. Your available balance is displayed above the amount field.
{% endstep %}
{% step %}
**Select the Currency to Receive**
Under **You Get**, choose the asset you want to receive. Use the arrows between the two fields to reverse the direction of the pair at any time.
{% endstep %}
{% step %}
**Enter the Amount**
Enter the amount to swap in the **You Send** field. The **You Get** field is calculated automatically and cannot be edited directly. Once both currencies and an amount are set, the widget displays the estimated output, exchange rate, network fee, and platform fee.
{% hint style="warning" %}
Stay within the pair's minimum and maximum swap limits — the widget will flag amounts outside the allowed range.
{% endhint %}
{% endstep %}
{% step %}
**Choose Your Rate Type**
Toggle between **Floating rate** and **Fixed rate**. For fixed rate, note the countdown — the quote must be confirmed before it expires.
{% endstep %}
{% step %}
**Review and Confirm**
Check the full summary — pair, amounts, rate, and fees — then click **Swap**.
{% hint style="warning" %}
**Swaps are irreversible.**
Once confirmed, the conversion cannot be cancelled or undone. Make sure your remaining Hot Wallet float can still cover ongoing player withdrawals — see [Float Set Up and Maintenance](/assets/float-set-up-and-maintenance).
{% endhint %}
{% endstep %}
{% step %}
**Monitor the Status**
The swap progresses through the following stages: **Getting Confirmations → Exchanging → Sending → Completed**.
You can safely close the processing screen at any time — the swap continues in the background and remains accessible in Merchant Transactions.
{% endstep %}
{% endstepper %}
Once the swap completes, the output currency is deposited back into your Hot Wallet and you will receive a notification.
#### Swap Statuses
Status
Meaning
Getting Confirmations
Your funds have been dispatched and are awaiting network confirmations.
Exchanging
The conversion is in progress.
Sending
The output currency is on its way back to your Hot Wallet.
Completed
The swap has settled and your Hot Wallet balance is updated. No further action required.
Failed
The swap did not complete. Open the details panel in Merchant Transactions to see the reason.
On Hold
The swap is paused pending an additional compliance check by the exchange partner. This is rare — contact your account manager or support if a swap remains on hold.
Refunded
The swap could not be completed and the original funds have been returned to your Hot Wallet.
#### Tracking Swaps in Your Transaction History
Every swap is recorded in Merchant Transactions with the type **Swap Deposit** and **Swap Payout**. The transaction details include the swap pair, input and output amounts, the exchange rate at execution, fees, and both transaction hashes (outbound and inbound). Swaps are filterable by type, date, and status, and are included in CSV exports.
#### Things to Bear in Mind
* **Swaps are irreversible** once confirmed. Review the summary carefully before clicking Swap.
* **Check your float first.** Swapping a large portion of an asset may leave insufficient liquidity for player withdrawals in that currency.
* **Fixed-rate quotes expire.** If the countdown runs out before you confirm, request a fresh quote.
* **Limits vary per pair.** Minimum and maximum swap amounts depend on the currency pair and are shown in the widget.
* **Viewers cannot swap.** They can view and export swap history only.
***
#### What's Next?
* [Merchant Transactions](/transaction-management/merchant-transactions) to review, filter, and export your full swap history.
* [Float Set Up and Maintenance](/assets/float-set-up-and-maintenance) to make sure your Hot Wallet stays sufficiently funded after rebalancing.
* [Managing Notifications](/account-settings/managing-notifications) to enable alerts for completed and failed swaps.
* [Team Management (Roles and Permissions)](/account-settings/team-management-roles-and-permissions) to control who on your team can initiate swaps.
# Treasury Wallet
In Pay.io, we offer **a two-wallet system** —[ **Hot Wallet**](/assets/hot-wallet) and **Treasury Wallet**.
The **Treasury Wallet** is your secure, **self-custody** storage for funds held outside the active payment layer.
Unlike the Hot Wallet, which is managed by Pay.io to support day-to-day player transactions, **the Treasury Wallet is held entirely under your custody via passkey authentication**. Pay.io does not have access to these funds or holds them.
Think of it as your **vault**. It sits outside the operational layer, protecting your profits and surplus balances from exposure, whilst remaining accessible whenever you need to replenish your Hot Wallet or withdraw funds to an external destination entirely.
{% hint style="warning" %}
Treasury Wallet can be configured after [**Business Verification** ](/getting-started/how-to-get-started#compliance-verification-kyb-and-aml) procedures are **completed**.
{% endhint %}
### What's in the Treasury Wallet
The Treasury Wallet page gives you full visibility over your secured holdings through key views:
**Secure Storage value** which shows the total combined value of assets held in your Treasury Wallet
**Balance Overview** which displays a per-asset breakdown of all funds currently held in your Treasury Wallet. Each row displays the asset, network, and current balance in crypto and fiat, giving you a clear picture of your total secured holdings at a glance.
**Key Actions** allowing you to initiate inbound and outbound movement — a deposit directly to Treasury Wallet, a transfer back to your Hot Wallet, or a withdrawal to an external wallet or exchange.
***
### Treasury Wallet vs. Hot Wallet At a Glance
| | Hot Wallet | Treasury Wallet |
| ---------------------- | ------------------------------------------------------------------------------------- | --------------------------------------------------------- |
| **Purpose** | Operational liquidity for active payment flows | Secure storage of surplus and profit funds |
| **Custody** | Managed by Boomfi | Under your own custody (passkey-protected) |
| **Funded by** | Manual deposits, transfers from Treasury | Automatic sweeps, Hot Wallet transfers, external deposits |
| **Outbound transfers** | Player withdrawals and deposits, sweeps to Treasury and manual transfers to Treasury. | Transfers to Hot Wallet, withdrawals to external wallets. |
| **Player-facing** | Yes — powers deposits and withdrawals | No |
| **Pay.io access** | No | No |
***
### Setting up the Treasury Wallet (Admin only)
Treasury Wallets are set up automatically by Pay.io whenever a new asset is added and configured in your Hot Wallet — there is no need to create them manually on a per-asset basis.
However, before any Treasury Wallet can be used, a **one-time setup** is required to register your passkeys and confirm the wallets under your custody. You'll be prompted to complete the passkey registration when setting up your wallets.
Passkey Registration pop-up for Treasury Wallet configuration
#### **Prerequisites**
* At least one asset must be configured and active in your **Hot Wallet**. See [Asset Management](/assets/asset-management-add-edit-disable) for guidance.
#### **First-Time Setup**
{% stepper %}
{% step %}
### **Navigate to the Treasury Wallet Page**
From the left-hand navigation, select **Treasury Wallet**. If no Treasury Wallets have been confirmed yet, you will be prompted to complete the setup flow.
{% endstep %}
{% step %}
### **Register Your Passkeys**
You will be asked to register a passkey for your Treasury Wallet. This passkey is the authentication mechanism that places Treasury wallet with its assets under your **sole** **custody** — it is not stored or accessible by Pay.io.
{% hint style="info" %}
**Store your passkey credentials securely.**
Loss of your passkey may prevent access to your Treasury Wallet funds. Pay.io cannot recover access on your behalf.
{% endhint %}
{% endstep %}
{% step %}
### **Create Treasury Wallet With Your Passkeys**
Once the passkey has been registered, you will be asked to sign the wallet creation request using your newly registered passkey. This cryptographically confirms your ownership of the Treasury Wallets being created.
{% endstep %}
{% step %}
### **Finalise the Process**
Review the wallets to be created — one per configured asset network — and click "Done". Your Treasury Wallets will now be active and ready to receive funds.
{% endstep %}
{% endstepper %}
***
### How the Treasury Wallet Is Funded
The Treasury Wallet can be funded in three ways:
| Funding Method | Description |
| ----------------------------- | ------------------------------------------------------------------------------------------------------------------------------------------------------------------------------------------------------------------------------------------------------------------------------------------------- |
| **Automatic Sweeps** | When your Hot Wallet balance exceeds the maximum retained threshold you have configured, funds are automatically transferred to your Treasury Wallet. This is the primary funding mechanism for most operations. See how to [set up sweep logic per asset](/assets/setting-up-sweeps-and-alerts). |
| **Transfers from Hot Wallet** | You can manually initiate a transfer from your Hot Wallet to the Treasury Wallet at any time from the Hot Wallet page. |
| **External Wallet Deposits** | Treasury Wallets can also receive funds directly from any external wallet or exchange, bypassing the Hot Wallet entirely. |
***
#### What's Next?
* [Setting up Sweeps and Alerts](/assets/setting-up-sweeps-and-alerts) to automate the movement of excess funds from your Hot Wallet into your Treasury Wallet.
* [Transfer From Hot Wallet to Treasury Wallet](/assets/treasury-wallet/transfer-from-hot-wallet-to-treasury-wallet) to manually move surplus funds from your operational float into secure self-custody storage.
* [Transfer From Treasury Wallet to Hot Wallet](/assets/treasury-wallet/transfer-from-treasury-wallet-to-hot-wallet) to replenish your operational float by moving funds back into the Hot Wallet.
* [Depositing to Your Treasury Wallet](/assets/treasury-wallet/deposit-to-treasury-wallet) to fund your Treasury Wallet directly from an external wallet or exchange.
* [Withdrawing From Your Treasury Wallet](/assets/treasury-wallet/withdraw-from-treasury-wallet) to send funds from your Treasury Wallet to an external wallet or exchange, exiting the Pay.io system entirely.
# Transfer from Hot Wallet to Treasury Wallet
Transferring funds from your [Hot Wallet](/assets/hot-wallet) to your [Treasury Wallet](/assets/treasury-wallet) is the primary way to secure surplus balances and protect your profits. Whilst this process can be automated via sweep thresholds, you can also initiate a manual transfer at any time directly from the Hot Wallet page.
{% hint style="info" %}
To automate this process, configure a sweep threshold for each asset so that any balance exceeding your defined maximum is transferred to Treasury automatically. See [Setting up Sweeps and Alerts](/assets/setting-up-sweeps-and-alerts) for guidance.
{% endhint %}
#### Prerequisites
* Your Treasury Wallet has been set up and confirmed. See [Treasury Wallet](/assets/treasury-wallet#setting-up-the-treasury-wallet-admin-only) for the one-time setup steps.
* Your Hot Wallet holds a positive balance for the asset you wish to transfer.
### Making a Transfer
{% stepper %}
{% step %}
### **Navigate to the Hot Wallet Page**
From the left-hand navigation, select **Hot Wallet**. Here you will see your current balances across all configured assets and networks.
Click the **“Transfer to Treasury Wallet”** button to begin.
{% endstep %}
{% step %}
### **Select Your Token and Network**
A modal window will appear. Use the dropdowns to select:
* **Token** as the cryptocurrency or stablecoin you wish to transfer (e.g., USDT, BTC, ETH).
* **Network** as the blockchain network over which the transfer will be made (e.g., Tron, Ethereum, Polygon).
{% endstep %}
{% step %}
### **Enter the Transfer Amount**
Specify the amount you wish to move to your Treasury Wallet. You can either:
* **Enter an amount manually** in the input field — the total is expressed in crypto, with a live fiat conversion rate displayed beneath the field for reference, or
* **Select a predefined percentage** of your available balance — choose from the quick-select options to calculate the transfer amount automatically based on your current Hot Wallet holdings.
{% hint style="info" %}
The fiat conversion displayed beneath the input field updates in **real time based on the current market rate for the selected asset**. Use this as a reference to gauge the value of the transfer without needing to calculate it manually.
{% endhint %}
{% hint style="warning" %}
**Ensure you retain sufficient funds in your Hot Wallet to cover ongoing player withdrawals after the transfer**.
Moving too large a proportion of your float to Treasury may disrupt payout operations.
See [Float Set-Up and Maintenance](/assets/float-set-up-and-maintenance) for guidance on managing your operational balance.
{% endhint %}
{% endstep %}
{% step %}
### **Execute the Transfer**
Once you are satisfied with the amount, click the **“Transfer”** button to execute. The funds will be moved from your Hot Wallet to your Treasury Wallet and will appear in your Treasury balance once the required network confirmations have been reached.
{% hint style="info" %}
**Confirmation times vary by network.** You can monitor the status of the transfer in the **Merchant Transaction** section, or by looking up the transaction hash on the relevant block explorer.
{% endhint %}
{% endstep %}
{% endstepper %}
***
#### What's Next?
* [Setting up Sweeps and Alerts](/assets/setting-up-sweeps-and-alerts) to automate Hot Wallet to Treasury transfers by configuring sweep thresholds per asset.
* [Float Set-Up and Maintenance](/assets/float-set-up-and-maintenance) to learn how to size your operational float and keep it adequately funded.
* [Withdrawing From Your Treasury Wallet](/assets/treasury-wallet/withdraw-from-treasury-wallet) to move funds from your Treasury Wallet to an external wallet or exchange.
# Transfer from Treasury Wallet to Hot Wallet
When your operational float is running low, you can manually transfer funds from your Treasury Wallet back into your [Hot Wallet](/assets/hot-wallet) at any time. Because the Treasury Wallet is held under your own custody, every outbound transfer requires authentication from the **passkey holder** before it can be executed, ensuring that no funds can leave Treasury without explicit authorisation.
#### Prerequisites
* Your Treasury Wallet has been set up, confirmed, and holds a positive balance for the asset you wish to transfer. See [Treasury Wallet](/assets/treasury-wallet) for setup guidance.
* The **passkey holder (Merchant Admin)** for your Treasury Wallet is available to authenticate the transfer.
### Making a Transfer
{% stepper %}
{% step %}
### **Navigate to the Treasury Wallet Page**
From the left-hand navigation, select **Treasury Wallet** under **Assets**. Here you will see your current balances across all configured assets and networks.
Click the **"Transfer to Hot Wallet"** button to begin.
{% endstep %}
{% step %}
### **Select Your Token and Network**
A modal window will appear. Use the dropdowns to select:
* **Token** as the cryptocurrency or stablecoin you wish to transfer (e.g., USDT, BTC, ETH).
* **Network** as the blockchain network over which the transfer will be made (e.g., Tron, Ethereum, Polygon).
{% endstep %}
{% step %}
### **Enter the Transfer Amount**
Specify the amount you wish to move to your Hot Wallet. You can either:
* **Enter an amount manually** in the input field — the total is expressed in crypto, with a live fiat conversion rate displayed beneath the field for reference, or
* **Select a predefined percentage** of your available balance — choose from the quick-select options to calculate the transfer amount automatically based on your current Treasury holdings.
{% hint style="info" %}
**The fiat conversion displayed beneath the input field updates in real time based on the current market rate for the selected asset.**
Use this as a reference to gauge the value of the transfer without needing to calculate it manually.
{% endhint %}
{% hint style="warning" %}
**Avoid transferring more than necessary to cover your operational needs.**
Excess funds moved into the Hot Wallet increase operational exposure unnecessarily. If your sweep thresholds are configured, surplus funds will be automatically moved back to Treasury — but it is good practice to transfer conservatively. See [Float Set-Up and Maintenance](/assets/float-set-up-and-maintenance) for guidance on sizing transfers appropriately.
{% endhint %}
{% endstep %}
{% step %}
### **Click "Transfer"**
Once you are satisfied with the details, click the **"Transfer"** button to proceed. The system will then prompt the passkey holder to authenticate the transaction.
{% endstep %}
{% step %}
### **Authenticate With Your Passkey (Merchant Admin)**
This is a required step for every outbound transfer from the Treasury Wallet. The designated passkey holder will be prompted to sign the transaction using their registered passkey — via Face ID, fingerprint recognition, or device PIN, depending on the device.
This cryptographic signature is the sole mechanism by which Treasury Wallet transfers are authorised. The transaction cannot proceed without it.
{% hint style="info" %}
**Only the registered passkey holder can approve this action.**
Ensure the right person is available before initiating a transfer, particularly during time-sensitive operations such as topping up the float to restore player payouts. If you need guidance on passkey management within your team, contact your account manager.
{% endhint %}
{% endstep %}
{% step %}
### **Transfer Confirmed**
Once the passkey authentication is complete, the transaction will be executed. Funds will appear in your **Hot Wallet balance** once the required network confirmations have been reached.
{% hint style="info" %}
**Confirmation times vary by network.**
You can monitor the status of the transfer in the **Merchant Transactions** section, or by looking up the transaction hash on the relevant block explorer.
{% endhint %}
{% endstep %}
{% endstepper %}
***
#### What's Next?
* [Float Set-Up and Maintenance](/assets/float-set-up-and-maintenance) to learn how to size and maintain your operational float.
* [Setting up Sweeps and Alerts](/assets/setting-up-sweeps-and-alerts) to automate transfers from Hot Wallet to Treasury to reduce the need for manual intervention.
# Deposit to Treasury Wallet
In addition to receiving funds via automatic sweeps from your Hot Wallet, your **Treasury Wallet** can also be funded directly from an external wallet or exchange. This is useful when you wish to move funds into self-custody storage without routing them through the operational layer first.
#### Prerequisites
* Your Treasury Wallet has been set up and confirmed. See [Treasury Wallet](https://docs.pay.io/assets/treasury-wallet) for the one-time setup steps.
* You have access to an external wallet or exchange from which you will be sending funds.
***
## Making a Deposit
{% stepper %}
{% step %}
### **Navigate to the Treasury Wallet Page**
From the left-hand navigation, select **Treasury Wallet**. Here you will see your current balances across all configured assets and networks.
Click the **"Deposit"** button to begin.
{% endstep %}
{% step %}
### **Select Your Asset and Network**
A modal window will appear. Use the dropdowns to select:
* **Token** as the cryptocurrency or stablecoin you wish to deposit (e.g., USDT, BTC, ETH).
* **Network** as the blockchain network over which the funds will be sent (e.g., Tron, Ethereum, Polygon).
{% hint style="info" %}
Not sure which network to choose? See [Asset Networks](/assets/asset-management-add-edit-disable/asset-networks) for guidance on selecting the right network for your asset.
{% endhint %}
{% endstep %}
{% step %}
### **Scan the QR Code or Copy the Wallet Address**
Once you have selected your token and network, a unique QR code will be displayed alongside your Treasury Wallet receiving address.
From your external wallet or exchange, either:
* **Scan the QR code** with your device to autopopulate the destination address, or
* **Copy the wallet address** manually and paste it into your sending platform.
{% hint style="warning" %}
**Before sending, verify the following:**
* The receiving address displayed beneath the QR code matches your Treasury Wallet address exactly.
* The **token** you are sending **matches** the token selected in the previous step.
* The **network** you are sending on **matches** the network you selected.
Sending funds using the wrong token and network combination may result in **permanent, unrecoverable loss of funds**.
{% endhint %}
{% endstep %}
{% step %}
### **Complete the Deposit From Your Device**
Confirm and broadcast the transaction from your external wallet or exchange. Once the required number of network confirmations have been reached, the funds will appear in your Treasury Wallet balance automatically.
{% hint style="info" %}
**Confirmation times vary by network.**
If your funds do not appear immediately, allow a few minutes for the transaction to be confirmed on-chain. You can monitor the status using the transaction hash on the relevant block explorer.
{% endhint %}
{% endstep %}
{% endstepper %}
***
#### What's Next?
* [Transferring Funds to Your Hot Wallet](/assets/treasury-wallet/transfer-from-treasury-wallet-to-hot-wallet) to move funds from Treasury back into your operational float when needed.
* [Float Set-Up and Maintenance](/assets/float-set-up-and-maintenance) to ensure your Hot Wallet always holds sufficient liquidity for player payouts.
* [Setting up Sweeps and Alerts](/assets/setting-up-sweeps-and-alerts) to automate the movement of surplus Hot Wallet funds into your Treasury Wallet.
# Withdraw from Treasury Wallet
Execute withdrawals from Treasury to external wallet or exchange
You can withdraw funds from your Treasury Wallet to any external wallet or exchange address at any time. Once confirmed, the funds will leave your Treasury Wallet and arrive at the destination address you specify.
Because the Treasury Wallet is held under your own custody, every outbound transfer requires authentication from the **passkey holder** before it can be executed, ensuring that no funds can leave Treasury without explicit authorisation.
{% hint style="warning" %}
**Withdrawals from the Treasury Wallet are irreversible**. Once a transaction has been broadcast to the blockchain, it cannot be recalled or reversed. Please review all details carefully before confirming.
{% endhint %}
#### Prerequisites
* Your Treasury Wallet has been set up and confirmed, and holds a positive balance for the asset you wish to withdraw. See [Treasury Wallet](/assets/treasury-wallet) for setup guidance.
* You have access to the destination wallet address, and it belongs to a wallet or exchange that supports the asset and network you intend to use.
* The **passkey holder (Merchant Admin)** for your Treasury Wallet is available to authenticate the transfer.
## Making a Withdrawal
{% stepper %}
{% step %}
### **Navigate to the Treasury Wallet Page**
From the left-hand navigation, select **Treasury Wallet** under **Assets**. Here you will see your current balances across all configured assets and networks.
Click the **“Withdraw”** button to begin.
{% endstep %}
{% step %}
### **Select Your Token and Network**
A modal window will appear. Use the dropdowns to select:
* **Token** as the cryptocurrency or stablecoin you wish to withdraw (e.g., USDT, BTC, ETH).
* **Network** as the blockchain network over which the funds will be sent (e.g., Tron, Ethereum, Polygon).
{% hint style="info" %}
The **network** you select here **must** **match** the **network** supported by your destination wallet or exchange. If you are unsure, check with your exchange before proceeding.
See [Asset Networks](/assets/asset-management-add-edit-disable/asset-networks) for further guidance.
{% endhint %}
{% hint style="info" %}
**Verify the destination address carefully before confirming.** Ensure the address is correct and belongs to the intended network for the asset being withdrawn. Sending funds to an incorrect address or mismatched network may result in **permanent, unrecoverable loss of funds**.
Once a withdrawal is confirmed and broadcast, the funds will leave your Treasury Wallet and exit the Pay.io system entirely. This action cannot be reversed.
{% endhint %}
{% endstep %}
{% step %}
### **Enter the Destination Wallet Address**
Enter the external wallet or exchange address to which you wish to send the funds.
{% hint style="warning" %}
**Ensure** the destination address belongs to the **same network** you selected in the previous step. Sending funds to an address on an incompatible network may result in **permanent, unrecoverable loss of funds**.
{% endhint %}
{% endstep %}
{% step %}
### **Enter the Withdrawal Amount**
Specify the amount you wish to withdraw. You may withdraw a partial balance or the full available amount for the selected asset.
{% endstep %}
{% step %}
### **Review and Confirm**
Before proceeding, carefully verify the following:
* The **token** selected matches the asset you intend to send.
* The **network** selected matches the network of your destination address.
* The **destination address** is correct and belongs to the intended wallet or exchange.
* The **amount** is accurate.
Once you are satisfied that all details are correct, click the **“Withdraw”** button to confirm.
You will be prompted to authenticate the withdrawal using your **passkey**. The system requires the Treasury Wallet passkey holder to sign the transaction with the corresponding passkey. This is the only way a transaction can be approved from Treasury Wallet.
After authentication, the transaction will be broadcast to the blockchain and the funds will be sent to the specified address.
{% endstep %}
{% endstepper %}
***
#### What Happens After a Withdrawal
Once confirmed and broadcast, the withdrawn funds will:
* Be deducted from your Treasury Wallet balance immediately.
* Arrive at the specified destination wallet or exchange address.
This action is final. If you have sent funds to an incorrect address or used the wrong network, Pay.io is unable to intervene or recover the funds on your behalf.
***
#### What's Next?
* [Depositing to Your Treasury Wallet](/assets/treasury-wallet/deposit-to-treasury-wallet) to add funds to your Treasury Wallet from an external wallet or exchange.
* [Transferring Funds to Your Hot Wallet](/assets/treasury-wallet/transfer-from-treasury-wallet-to-hot-wallet) to move funds from Treasury back into your operational float.
# Withdrawal Requests
The **Withdrawal Requests** page is a dedicated area in the Merchant Console providing an overview and a queue of player withdrawal requests. All of those requests require manual review and approval from your team. A withdrawal will appear here when it exceeds the auto-approval limits or daily withdrawal quota you have configured in your Hot Wallet settings, or when auto-approval is disabled entirely for a given asset.
{% hint style="info" %}
Withdrawals that fall within your configured auto-approval limits are processed automatically and will not appear in this queue. To adjust these thresholds, see [User Withdrawal Limits](/assets/user-withdrawal-limits).
{% endhint %}
### The Withdrawal Requests Queue
When you navigate to **Withdrawal Requests**, you will see a table of all pending and previously actioned requests. The table includes the following columns:
| Column | Description |
| ----------------------- | ------------------------------------------------------ |
| **Transaction ID** | Unique identifier for the withdrawal request |
| **User ID** | The player who submitted the request |
| **Request Time** | The date and time the request was submitted |
| **Origin Address** | The address to which funds will be sent too |
| **Destination Address** | The player's external wallet address |
| **Asset** | The cryptocurrency or stablecoin being withdrawn |
| **Amount** | The withdrawal amount in the selected asset |
| **USD** | The equivalent value in USD at the time of the request |
| **Action** | Approve or reject the individual request |
### Filtering and Searching
To help you manage your queue efficiently, the following filters are available:
* **Timeframe** - filter by a preset period (today, yesterday, this week, this month, this year, or all time) or define a custom date range.
* **Asset** - filter by a specific cryptocurrency or stablecoin.
* **Search** - look up a specific request by transaction ID, user ID, or wallet address.
You can also filter by request status:
* **Pending** - requests awaiting your approval or rejection.
* **Rejected** - requests that have been previously declined.
### Viewing Request Details
For a full breakdown of any individual request, click the **"Details"** button on the relevant row. The details panel provides the following information:
* User ID
* Origin and destination wallet addresses
* Asset and transaction type
* Request time (UTC)
* Amount in asset
* Status
* Transaction hash
* Transaction ID
From the details panel, you can also take action directly using the **Approve** or **Reject** buttons.
### Approving Withdrawal Requests
You can approve requests individually or in bulk.
#### **Individual Approval**
Click the **"Approve"** button in the **Action** column of the relevant row, or use the **Approve** button within the request's details panel.
#### **Bulk Approval**
Select multiple requests using the checkboxes in the first column of the table, and use the bulk action controls to approve them in a single action.
{% hint style="info" %}
**Approvals are irreversible.**
By approving a withdrawal request, you are authorising an immediate transfer of funds to the player's specified wallet address. Once confirmed, this action cannot be undone.
Before approving, ensure your **Hot Wallet float** **holds** **sufficient** **liquidity** **to** **cover** the total value of the requests you are approving. See [Float Set-Up and Maintenance](https://docs.pay.io/assets/float-set-up-and-maintenance) for guidance.
{% endhint %}
### **Processing Times**
The majority of approved withdrawals are processed within **5 seconds to 5 minutes**. Processing times may vary depending on network conditions.
#### **Partial Processing in case of Bulk Approval**
When approving in bulk, it is possible that not all requests in a batch will process successfully. For example, 95 out of 100 approvals may complete, whilst the remaining 5 require further attention.
{% hint style="info" %}
If some requests in a bulk approval do not process successfully, navigate to [**User Transactions**](/transaction-management/user-transactions) to identify and review the affected transactions individually.
{% endhint %}
### Rejecting Withdrawal Requests
If you need to decline a request, click the **"Reject"** button for the relevant row or use the **Reject** button within the details panel.
When rejecting a request, you will be required to:
1. **Select a reason** for the rejection from the available options, e.g. Invalid request.
2. **Leave an internal note** (optional) for a comment for your team's records.
The rejection reason and note are for internal use and will not be visible to the player.
### Keep in Mind
* **You are responsible** for reviewing requests that **exceed your** [**auto-approval limit**](/assets/setting-up-sweeps-and-alerts) or that **surpass a player's daily withdrawal quota**. These will always land in this queue for manual review.
* Always check your **operational float** before approving large or high-volume batches. Approving more than your Hot Wallet can cover may disrupt ongoing player activity.
* For any transactions that fail to process after a bulk approval, review them individually via the [**User Transactions**](/transaction-management/user-transactions) page before re-attempting.
***
### What's Next?
* [User Withdrawal Limits](/assets/user-withdrawal-limits) to configure auto-approval thresholds and daily quotas to reduce the volume of requests requiring manual review.
* [Float Set-Up and Maintenance](/assets/float-set-up-and-maintenance) to ensure your Hot Wallet holds sufficient liquidity before approving withdrawals.
* [User Transactions](/transaction-management/user-transactions) to review and manage the full history of player transaction activity.
# User Transactions
The **User Transactions** page provides a complete, searchable record of every player-initiated transaction that has moved through your platform — deposits *and* payouts, across every asset and network you have configured. Where the **Withdrawal Requests** page is an action queue for items awaiting review, the User Transactions page is the **system of record** for everything that has already been processed.
Use it to investigate player-reported issues, reconcile activity, track failures, and retry transactions that did not complete successfully the first time.
{% hint style="info" %}
**Looking for withdrawals that still need manual approval?** See [Withdrawal Requests](/transaction-management/withdrawal-requests).
The User Transactions page only lists requests that have already been dispatched to the Payment Gateway.
{% endhint %}
### Why Use It?
* **A single source of truth** for every deposit and payout across your operation.
* **Fast triage** of failed transactions — filter, inspect, and retry in seconds.
* **Granular audit trail** — every row links to the on-chain transaction hash and the originating user.
* **Reconciliation ready** — export the full view to CSV for finance or compliance review.
### Accessing the Page
From the left-hand navigation, go to **Transaction Management → User Transactions**.
### Understanding the Transaction Table
Each row represents a single player transaction. The table is sortable and filterable, and lists the following columns:
| Column | Description |
| ----------------------- | -------------------------------------------------------------------------------------------------------------------------------------- |
| **Transaction ID** | Unique identifier for the transaction within Pay.io. Use this when raising support tickets. |
| **User ID** | The player who initiated the transaction. |
| **Request time** | Date and time (UTC) the transaction was requested. |
| **Origin address** | The wallet address the funds were sent *from*. For payouts this is your Hot Wallet; for deposits this is the player's external wallet. |
| **Destination address** | The wallet address the funds were sent *to*. The inverse of Origin. |
| **Type** | **Payout** (withdrawal to a player) or **Deposit** (incoming funds from a player). |
| **Asset** | The cryptocurrency or stablecoin involved, with its network. |
| **Amount** | The value transacted, expressed in the selected asset. |
| **USD** | The equivalent value in USD at the time of the request. |
| **Status** | **Confirmed**, **Processing**, or **Failed**. Failed rows display an inline retry icon. |
| **Transaction Hash** | The on-chain transaction hash. Use this to look the transaction up on the relevant block explorer. |
| **Detail** | Click the eye icon to open the full Transaction Details panel. |
### Filtering and Searching
The filter bar at the top of the table lets you narrow the view:
* **Timeframe** — today, yesterday, this week, this month, this year, all time, or a custom date range.
* **Type** — Payout or Deposit.
* **Asset** — a specific cryptocurrency or stablecoin.
* **Status** — Confirmed, Processing, or Failed.
* **Search** — look up by transaction ID, user ID, wallet address, or transaction hash.
* **Clear All** — resets every filter to its default.
{% hint style="info" %}
**Filters combine additively.**
Setting **Type: Payout** and **Status: Failed** together will surface every failed payout in the selected timeframe — the fastest way to find transactions that need your attention.
{% endhint %}
### Viewing Transaction Details
Click the **eye icon** in the Detail column of any row to open the Transaction Details panel. The panel contains the complete record for the transaction, including fields that are not displayed in the table view.
#### **Confirmed Transaction**
A **Confirmed** transaction has been broadcast to the blockchain and has reached the required number of network confirmations. No further action is required.
#### **Failed Transaction**
A **Failed** transaction did not complete. The details panel displays the failure reason at the bottom, followed by a **Retry Transaction** button.
Common failure reasons include:
* **Provider failure** — an issue with the underlying Payment Gateway or a downstream liquidity provider.
* **Insufficient funds** — your Hot Wallet did not hold enough balance for the asset and network at the time of dispatch.
* **Network error** — a temporary issue reaching the blockchain.
#### Retrying a Failed Transaction
When a transaction fails, Pay.io gives you the option to retry it directly from the Transaction Details panel. Retries re-submit the same transaction — same amount, same destination address, same asset — through the Payment Gateway.
**Prerequisites**
* The transaction's status is **Failed**.
* Your Hot Wallet holds sufficient balance for the asset and network in question. See [Float Set-Up and Maintenance](/assets/float-set-up-and-maintenance) if you need to top up.
* You understand why the transaction failed — retrying without addressing the underlying cause will typically produce the same result.
**Retrying the Transaction**
{% stepper %}
{% step %}
**Open the Transaction Details Panel**
From the User Transactions table, locate the failed transaction and click the **eye icon** in the **Detail** column. You can also click the small retry icon directly next to the **Failed** status in the table — both routes lead to the same panel.
{% hint style="info" %}
Use the **Status: Failed** filter to find all failed transactions at once, particularly after a bulk approval batch.
{% endhint %}
{% endstep %}
{% step %}
**Review the Failure Reason**
At the bottom of the details panel, Pay.io displays the reason the transaction failed — for example, **Provider failure** or **Insufficient funds**. Read this carefully before proceeding.
{% hint style="warning" %}
Retrying a transaction that failed due to **insufficient funds** will fail again unless you top up your Hot Wallet first. Check your float before clicking Retry.
{% endhint %}
{% endstep %}
{% step %}
**Click Retry Transaction**
Click the green **Retry Transaction** button. Pay.io will re-dispatch the original transaction to the Payment Gateway using the same parameters — amount, asset, network, and destination address.
{% endstep %}
{% step %}
**Monitor the New Status**
The transaction's status will update to **Processing** while it is being re-dispatched. Most retries resolve to **Confirmed** within **5 seconds to 5 minutes**, depending on network conditions.
If the retry also fails, the status will return to **Failed** and the details panel will display the new failure reason. Investigate before retrying a third time.
{% hint style="info" %}
You can monitor the on-chain progress using the **Transaction Hash** on the relevant block explorer once the retry has been broadcast.
{% endhint %}
{% endstep %}
{% endstepper %}
### Exporting Transactions
To export the current view to CSV for reconciliation, reporting, or audit purposes:
1. Apply any filters you wish to include in the export.
2. Click **Download CSV** in the top right-hand corner of the table.
The exported file contains every column displayed in the table, plus a **Failure Reason** column populated for any failed rows. Only transactions matching your active filters will be included.
{% hint style="info" %}
CSV exports are generated at the moment you click Download, using the filters currently applied. If you need a consistent, point-in-time export for audit purposes, apply a specific date range before exporting
{% endhint %}
### Things to Bear in Mind
* **The User Transactions page is read-only for everything apart from retries.** You cannot edit, cancel, or delete a transaction from this view.
* **Retries are a re-dispatch, not a new transaction.** The Transaction ID does not change, but a new **Transaction Hash** is generated once the retry is broadcast to the blockchain.
* **Status updates are near real-time**, but may lag slightly behind on-chain state during periods of high network congestion.
* **Bulk retry is not available,** as each failed transaction must be retried individually to ensure deliberate review of the failure reason.
* **Viewers** can read this page and export CSVs but cannot retry transactions. See [Team Management — Roles and Permissions](/account-settings/team-management-roles-and-permissions) for the full matrix.
***
#### What's Next?
* [Withdrawal Requests](/transaction-management/withdrawal-requests) to manage the queue of withdrawals awaiting manual approval.
* [Float Set-Up and Maintenance](/assets/float-set-up-and-maintenance) to keep your Hot Wallet topped up so transactions do not fail for liquidity reasons.
* [Managing Notifications](/account-settings/managing-notifications) to enable alerts for failed transactions and low balance events.
* [Webhook Retry Policy](/api-reference/core-concepts/webhook-retry-policy) to understand how failed webhook deliveries are handled alongside transaction retries.
# Merchant Transactions
The **Merchant Transactions** page is the record of every operator-initiated movement of funds across your wallets — deposits into your **Hot Wallet**, transfers, and payouts from your **Treasury Wallet**, automatic sweeps between the two, and asset swaps. Where the [**User Transactions**](/transaction-management/user-transactions) page captures *player* activity, Merchant Transactions captures *your* activity as the operator.
This is the ledger your finance and operations teams will return to most often.
{% hint style="info" %}
**Looking for player-initiated deposits and payouts?** See User Transactions. Merchant Transactions only lists movements you or an automated sweep initiated.
{% endhint %}
#### Why Use It?
* **A complete operator-side ledger** — every funding top-up, transfer, external withdrawal, sweep, and swap in one place.
* **End-to-end reconciliation** — pair Merchant Transactions with [User Transactions](/transaction-management/user-transactions) to account for every movement in and out of your wallets.
* **Treasury oversight** — audit how much has been swept to Treasury and when, and trace the origin of every Treasury movement.
* **Reporting-ready** — export the full ledger to CSV for finance, compliance, or audit review.
#### Accessing the Page
From the left-hand navigation, go to **Transaction Management → Merchant Transactions**.
#### Understanding the Transaction Table
Each row represents a single wallet movement you or the platform initiated on your behalf. The table lists the following columns:
| Column | Description |
| -------------------- | -------------------------------------------------------------------------------------------------------------------------------------------------------------------------- |
| **Transaction ID** | Unique identifier for the wallet movement within Pay.io. Use this when raising support tickets. |
| **Process time** | Date and time (UTC) the transaction was processed by the Payment Gateway. |
| **Wallet** | The address of the wallet involved in the movement — your Hot Wallet receiving address, your Treasury Wallet address, or the external address for an outbound transaction. |
| **Type** | The kind of movement. See [Transaction Types](#transaction-types) below. |
| **Asset** | The cryptocurrency or stablecoin involved, with its network. |
| **Amount** | The value transacted, expressed in the selected asset. |
| **USD** | The equivalent value in USD at the time of processing. |
| **Status** | **New**, **Processing**, **Confirmed**, or **Failed**. See Statuses below. |
| **Transaction Hash** | The on-chain transaction hash. Use this to look the transaction up on the relevant block explorer. |
| **Detail** | Click the eye icon to open the full Transaction Details panel. |
#### **Transaction Types**
Merchant Transactions groups movements into six distinct types, which map directly to the operational actions available across the Merchant Console.
| Type | What It Represents | Typical Source |
| --------------------------- | -------------------------------------------------------------------------- | ---------------------------------------------------------------------------------------------------------------------------------------------------------------------------- |
| **Hot Wallet Deposit** | An incoming transfer into your Hot Wallet. | Manually depositing funds from an external wallet or exchange. See [Making a Deposit](/assets/making-a-deposit). |
| **Hot Wallet Payout** | An outgoing transfer from your Hot Wallet, *excluding* player withdrawals. | Manual transfers from Hot Wallet to Treasury Wallet. See [Transfer From Hot Wallet to Treasury Wallet](/assets/treasury-wallet/transfer-from-hot-wallet-to-treasury-wallet). |
| **Treasury Wallet Deposit** | An incoming transfer into your Treasury Wallet. | External deposits to Treasury. See [Depositing to Your Treasury Wallet](/assets/treasury-wallet/deposit-to-treasury-wallet). |
| **Treasury Wallet Payout** | An outgoing transfer from your Treasury Wallet. | Transfers to Hot Wallet or withdrawals to an external address. See [Withdrawing From Your Treasury Wallet](/assets/treasury-wallet/withdraw-from-treasury-wallet). |
| **Sweep** | An automatic transfer from your Hot Wallet to your Treasury Wallet. | Triggered when your Hot Wallet balance exceeds the sweep threshold. See [Setting up Sweeps and Alerts](/assets/setting-up-sweeps-and-alerts). |
| **Swap Deposit** | A conversion of one asset into another from your Hot Wallet. | Manual swaps initiated via the Swap widget. See [Swapping Assets](/assets/swapping-assets). |
| **Swap Payout** | A conversion of one asset into another from your Hot Wallet. | Manual swaps initiated via the Swap widget. See [Swapping Assets](/assets/swapping-assets). |
{% hint style="info" %}
**Player withdrawals do not appear on this page.**\
They are player-initiated and live in the [User Transactions](/transaction-management/user-transactions) ledger. Merchant Transactions only shows movements initiated by you, your team, or the automated sweep engine.
{% endhint %}
**Statuses**
Status
Meaning
New
The transaction has been created, but has not yet been dispatched to the Payment Gateway. Usually, a transient state.
Processing
The transaction has been broadcast and is awaiting the required network confirmations.
Confirmed
The transaction has reached the required confirmations and has settled on-chain. No further action required.
Failed
The transaction did not complete. Open the details panel to see the failure reason.
{% hint style="info" %}
**Swap transactions follow their own status flow:** Getting Confirmations → Exchanging → Sending → Completed, with Failed, On Hold, and Refunded as exception states. See [Swapping Assets](/assets/swapping-assets) for what each status means.
{% endhint %}
**Filtering and Searching**
The filter bar at the top of the table lets you narrow the view:
* **Timeframe** — today, yesterday, this week, this month, this year, all time, or a custom date range.
* **Type** — filter to a single transaction type (e.g. show only Sweeps, only Swaps, or only Treasury Wallet Payouts).
* **Asset** — a specific cryptocurrency or stablecoin.
* **Status** — New, Processing, Confirmed, or Failed.
* **Search** — look up by transaction ID, wallet address, or transaction hash.
* **Clear All** — resets every filter to its default.
{% hint style="info" %}
**Want a quick view of every sweep over the past month?**\
Set **Type: Sweep** and **Timeframe: This month**. This is the fastest way to audit automatic sweep activity before a Treasury reconciliation.
{% endhint %}
#### Viewing Transaction Details
Click the **eye icon** in the Detail column of any row to open the Transaction Details panel. The panel contains the complete record for the movement, including fields that are not displayed in the table view.
The details panel displays:
* **Wallet Address** — the wallet involved in the movement.
* **Asset** — the cryptocurrency or stablecoin, with its network.
* **Type** — Deposit, Payout, Sweep, or Swap, scoped to the relevant wallet.
* **Request time** — the date and time the transaction was initiated.
* **Amount** — the value transacted, expressed in the selected asset.
* **Status** — the current state (New, Processing, Confirmed, or Failed).
* **Transaction Hash** — the on-chain hash, copyable for use in a block explorer.
* **Transaction ID** — the Pay.io identifier, copyable for support tickets.
For **Failed** transactions, the details panel additionally displays the failure reason at the bottom of the record.
For **Swap** transactions, the details panel additionally displays the swap pair, input and output amounts, the exchange rate at execution, the network and platform fees, and both transaction hashes — outbound (your Hot Wallet to the exchange) and inbound (the exchange back to your Hot Wallet).
{% hint style="info" %}
For payouts from the Treasury Wallet, the details panel also records which team member authorised the transfer using their passkey.
{% endhint %}
#### Exporting Transactions
To export the current view to CSV for reconciliation, reporting, or audit purposes:
1. Apply any filters you wish to include in the export.
2. Click **Download CSV** in the top right-hand corner of the table.
The exported file contains every column displayed in the table, plus a **Failure Reason** column populated for any failed rows. Only transactions matching your active filters will be included.
{% hint style="info" %}
For a complete picture of a reconciliation period, export **User Transactions** and **Merchant Transactions** for the same date range. Together they account for every inbound and outbound movement across your wallets.
{% endhint %}
#### Things to Bear in Mind
* **Merchant Transactions is read-only.** You cannot edit, cancel, or retry a transaction from this view. Retries for failed movements are initiated from the originating page — for example, a failed sweep is resolved by reviewing its root cause in Hot Wallet configuration.
* **Sweeps appear automatically.** You do not need to do anything for sweep activity to be recorded — it is logged as soon as the sweep engine triggers.
* **Treasury Wallet payouts require passkey authentication before appearing here.** A transaction will not progress past **New** until the passkey holder has signed. See Transfer From Treasury Wallet to Hot Wallet.
* **Status updates are near real-time**, but may lag slightly behind on-chain state during periods of high network congestion.
* **Viewers** can read this page and export CSVs but cannot initiate any of the underlying transactions. See Team Management — Roles and Permissions for the full matrix.
**What's Next?**
* [**User Transactions** ](/transaction-management/user-transactions)for the corresponding record of player-initiated deposits and payouts.
* [**Swapping Assets**](/assets/swapping-assets) to convert one asset into another directly from your Hot Wallet.
* [**Setting up Sweeps and Alerts**](/assets/setting-up-sweeps-and-alerts) to configure the automated sweeps that populate this ledger.
* [**Transfer From Hot Wallet to Treasury Wallet**](/assets/treasury-wallet/transfer-from-hot-wallet-to-treasury-wallet) to initiate manual Hot-to-Treasury transfers.
* [**Withdrawing From Your Treasury Wallet**](/assets/treasury-wallet/withdraw-from-treasury-wallet) to send Treasury funds to an external wallet or exchange.
* [**Managing Notifications**](/account-settings/managing-notifications) to enable alerts for sweeps, wallet deposits, and transfers.
# Settings Overview
Settings is your central area for managing both your organisation's configuration and your personal account details for the Merchant Console. You can access it from the left-hand navigation under **Manage Console → Settings**.
The Settings area is divided into two primary sections: [**Organisational Settings**](#organisational-settings) and [**Account Details**](#account-details).
## Organisational Settings
Organisational Settings contains configuration that applies across your entire Pay.io account. Only **Admin users** can request changes to organisational details.
The following information is displayed:
| Field | Description |
| ------------------------ | ----------------------------------------------------------------------------------------- |
| **Organisation Email** | The email address your organisation registered with. To edit, please email . |
| **Organisation Name** | The name displayed across the Pay.io UI. To edit, please email . |
| **Country of Operation** | The country in which your organisation operates. To edit, please email . |
| **Phone Number** | Your organisation's contact number |
| **Default Currency** | The base fiat currency used for conversions across the platform |
Under **Organisational Settings**, in addition to Account Organisation Details you have access to:
* [**Team Members**](/account-settings/team-management-roles-and-permissions) to manage the users who have access to your Merchant Console, including their roles and permissions. Available to view for manager and Viewer roles, editable for Administrator.
* [**API Keys and Webhooks**](/account-settings/managing-api-keys) to generate and revoke API keys, and configure webhook endpoints for real-time event notifications. Available to view for manager and Viewer roles, editable for Administrator.
* [**Compliance and Verification**](/account-settings/compliance-procedures) to view the current status of your organisation's compliance and verification checks. Available to view for Viewer role, editable for Administrator and Manager roles.
### **Changing Your Organisation Email**
To update your organisation email address, an admin user must send a change request to . This cannot be changed directly from the console.
***
## Account Details
Account Details is the second section of Settings area, which contains your personal profile information and account preferences.
Each user manages this section independently. Changes made here apply only to your own account.
Under **Account Details,** you can view and manage:
* **Profile** to view your name and email address associated with your account.
* **Password** to update your account password at any time. See [How to Change Your Password](/account-settings/settings-overview/changing-my-password) for a step-by-step walkthrough.
* **Preferences** to configure your personal notification settings for key platform events. See [Managing Notifications](/account-settings/managing-notifications) for full details.
# Changing Console Theme
Switching Between Light and Dark Mode
The Merchant Console is available in both **Light** and **Dark** mode. You can switch between the two at any time to suit your working environment or personal preference.
#### Switching Your Theme
{% stepper %}
{% step %}
Click on your **account avatar** in the top right-hand corner of the screen.
{% endstep %}
{% step %}
Select **Appearance** from the dropdown menu.
{% endstep %}
{% step %}
Choose your preferred theme: **Light** or **Dark** or **System theme.** Your selection is applied instantly.
{% endstep %}
{% endstepper %}
{% hint style="info" %}
This preference is tied to your individual account and does not affect the theme for any other users in your organisation. Each team member can set their own appearance preference independently.
{% endhint %}
***
#### What's Next?
* [Account Settings Overview](/account-settings/settings-overview) to explore all available settings for your account and organisation.
* [Managing Notifications](/account-settings/managing-notifications) to configure which platform events trigger email alerts for your account.
# Changing My Password
You can update your Merchant Console account password at any time from the **Account Details** section of your settings. We recommend changing your password periodically and immediately if you suspect your credentials have been compromised.
### Changing Your Password
{% stepper %}
{% step %}
#### **Navigate to Account Settings**
From the left-hand navigation, go to **Manage Console → Settings**. On the Settings page, select the **Account Details** tab.
{% endstep %}
{% step %}
#### **Locate the Password Section**
Under **Account Details**, find the **Personal Info** section. Here you will see the option under **Security and Access** to update your password.
{% endstep %}
{% step %}
#### **New Password Set up**
The instructions on how to change your password will be sent to your registered email. In the email, you'll be directed to reset your password.
In the new tab, enter your new password. Enter the new password a second time to confirm it.
{% hint style="info" %}
Choose a strong, unique password that is not used for any other account. A strong password typically includes a mix of uppercase and lowercase letters, numbers, and special characters, and is at least 8 characters long.
{% endhint %}
{% endstep %}
{% step %}
#### **Save Your Changes**
Apply your new password. You may be prompted to log in again using your updated credentials.
{% hint style="info" %}
If you have forgotten your current password and cannot log in, use the **Forgotten Password** link on the login page to reset it via your registered email address.
{% endhint %}
{% endstep %}
{% endstepper %}
***
#### What's Next?
* [Account Settings Overview](/account-settings/settings-overview) to explore all available settings for your account and organisation.
* [Managing Notifications](/account-settings/managing-notifications) to configure which platform events trigger email alerts for your account.
# Managing Notifications
Pay.io can send you email notifications for key events across your Hot Wallet, Treasury Wallet, and withdrawal flows. Keeping the right alerts enabled ensures your team can react quickly to events that require immediate attention — such as a **low wallet balance** or a **pending withdrawal request**.
{% hint style="success" %}
**Notification preferences** **are configured per user, under Account Details**. **Each member of your team can enable or disable alerts independently based on their role and responsibilities.**
{% endhint %}
#### Accessing Notification Settings
{% stepper %}
{% step %}
From the left-hand navigation, go to **Manage Console → Settings**.
Select the **Account Details** tab.
{% endstep %}
{% step %}
Click on the **Preferences** tab within Account Details.
{% endstep %}
{% step %}
Select the needed notifications from all available notification types by clicking the **checkbox to enable** (box turns green)**.** To disable a chosen notification, just click the checkbox once again to uncheck it (box turns grey).
{% endstep %}
{% endstepper %}
#### Available Notifications
| Notification Type | Description |
| ------------------------- | ---------------------------------------------------------------------------------------------------------------------------------------------- |
| **Minimum Balance Alert** | Triggered when a wallet balance falls below the minimum threshold you have defined for a given asset. Email notification is sent once an hour. |
| **Operational Sweep** | Triggered when an automatic sweep moves funds from your Hot Wallet to your Treasury Wallet. |
| **Wallet Deposits** | Triggered when a **Merchant deposit** is received into your Hot Wallet or Treasury Wallet. User deposits **won't trigger** this notification. |
| **Wallet Transfers** | Triggered when funds are transferred between your Hot Wallet and Treasury Wallet, in either direction. |
| **Withdrawal Requests** | Triggered when a player withdrawal request is submitted and requires manual review and approval. |
#### Enabling and Disabling Notifications
To enable a notification, click the toggle next to it so that it turns green. To disable it, click the toggle again so that it turns grey.
Click the **"Save Changes"** button to confirm your choices.
{% hint style="info" %}
**Recommended minimum configuration for operational teams:**
At a minimum, we recommend enabling **Minimum Balance Alert** and **Withdrawal Requests** notifications. Together, these ensure your team is informed when the float needs topping up and when player withdrawals are awaiting approval — the two events most likely to affect platform operations if left unattended.
{% endhint %}
***
#### What's Next?
* [Setting up Sweeps and Alerts](/assets/setting-up-sweeps-and-alerts) to configure the minimum balance thresholds that trigger your low balance alert notifications.
* [Withdrawal Requests](/transaction-management/withdrawal-requests) to manage pending player withdrawal requests that require manual approval.
* [Float Set-Up and Maintenance](/assets/float-set-up-and-maintenance) to ensure your Hot Wallet always holds sufficient liquidity for player payouts.
# Team Management (Roles and Permissions)
The **Team** tab within **Organisational Settings** allows Administrators to manage who has access to the Merchant Console and what they can do within it. Pay.io uses a **Role-Based Access Control (RBAC)** model to ensure that each team member has precisely the level of access their role requires.
This is particularly important in iGaming operations, where sensitive actions such as approving withdrawal requests, managing wallet limits, and handling API keys must be governed by clear accountability.
{% hint style="info" %}
**Only Administrator users can invite or remove team members and assign or update roles.**
If you need changes made to your team and do not have Administrator access, contact your organisation's Administrator.
{% endhint %}
### Accessing Team Management
From the left-hand navigation, go to **Manage Console → Settings**. Under **Organisational Settings**, select the **Team** tab.
Here you will see a table of all current team members, including the following information per user:
| Column | Description |
| ------------------- | -------------------------------------------------------------------------------------------------------------- |
| **Name** | The team member's display name. The account owner is labelled **Owner**. Your own account is labelled **You**. |
| **Email Address** | The email address associated with the team member's account |
| **Role** | The role currently assigned to the team member |
| **Last Login** | The date and time of the team member's most recent session |
| **IP and Location** | The IP address and geographic location of the last login |
| **Type** | The authentication method used (e.g., Login with Email, Login with Passkey) |
| **Actions** | Edit or remove the team member |
### Understanding Roles
Pay.io defines three core roles, each granting a distinct level of access across the Merchant Console.
**Administrator**
Full access to all console features and settings. Administrators are responsible for configuring the platform, managing the team, and overseeing all operational and compliance functions.
**Manager**
Operational access for day-to-day platform management. Managers can handle wallets, transactions, and withdrawals, but cannot manage users, organisation settings, or Treasury Wallet setup.
**Viewer**
Read-only access across wallets, transactions, and reports. Viewers cannot initiate transactions, approve withdrawals, or make any configuration changes.
### Roles and Permissions Matrix
The table below details which actions are available to each role across the Merchant Console.
| Feature / Action | Administrator | Manager | Viewer |
| ----------------------------------------------------------- | ------------- | ------- | --------- |
| View Transactions & Reports | ✓ | ✓ | ✓ |
| Change own Password & Notification Preferences | ✓ | ✓ | ✓ |
| View Team List | ✓ | ✓ | ✓ |
| Generate / Export Reports | ✓ | ✓ | ✓ |
| View KYB Status & Compliance Details | ✓ | ✓ | Read-only |
| Manage Hot Wallets (add / disable assets, configure limits) | ✓ | ✓ | — |
| Initiate Deposits (Hot Wallet & Treasury Wallet) | ✓ | ✓ | — |
| Initiate Manual Transfers (Hot ↔ Treasury) | ✓ | ✓ | — |
| Approve / Reject Withdrawal Requests | ✓ | ✓ | — |
| Manage API Keys & Webhooks | ✓ | ✓ | — |
| Create Treasury Wallets | ✓ | — | — |
| Invite / Remove Team Members | ✓ | — | — |
| Assign Roles | ✓ | — | — |
| Initiate Treasury Withdrawals | ✓ | — | — |
| Manage External Treasury Wallets | ✓ | — | — |
| Update Organisation Details | ✓ | — | — |
| Deactivate Account | ✓ | — | — |
{% hint style="info" %}
You can view this matrix at any time within the console by clicking the **"Roles and permissions"** button in the top right-hand corner of the Team tab.
{% endhint %}
***
### Updating a Team Member's Role
To change the role assigned to an existing team member, click the **edit icon** in the **Actions** column of their row. Update the role assignment and save your changes. See step-by-step guide in [Invite or Remove Team Members](/account-settings/team-management-roles-and-permissions/invite-or-remove-team-members) page.
{% hint style="info" %}
**Role changes take effect immediately.**
Ensure the team member is aware of any changes to their access level, particularly if permissions are being reduced.
{% endhint %}
***
#### What's Next?
* [Invite or Remove Team Members](/account-settings/team-management-roles-and-permissions/invite-or-remove-team-members) to add new users to your organisation, or revoke access for departing team members.
* [Account Settings Overview](/account-settings/settings-overview) to explore all available settings for your account and organisation.
* [API Keys and Webhooks](/account-settings/managing-api-keys) to manage API credentials and configure event subscriptions.
# Invite or Remove Team Members
**Administrators** can invite new team members directly from the Merchant Console, assigning them a role from the moment they join.
Access can also be revoked at any time to ensure former employees or external collaborators can no longer act on behalf of your organisation.
### Inviting a Team Member
{% stepper %}
{% step %}
#### **Navigate to the Team Tab**
From the left-hand navigation, go to **Manage Console → Settings**. Under **Organisational Settings**, select the **Team** tab.
{% endstep %}
{% step %}
#### **Click "Invite Someone"**
Click the **"+ Invite someone"** button in the top right-hand corner of the Team Member's table. A modal window will appear.
{% endstep %}
{% step %}
#### **Enter the Team Member's Details**
Complete the following fields in the **Invite Team Member** modal:
* **First name** → the invitee's first name.
* **Last name**→ the invitee's last name.
* **Email address** → the email address to which the invitation will be sent.
* **Assign role** → select the role the team member will hold upon joining. Choose from **Administrator**, **Manager**, or **Viewer**.
{% hint style="info" %}
Not sure which role to assign? Refer to the [Roles and Permissions](https://docs.pay.io/settings/team/roles-and-permissions) guide for a full breakdown of what each role can access. You can also view the matrix at any time by clicking **"Roles and permissions"** on the Team tab.
{% endhint %}
{% endstep %}
{% step %}
#### **Send the Invitation**
Click the **"Invite team member"** button. The invitee will receive a secure activation link at the email address provided. Once they complete the sign-up flow, they will be linked to your merchant account with the role you assigned.
{% hint style="warning" %}
The assigned role and merchant account context are enforced from the moment the invitee activates their account. Ensure you select the correct role before sending — you can always update it afterwards from the Team tab.
{% endhint %}
{% endstep %}
{% endstepper %}
***
### Removing a Team Member
When a team member leaves your organisation or no longer requires access, their account should be removed promptly to maintain the security and integrity of your console.
{% stepper %}
{% step %}
#### **Locate the Team Member**
From the **Team** tab, find the team member you wish to remove in the table.
{% endstep %}
{% step %}
#### **Click the Remove Icon**
Click the **delete icon** in the **Actions** column of their row. A confirmation modal will appear.
{% endstep %}
{% step %}
#### **Confirm Removal**
Review the confirmation prompt and confirm the removal. The team member's access will be revoked immediately — they will no longer be able to log in to the Merchant Console or perform any actions on behalf of your organisation.
{% hint style="warning" %}
Removal is a permanent action and cannot be undone. However, all historical activity and audit logs associated with the removed user are retained for compliance purposes.
Only **Administrator** users can remove team members. If you need a user removed and do not have Administrator access, contact your organisation's Administrator.
{% endhint %}
{% endstep %}
{% endstepper %}
***
#### Things to Bear in Mind
* A team member's role can be updated at any time after they have joined. Role changes take effect immediately.
* Removing a user revokes their access instantly but preserves all historical records of their activity, your audit trail remains intact.
* A user can be invited again if they have been removed from the team members.
* If you are the **account Owner**, your account cannot be removed by other Administrators.
* Always review your team's roles periodically to ensure the principle of least privilege is maintained as your organisation scales.
***
#### What's Next?
* [Team Management (Roles and Permissions)](/account-settings/team-management-roles-and-permissions) to understand what each role can access across the Merchant Console.
* [Account Settings Overview](/account-settings/settings-overview) to explore all available settings for your account and organisation.
* [API Keys and Webhooks](/account-settings/managing-api-keys) to manage API credentials and event subscriptions for your integration.
# Pay.io APIs Overview
Pay.io APIs provide merchants with a simple and reliable way to integrate cryptocurrency deposit and withdrawal functionality into their platforms. The APIs are designed to give operators full control over their digital asset operations while enabling customers to fund and withdraw from their accounts securely and efficiently.
Through the integration, merchants can:
* Enable **deposits** and **withdrawals**.
* **Manage** supported **currencies**.
* **Control** deposit **addresses**.
* **Handle** **transaction** **recovery**.
***
### Payment Gateway API
The[ **Payment Gateway API**](/api-reference/user-payment-api/create-a-deposit-address) allows integrating a cashier interface that can be embedded into any service or website. The API provides a way for customers to manage their balances and transactions seamlessly while supporting flexible funding options.
Key API capabilities include:
* **Deposits and withdrawals** - Customers can add or withdraw funds directly through the gateway.
* **Balance visibility** - Real-time access to account balances and key transactions.
* **Multi-provider support** - Optional direct MESH integration, giving access to multiple crypto payment providers.
Sample Cashier UI example powered by Payment Gateway API
***
### Merchant Console API
The[ **Merchant Console API**](/api-reference/merchant-console-api/get-a-list-of-available-currencies) complements the Payment Gateway by providing business owners with a data to build a central interface for monitoring and managing transactions. Integrated through a simple API, the console offers full visibility and control over financial operations, from reconciliation to fund management.
The console supports:
* **White-label interface** - Customisable to reflect the operator’s branding and player experience.
* **Noncustodial access to funds** - Merchants retain control over player balances, reducing custodial risk.
* **Comprehensive reporting** - Detailed transaction data to support auditing, compliance, and reconciliation.
* **Fund management tools** - Direct connection with the HubWallet interface to enable seamless transfers between asset holding accounts.
Merchant Console with data from API
# Getting Started
The **Pay.io Payment Gateway API** enables merchants to build a full cashier solution directly into your websites or applications. With a single integration, you can:
* Trigger **deposits** and **withdrawals**
* Show **real-time balances** and transaction history
* Access multiple crypto payment providers through **native MESH integration**
While business owners manage their accounts and configurations in the **Merchant Console**, the **Payment Gateway API** is what powers the end-user cashier experience.
***
### Prerequisites
Before you start making API calls, you'll need to:
* **Onboard as a merchant with Pay.io** - our team will configure your account, including enabling key currencies, according to your needs.
* **Obtain your API key** - Found in the Merchant Console or provided by our support team.
* **Generate RSA key pair -** You’ll provide Pay.io your public key during setup (see [Authorisation](/api-reference/core-concepts/authorisation) for details).
* **Set up request signing** — Each API call requires a nonce and RSA-SHA256 signature.
***
### Pay.io APIs Overview
#### Merchant API
Used by your backend to configure cashier options:
* [**Currencies API** ](/api-reference/merchant-console-api/get-a-list-of-available-currencies#get-a-list-of-available-currencies)- Used to retrieve the list of enabled currencies for you.
* [**Transactions API**](/api-reference/merchant-console-api/get-a-list-of-merchant-transactions) - Access transaction history across users and retry payouts requiring approval.
#### User Payment API
Used to serve your end-users inside the cashier through our payment gateway experience:
* [**Deposits API** ](/api-reference/user-payment-api/create-a-deposit-address)- Generate unique deposit addresses or create wallet deposit links.
* [**Withdrawals API** ](/api-reference/user-payment-api/create-a-user-withdrawal)- Allow users to request withdrawals to personal wallets.
* [**User Transactions API** ](/api-reference/user-payment-api/get-a-list-of-user-transactions)- Display a user’s transaction history in your cashier UI.
***
### Making Your First API Call: List Currencies
Once your merchant account is onboarded, your **first step** is to list which currencies are available for your cashier to set up the Payment Gateway.
#### Request
```bash
curl --location 'https://gateway.stage.pay.io/v1/merchant/currencies' \
--header 'X-API-Key: YOUR_API_KEY' \
--header 'X-API-Nonce: YOUR_UUID_NONCE' \
--header 'X-API-Signature: SIGNATURE'
```
#### Response (example)
```json
{
"currencies": [
{
"id": "1270e0a2-593b-5272-8c0e-90ba5552d921",
"name": "SOL",
"currency_code": "SOL",
"symbol": "◎",
"network": "Solana",
"currency_icon": "https://cdn.hub88.io/hub-wallet/SOL-ic.svg"
},
{
"id": "990cd2f7-b169-5665-b0e1-05cc46ae4209",
"name": "USDC",
"currency_code": "USDC",
"symbol": "$",
"network": "Base Chain"
}
]
}
```
***
### Next Steps For Payment Gateway
Once you have your supported currencies, you can:
* Request a **deposit address** for a user ([`POST /v1/user/deposit/address`](/api-reference/user-payment-api/create-a-deposit-address))
* Initiate a **withdrawal** ([`POST /v1/user/withdraw`](/api-reference/user-payment-api/create-a-user-withdrawal))
* Fetch **transactions** for a user ([`POST /v1/user/transactions`](/api-reference/user-payment-api/get-a-list-of-user-transactions)) or across your merchant ([`POST /v1/merchant/transactions`](/api-reference/merchant-console-api/get-a-list-of-merchant-transactions))
See the [Authorisation](/api-reference/core-concepts/authorisation) for details on how to sign and authenticate your requests.
# Making your first API request
Once your **merchant account is onboarded**, your **first step** is to list which currencies are available for your cashier to set up the Payment Gateway.
{% stepper %}
{% step %}
#### Create your API key
Merchants must provide **Pay.io** with a **public key** during onboarding.
**Requirements:**
* At least 2048 bits
* PEM format
You can use the following code sample to generate the public key and private key.
{% code title="Example in Python" overflow="wrap" lineNumbers="true" %}
```python
from cryptography.hazmat.primitives.asymmetric import rsa
from cryptography.hazmat.primitives import serialization
# Generate 2048-bit private key
private_key = rsa.generate_private_key(public_exponent=65537, key_size=2048)
# Serialize keys to PEM
pem_private = private_key.private_bytes(
encoding=serialization.Encoding.PEM,
format=serialization.PrivateFormat.TraditionalOpenSSL,
encryption_algorithm=serialization.NoEncryption()
)
pem_public = private_key.public_key().public_bytes(
encoding=serialization.Encoding.PEM,
format=serialization.PublicFormat.SubjectPublicKeyInfo
)
```
{% endcode %}
{% endstep %}
{% step %}
#### Create merchant signature and nonce
Every API request must be signed. To set up the signature:
1. **Generate a nonce.** Nonce is a secure random string, at least 16 characters long.
`# Example in Python def generate_nonce(): return str(uuid.uuid4())`
2. **Build canonical string** using the rules:
1. The request’s signature is calculated over this **exact** concatenation (no delimiters):
`METHOD + PATH + NONCE + QUERY + BODY`
3. **Sign** with your merchant’s private key using **RSA-SHA256**.
4. **Base64-encode** the signature.
5. **Send** it in the `X-API-Signature` header
{% code title="Example Python " overflow="wrap" lineNumbers="true" %}
```python
def generate_auth_headers(method, path, query_string, body, api_signing_secret):
# 1. Generate unique nonce (UUID4 string)
nonce = str(uuid.uuid4())
# 2. Build the canonical signing data
signing_data = method + path + nonce + query_string + (body or "")
# 3. Create the HMAC-SHA256 signature
signature = hmac.new(
key=api_signing_secret.encode("utf-8"),
msg=signing_data.encode("utf-8"),
digestmod=hashlib.sha256
).hexdigest()
# 4. Return headers
return {
"X-API-Nonce": nonce,
"X-API-Signature": signature
}
# Example usage
headers = generate_auth_headers(
method="POST",
path="/v1/payments",
query_string="order_id=123",
body='{"amount":100,"currency":"USD"}',
api_signing_secret="my_secret_key"
)
```
{% endcode %}
{% endstep %}
{% step %}
#### **Prepare the full content of the request with your information**.
You'll be calling the Merchant Console API[ Get a list of available currencies](/api-reference/merchant-console-api/get-a-list-of-available-currencies) endpoint.
**Request**
{% code overflow="wrap" lineNumbers="true" %}
```bash
curl --location 'https://gateway.stage.pay.io/v1/merchant/currencies' \
--header 'Content-Type: application/json' \
--header 'X-API-Key: YOUR_API_KEY' \
--header 'X-API-Nonce: YOUR_UUID_NONCE' \
--header 'X-API-Signature: SIGNATURE'
```
{% endcode %}
**Response (example)**
{% code overflow="wrap" lineNumbers="true" %}
```json
{
"currencies": [
{
"id": "1270e0a2-593b-5272-8c0e-90ba5552d921",
"name": "SOL",
"currency_code": "SOL",
"symbol": "◎",
"network": "Solana",
"currency_icon": "https://cdn.hub88.io/hub-wallet/SOL-ic.svg"
},
{
"id": "990cd2f7-b169-5665-b0e1-05cc46ae4209",
"name": "USDC",
"currency_code": "USDC",
"symbol": "$",
"network": "Base Chain"
}
]
}
```
{% endcode %}
Always include a request body in `POST`, `PUT`, or `PATCH` requests.
{% endstep %}
{% endstepper %}
***
### Next steps for Pay.io APIs
Once you have your supported currencies, you can:
* Request a **deposit address** for a user ([`POST /v1/user/deposit/address`](/api-reference/user-payment-api/create-a-deposit-address))
* Initiate a **withdrawal** ([`POST /v1/user/withdraw`](/api-reference/user-payment-api/create-a-user-withdrawal))
* Fetch **transactions** for a user ([`POST /v1/user/transactions`](/api-reference/user-payment-api/get-a-list-of-user-transactions)) or across your merchant ([`POST /v1/merchant/transactions`)](/api-reference/merchant-console-api/get-a-list-of-merchant-transactions)
See the [Authorisation](/api-reference/core-concepts/authorisation) for details on how to sign and authenticate your requests.
# Request Structure
### Request URL structure
Pay.io APIs use a straightforward URL naming convention, consisting of two parts, a **base URL** and **endpoint path**.
#### Base URL for API requests in staging environment
https://gateway.stage.pay.io/
**Request structure example**
Structure
```
https://{base-url}/{endpoint-path}
```
Example full request URL for staging environment
```
https://gateway.stage.pay.io/v1/merchant/currencies
```
***
### Required Headers
* `X-API-Key`: Your unique API key obtained from your account settings in Merchant Console or provided by support team.
* `X-API-Nonce`: A unique identifier (UUID) for each request to prevent replay attacks. See [Creating a Merchant Signature (nonce)](/api-reference/core-concepts/authorisation#creating-a-merchant-signature) guide for more.
* `X-API-Signature`: Signature generated using **RSA-SHA256**. See more in [Authorisation](/api-reference/core-concepts/authorisation#creating-a-public-and-private-key) guide.
# Authorisation
## Authorisation
All Pay.io API requests must be authenticated with three headers:
| Header | Description |
| ----------------- | ------------------------------------------------------ |
| `X-API-Key` | Your unique merchant API key from Merchant Console. |
| `X-API-Nonce` | Unique identifier (UUID) per request. |
| `X-API-Signature` | RSA-SHA256 signature generated using your private key. |
***
### Creating a Public and Private Key
Merchants must provide Pay.io with a public key during onboarding.
Requirements:
* At least 2048 bits
* PEM format
You can use the following code sample to generate the public key and private key.
```python
from cryptography.hazmat.primitives.asymmetric import rsa
from cryptography.hazmat.primitives import serialization
# Generate 2048-bit private key
private_key = rsa.generate_private_key(public_exponent=65537, key_size=2048)
# Serialize keys to PEM
pem_private = private_key.private_bytes(
encoding=serialization.Encoding.PEM,
format=serialization.PrivateFormat.TraditionalOpenSSL,
encryption_algorithm=serialization.NoEncryption()
)
pem_public = private_key.public_key().public_bytes(
encoding=serialization.Encoding.PEM,
format=serialization.PublicFormat.SubjectPublicKeyInfo
)
```
***
### Creating a Merchant Signature
Every API request must be signed with your merchant's RSA private key. Pay.io verifies the signature using the public key you provided during onboarding. This is an asymmetric scheme — there is no shared secret.
Steps:
{% stepper %}
{% step %}
Generate a nonce - a secure random string of at least 16 characters. A UUID4 works well.
{% endstep %}
{% step %}
Normalize the body - strip all whitespace from the request body before signing. The server silently normalizes the body the same way, so signing pretty-printed JSON without stripping whitespace will fail signature verification.
{% endstep %}
{% step %}
Build the canonical string using the rule below (no delimiters): `METHOD + PATH + NONCE + QUERY + BODY`
{% endstep %}
{% step %}
Sign the canonical string with your merchant's private key using RSA-SHA256 (PKCS#1 v1.5).
{% endstep %}
{% step %}
Base64-encode the signature (standard Base64, not URL-safe).
{% endstep %}
{% step %}
Send the request with all three headers: `X-API-Key`, `X-API-Nonce`, and `X-API-Signature`.
{% endstep %}
{% endstepper %}
**Example in Python:**
```python
import uuid
import re
import base64
import json
from cryptography.hazmat.primitives import hashes, serialization
from cryptography.hazmat.primitives.asymmetric import padding
def generate_auth_headers(method, path, query_string, body, api_key, private_key_pem):
# Load the merchant's RSA private key from PEM
private_key = serialization.load_pem_private_key(
private_key_pem.encode("utf-8") if isinstance(private_key_pem, str) else private_key_pem,
password=None,
)
# Generate a unique nonce per request (UUID4, >= 16 chars)
nonce = str(uuid.uuid4())
# Strip all whitespace from the body to match server-side normalization
normalized_body = re.sub(r"\s", "", body or "")
# Build the canonical signing string: METHOD + PATH + NONCE + QUERY + BODY
signing_data = f"{method.upper()}{path}{nonce}{query_string or ''}{normalized_body}"
# Sign with RSA-SHA256 (PKCS#1 v1.5)
signature = private_key.sign(
signing_data.encode("utf-8"),
padding.PKCS1v15(),
hashes.SHA256(),
)
# Base64-encode the signature (standard, not URL-safe)
signature_b64 = base64.b64encode(signature).decode("ascii")
# Return the three required headers
return {
"X-API-Key": api_key,
"X-API-Nonce": nonce,
"X-API-Signature": signature_b64,
}
# Example usage
headers = generate_auth_headers(
method="POST",
path="/v1/user/withdraw",
query_string="",
body=json.dumps({
"amount": "100.50",
"currency_id": "c872e749-...",
"user_reference_id": "hub_player_2",
}),
api_key="YOUR_API_KEY",
private_key_pem=open("merchant_private_key.pem", "rb").read(),
)
```
***
### Example Authenticated Request
```bash
curl --location 'https://gateway.stage.pay.io/v1/user/withdraw' \
--header 'X-API-Key: YOUR_API_KEY' \
--header 'X-API-Nonce: 123e4567-e89b-12d3-a456-426614174000' \
--header 'X-API-Signature: BASE64_SIGNATURE' \
--data '{
"amount":"100.50",
"currency_id":"c872e749-fd56-533e-b01f-de87ae38e7f1",
"wallet_address":"0x123...",
"user_reference_id":"hub_player_2"
}'
```
***
### Error Codes
**`missing signature`** — Status 401
```json
{ "message": "missing signature" }
```
**`missing api key`** — Status 401
```json
{ "message": "missing api key" }
```
**`invalid api key`** — Status 401
```json
{ "message": "invalid api key" }
```
**`nonce too short`** — Status 400
```json
{ "message": "nonce too short" }
```
**`nonce already used`** — Status 401
```json
{ "message": "invalid request signature" }
```
**`invalid nonce`** — Status 400
```json
{ "message": "invalid nonce" }
```
**`missing nonce`** — Status 401
```json
{ "message": "missing nonce" }
```
**`timestamp expired`** — Status 401
```json
{ "message": "timestamp expired" }
```
**`multiple nonces`** — Status 401
```json
{ "message": "multiple nonces" }
```
# Pagination
In Pay.io APIs pagination functionality is provided with **cursor pagination**.
Cursor pagination is a method of paginating through large result sets using **encoded cursors** rather than page numbers. It is more efficient than traditional offset-based pagination, particularly for datasets that are frequently updated or high in volume.
***
### Request Format
The following fields are supported in the **request body:**
| Field | Type | Description |
| -------- | ------------------ | -------------------------------------------------------- |
| `after` | string (optional) | The Cursor to paginate after (for forward pagination). |
| `before` | string (optional) | The Cursor to paginate before (for backward pagination). |
| `first` | integer (optional) | Number of transactions to return. |
| `last` | integer (optional) | Return the last N transactions (backward pagination). |
#### Example Request
Asking to return the first 10 transactions, after the fifth and before the 20th transaction.
{% code overflow="wrap" lineNumbers="true" %}
```json
{
"after": "5",
"before": "20",
"first": 10
}
```
{% endcode %}
***
### Response Format
The response is given in a `page_info` object, containing the following parameters:
| Field | Type | Description |
| ------------------- | ----------------- | --------------------------------------------- |
| `end_cursor` | string | The cursor for the last item in the page. |
| `has_next_page` | boolean, required | Indicator, if more results are available. |
| `has_previous_page` | boolean, required | Indicator, if previous results are available. |
| `start_cursor` | string | The cursor for the first item on this page. |
Use `next_cursor` or `previous_cursor` in subsequent requests to navigate through the dataset.
**Example response structure**
{% code lineNumbers="true" %}
```json
"page_info": {
"end_cursor": "dxM1QxNDowODoxNXwyMWFmYTc3OS1kMmYzLTQ1NGYtYTI3ZS0xOGUyM2MzZWQzMDA=",
"has_next_page": false,
"has_previous_page": false,
"start_cursor": "dHJhbmY1MTFkYi00YWRlLTQwMWQtYTQ5YS1iMDhlOTJiOWYyM2Y="
},
"total_count": 4,
```
{% endcode %}
***
# Event Notifications and Webhooks
The Pay.io Payment Gateway provides real-time event notifications, so merchants can stay up to date with deposits, withdrawals, and onramp purchases as they happen.
You can consume these events through Webhooks, the gateway pushes event notifications to your HTTP endpoint.
***
### Event Types for Webhooks
The gateway sends notifications for the following transaction events:
#### Deposit Events
* Processing Event - The deposit has been detected on the blockchain and is being processed.
* Confirmation Event - The blockchain has confirmed the transaction, funds are now available in the wallet.
#### Withdrawal Events
* Successful Event - The withdrawal was completed successfully, confirms that funds have been transferred.
#### Onramp Events
When a user buys crypto with fiat through an onramp session (created via [`POST /v1/user/payments`](/api-reference/user-payment-api/create-a-payment-session)), the purchase moves through several stages — the provider accepting the session, the card payment, and the on-chain delivery of funds. The gateway sends a User Onramp event at every stage, so you can show the user live purchase status and credit funds the moment they settle, without polling.
* **Pending Event** - The provider has picked up the session, awaiting the user's payment.
* **Processing Event** - The payment was accepted, and the crypto transfer is in progress.
* **Succeeded Event** - The crypto has been delivered to the destination wallet.
* **Failed Event** - The transaction failed and no funds moved.
{% hint style="info" %}
**One session, multiple callbacks.**
Deposit and withdrawal events are self-contained, but an onramp session emits a callback for each status change: pending → processing → succeeded (or failed).
Group them by **`transaction_uuid`**, and use **`correlation_key`** to match callbacks to the session you created via [POST /v1/user/payments](/api-reference/user-payment-api/create-a-payment-session).
{% endhint %}
***
### Webhook Integration
#### Setup Requirements
1. Webhook URL - Update the URL, which Payment Gateway will call in the Merchant Portal.
2. IP Whitelisting - Contact support for the list of IPs to allow.
3. Public Key - Obtain your Pay.io public key from the Merchant Console.
4. Secure Storage - Store the key securely in your application configuration.
5. Signature Verification - Implement verification on all incoming requests.
#### Webhook Security Verification
Each webhook request includes headers you must validate. Verification is identical for all event types — deposit, withdrawal, and onramp callbacks are all signed the same way.
| Header | Description |
| ----------- | -------------------------------------- |
| X-Signature | Base64-encoded request signature |
| X-Timestamp | UNIX timestamp when the event was sent |
| X-Algorithm | Signing algorithm, always RSA-SHA256 |
**Verification steps**
1. Extract the raw JSON request payload.
2. Read X-Signature, X-Timestamp, and X-Algorithm headers.
```
signature = request.headers.get('X-Signature')
timestamp = request.headers.get('X-Timestamp')
algorithm = request.headers.get('X-Algorithm')
```
3. Build a string to verify:
```
string_to_verify = json_payload + timestamp
```
4. Decode the Base64 signature.
5. Verify with RSA-SHA256 using the stored Pay.io public key.
**Example: Verification in Elixir**
```elixir
def verify_signature(json_payload, signature, public_key_pem, timestamp) do
case parse_public_key(public_key_pem) do
{:ok, public_key} ->
string_to_verify = json_payload <> to_string(timestamp)
signature_bytes = Base.decode64!(signature)
case :public_key.verify(string_to_verify, :sha256, signature_bytes, public_key) do
true -> {:ok, :verified}
false -> {:error, :signature_invalid}
end
{:error, reason} ->
{:error, reason}
end
end
```
***
### Event Structure
Each event payload includes:
* `event` - Type of event (User Deposit, User Payout, User Onramp).
* `transaction` - Full transaction details.
* `transaction_uuid` - Unique transaction ID for reconciliation.
* `user_reference` - Your internal user ID.
* `merchant_reference` - Reference configured during transaction creation (deposit and withdrawal events).
* `correlation_key` / `session_reference` - Session identifiers for matching onramp callbacks to the session you created (onramp events).
Because an onramp purchase starts on the fiat side and settles on the crypto side, its transaction object differs from deposit and withdrawal payloads:
| | User Deposit / User Payout | User Onramp |
| --------------------------------------- | --------------------------------------------------------- | ---------------------------------------------------------------------------------------------------------------------------------------------- |
| `currency` block | Nested object with `id`, `symbol`, `token_address`, icons | Not present |
| `to_currency` block | Not present | `{code, name, network}` |
| `from_amount` / `from_currency` | Not present | Present (fiat side of the purchase) |
| `to_address` | Present | Not present (destination is stored server-side) |
| `tx_hash` | Present |
Present, populated only on succeeded (null on pending / processing / failed )
|
| `merchant_reference` | Present | Not present |
| `correlation_key` / `session_reference` | Not present | Present |
| Multiple callbacks per session | No (single event) | Yes, one per status change |
**Example: Deposit Processing**
```json
{
"event": "User Deposit",
"transaction": {
"id": "43dae597-f283-4631-8e73-1e40ecfaedfa",
"status": "processing",
"date": "2025-08-27T14:51:53Z",
"currency": {
"id": "c872e749-fd56-533e-b01f-de87ae38e7f1",
"name": "USD Coin",
"symbol": "$",
"network": "Base Chain",
"token_address": "0x833589fCD6eDb6E08f4c7C32D4f71b54bdA02913",
"currency_icon": "https://cdn.hub88.io/hub-wallet/USDC-ic.svg",
"network_icon": "https://cdn.hub88.io/hub-wallet/BASE-ic.svg",
"currency_code": "USDC"
},
"amount": 2.35,
"provider_transaction_id": "pay_31sINaTdZeCYWCLobzX16X6QGFm",
"to_address": "0x6d0e5b532ba0857ca391ee2d11b02c596fcded3c",
"from_address": "0xabf7920042335cb1fd9e7c688f99822a1d879445",
"tx_hash": "0xcd8fba9d72c3e25d55f7f63d58fffbc3411692df611e480c6975adfb2d8938cd",
"transaction_type": "Deposit",
"amount_usd": 2.35
},
"transaction_uuid": "43dae597-f283-4631-8e73-1e40ecfaedfa",
"user_reference": "Jon14",
"merchant_reference": "1_hubwallet-demo_6gmma63qfxdag",
"payment_method": "Deposit"
}
```
**Example: Deposit Confirmation**
```json
{
"event": "User Deposit",
"transaction": {
"id": "43dae597-f283-4631-8e73-1e40ecfaedfa",
"status": "succeeded",
"date": "2025-08-27T14:53:59Z",
"currency": {
"id": "c872e749-fd56-533e-b01f-de87ae38e7f1",
"name": "USD Coin",
"symbol": "$",
"network": "Base Chain",
"token_address": "0x833589fCD6eDb6E08f4c7C32D4f71b54bdA02913",
"currency_icon": "https://cdn.hub88.io/hub-wallet/USDC-ic.svg",
"network_icon": "https://cdn.hub88.io/hub-wallet/BASE-ic.svg",
"currency_code": "USDC"
},
"amount": 2.35,
"provider_transaction_id": "pay_31sINaTdZeCYWCLobzX16X6QGFm",
"to_address": "0x6d0e5b532ba0857ca391ee2d11b02c596fcded3c",
"from_address": "0xabf7920042335cb1fd9e7c688f99822a1d879445",
"tx_hash": "0xcd8fba9d72c3e25d55f7f63d58fffbc3411692df611e480c6975adfb2d8938cd",
"transaction_type": "Deposit",
"amount_usd": 2.35
},
"transaction_uuid": "43dae597-f283-4631-8e73-1e40ecfaedfa",
"user_reference": "Jon14",
"merchant_reference": "1_hubwallet-demo_6gmma63qfxdag",
"payment_method": "Deposit"
}
```
**Example: Withdrawal Successful**
```json
{
"event": "User Payout",
"transaction": {
"id": "492bcb88-149e-4d18-bfd4-2d2c2b29e87d",
"status": "succeeded",
"date": "2025-08-27T15:04:28Z",
"currency": {
"id": "c872e749-fd56-533e-b01f-de87ae38e7f1",
"name": "USD Coin",
"symbol": "$",
"network": "Base Chain",
"token_address": "0x833589fCD6eDb6E08f4c7C32D4f71b54bdA02913",
"currency_icon": "https://cdn.hub88.io/hub-wallet/USDC-ic.svg",
"network_icon": "https://cdn.hub88.io/hub-wallet/BASE-ic.svg",
"currency_code": "USDC"
},
"amount": 2.0,
"provider_transaction_id": "pay_31sJg9321pd5yAWKOhVAIffWqVX",
"to_address": "0xabf7920042335cB1FD9e7C688F99822a1D879445",
"from_address": "0x09b8c5b24bcdd91af5a7d32f6a4ae9fa4183d4f4",
"tx_hash": "0x76088442e6ce9524ead531be4296a379cf772dc96cddc9cbb9b2b01d5f0be7fa",
"transaction_type": "Payout",
"amount_usd": 1.9804985390232988
},
"transaction_uuid": "492bcb88-149e-4d18-bfd4-2d2c2b29e87d",
"user_reference": "Jon14",
"merchant_reference": "1_hubwallet-demo_6gmma63qfxdag",
"payment_method": "Payout"
}
```
**Example: Onramp Pending**
The provider has picked up the session. `provider_transaction_id` and `payment_method` are still `null` at this stage — they populate once the user completes their payment.
```json
{
"event": "User Onramp",
"transaction_uuid": "d234aeb2-18c7-42d4-a441-01e028f45195",
"correlation_key": "f47ac10b-58cc-4372-a567-0e02b2c3d479:order_9981",
"session_reference": "order_9981",
"user_reference": "player_42",
"payment_method": null,
"transaction": {
"id": "d234aeb2-18c7-42d4-a441-01e028f45195",
"provider_transaction_id": null,
"transaction_type": "onramp",
"tx_hash": null,
"date": "2026-06-26T14:17:01Z",
"status": "pending",
"to_amount": null,
"to_currency": {
"code": "USDC",
"name": "USD Coin",
"network": "Base Chain"
},
"from_amount": null,
"from_currency": null
}
}
```
**Example: Onramp Processing**
The user has paid, and the crypto transfer is in progress. The fiat side (`from_amount`, `from_currency`) is now populated; `to_amount` stays `null` until the funds settle.
```json
{
"event": "User Onramp",
"transaction_uuid": "d234aeb2-18c7-42d4-a441-01e028f45195",
"correlation_key": "f47ac10b-58cc-4372-a567-0e02b2c3d479:order_9981",
"session_reference": "order_9981",
"user_reference": "player_42",
"payment_method": "CREDIT_DEBIT_CARD",
"transaction": {
"id": "d234aeb2-18c7-42d4-a441-01e028f45195",
"provider_transaction_id": "WmYukCEa2AyP5T25s9DHn2",
"tx_hash": null,
"transaction_type": "onramp",
"date": "2026-06-26T14:18:22Z",
"status": "processing",
"to_amount": null,
"to_currency": {
"code": "USDC",
"name": "USD Coin",
"network": "Base Chain"
},
"from_amount": 250.0,
"from_currency": "EUR"
}
}
```
**Example: Onramp Succeeded**
The crypto has been delivered to the destination wallet. `to_amount` now shows the final settled amount, as this is the event to act on when crediting the user.
```json
{
"event": "User Onramp",
"transaction_uuid": "d234aeb2-18c7-42d4-a441-01e028f45195",
"correlation_key": "f47ac10b-58cc-4372-a567-0e02b2c3d479:order_9981",
"session_reference": "order_9981",
"user_reference": "player_42",
"payment_method": "CREDIT_DEBIT_CARD",
"transaction": {
"id": "d234aeb2-18c7-42d4-a441-01e028f45195",
"provider_transaction_id": "WmYukCEa2AyP5T25s9DHn2",
"tx_hash":
"0x9c1583bacf1ec0a76ea9754e562abb008b80fa0ebd75f735e7f2674e866393ff",
"transaction_type": "onramp",
"date": "2026-06-26T14:19:43Z",
"status": "succeeded",
"to_amount": 271.53,
"to_currency": {
"code": "USDC",
"name": "USD Coin",
"network": "Base Chain"
},
"from_amount": 250.0,
"from_currency": "EUR"
}
}
```
**Example: Onramp Failed**
The transaction failed and no funds moved. No action is needed on your side beyond updating the user's purchase status.
```json
{
"event": "User Onramp",
"transaction_uuid": "d234aeb2-18c7-42d4-a441-01e028f45195",
"correlation_key": "f47ac10b-58cc-4372-a567-0e02b2c3d479:order_9981",
"session_reference": "order_9981",
"user_reference": "player_42",
"payment_method": "CREDIT_DEBIT_CARD",
"transaction": {
"id": "d234aeb2-18c7-42d4-a441-01e028f45195",
"provider_transaction_id": "WmYukCEa2AyP5T25s9DHn2",
"tx_hash": null,
"transaction_type": "onramp",
"date": "2026-06-26T14:19:43Z",
"status": "failed",
"to_amount": null,
"to_currency": {
"code": "USDC",
"name": "USD Coin",
"network": "Base Chain"
},
"from_amount": 250.0,
"from_currency": "EUR"
}
}
```
**Onramp Field Reference**
| Field | Type | Description |
| ------------------------------------- | ----------------- | ------------------------------------------------------------------------------------------------------------------------------------------------------------------------------------------------------------ |
| `event` | string | Always `"User Onramp"` |
| `transaction_uuid` | string (UUID) | Internal session ID |
| `correlation_key` | string | `{merchant_id}:{session_reference}` — matches the value returned from `POST /v1/user/payments` |
| `session_reference` | string \| null | Your own ID for the session, if you supplied it at creation |
| `user_reference` | string \| null | Player ID, if you supplied it at creation |
| `payment_method` | string \| null | e.g. `"CREDIT_DEBIT_CARD"`. Null on the first `pending` event |
| `transaction.status` | string | `pending` \| `processing` \| `succeeded` \| `failed` |
| `transaction.transaction_type` | string | Always `"onramp"` |
| `transaction.to_amount` | number \| null | Crypto amount received; null until settled |
| `transaction.to_currency` | object | `{code, name, network}` |
| `transaction.from_amount` | number \| null | Fiat amount paid; populated from `processing` onwards |
| `transaction.from_currency` | string \| null | Fiat currency code, e.g. `"EUR"` |
| `transaction.provider_transaction_id` | string \| null | Provider's ID; null on the first `pending` event |
| `transaction.tx_hash` | string \| null |
On-chain transaction hash of the crypto delivery.
Null until the transfer settles (null on pending / processing / failed events), and is only populated on succeeded event.
|
| `transaction.date` | string (ISO 8601) | Timestamp of this status change |
# Webhook Retry Policy
When Pay.io delivers a webhook to your configured endpoint, it expects a **`2xx` response** within **5 seconds**. If no valid response is received within that window, the delivery is considered failed and Pay.io will **automatically** **attempt** **redelivery** according to the [retry schedule below](#automatic-retries).
### Delivery Lifecycle
Every webhook delivery follows the same progression from initial attempt through to escalation:
{% stepper %}
{% step %}
#### Initial delivery
`POST` sent instantly to your configured endpoint. A `2xx` response is expected within 5 seconds.
{% endstep %}
{% step %}
#### Automatic retries (if initial delivery fails)
Up to 50 attempts
Linear back off kicks in when the initial delivery fails. Each attempt waits longer before retrying. See the [table of attempts and delays below](#automatic-retries).
{% endstep %}
{% step %}
#### Manual retries (if webhook status is `CALLBACK_FAILED`)
Up to 3 merchant-initiated attempts via the Merchant Console. When status is `CALLBACK_FAILED`, the Merchant can re-trigger delivery from the Merchant Console at any time. Tracked independently of automatic retries.
Available for Deposits and Payouts.
{% endstep %}
{% step %}
#### Support escalation
If all automatic and manual attempts exhausted. Contact Pay.io support to manually re-trigger delivery.
{% endstep %}
{% endstepper %}
### Automatic Retries
Failed webhook deliveries are retried automatically using a **linear backoff** strategy. The delay between each attempt is calculated as:
```
delay = attempt number × 10 minutes
```
| Attempt | Delay After Previous Failure |
| ------- | ---------------------------- |
| 1 | 10 minutes |
| 2 | 20 minutes |
| 3 | 30 minutes |
| 4 | 40 minutes |
| … | … |
| 50 | 500 minutes (\~8.3 hours) |
A maximum of **50 retry attempts** are made. Once all attempts are exhausted, the webhook is marked as **permanently failed** and no further automatic deliveries will be attempted.
### Manual Retries
In addition to automatic retries, merchants can manually re-trigger webhook delivery from the **Merchant Console** at **any time** whilst the callback status is `CALLBACK_FAILED`.
#### **Manual retry rules**
* Manual retries are available for both **Deposits** and **Payouts** with a status of `CALLBACK_FAILED`.
* A maximum of **3 manual retry attempts** are permitted **per transaction**.
* Manual retries are tracked independently of automatic retries — exhausting automatic attempts does not consume your manual retry allowance, and vice versa.
* Once all 3 manual retry attempts have been used, contact Pay.io support to request further assistance with redelivery.
***
### Best Practices
**Respond immediately, process asynchronously**
Your endpoint should return a `2xx` status code as soon as the webhook payload is received — even if you have not yet finished processing it. Queue the payload for processing in the background. Delaying your response to complete processing first risks exceeding the 5-second response window and triggering the retry cycle unnecessarily.
**Set up internal alerts for early-stage failures**
Automatic retries are designed to handle transient endpoint issues. However, as the attempt number increases, so does the delay before the next retry — reaching over 8 hours by attempt 50. Waiting for the automatic retry schedule to resolve a failure is rarely the right approach for time-sensitive transactions such as deposits or withdrawal confirmations.
{% hint style="success" %}
**We strongly recommend** configuring your own internal monitoring to alert your team when a webhook enters `CALLBACK_FAILED` status. This allows you to assess and resolve the underlying issue promptly, and to use your **manual retry allowance** to redeliver the webhook as soon as your endpoint is healthy — rather than waiting hours for the next automatic attempt.
{% endhint %}
A practical alerting threshold to consider:
| Automatic Attempt Reached | Cumulative Delay | Recommended Action |
| ------------------------- | ------------------------- | ----------------------------------------------- |
| 3 | \~60 minutes | Investigate endpoint health |
| 5 | \~150 minutes | Trigger internal alert to your engineering team |
| 10 | \~550 minutes (\~9 hours) | Escalate and initiate manual retry immediately |
**Use manual retries before automatic attempts are exhausted**
Your 3 manual retry attempts are a valuable tool for recovering from delivery failures quickly — particularly when the automatic retry schedule has reached a long delay window. Do not wait until automatic retries are fully exhausted before intervening. If your endpoint is healthy and a webhook has been waiting for hours, trigger a manual retry from the Merchant Console to resolve the delivery immediately.
{% hint style="info" %}
Manual and automatic retry attempts are tracked independently. However, once both are exhausted for a given transaction, Pay.io will not attempt further automatic redelivery. If you reach this state, contact Pay.io support as soon as possible.
{% endhint %}
**Ensure your endpoint is idempotent**
Because the same webhook event may be delivered more than once — across both automatic and manual retry attempts — **your endpoint must be built to handle duplicate deliveries safely**. Use the **transaction ID** included in the webhook payload as an idempotency key to ensure that processing the same event multiple times does not result in duplicate operations on your platform.
# Get a List of Available Currencies
## Get the enabled currencies set by the merchant
> This API endpoint retrieves a list of all enabled cryptocurrencies and tokens for the merchant. The response includes detailed information about each supported currency, including network details, token addresses, and visual assets for UI display.
```json
{"openapi":"3.0.0","info":{"title":"pay.io payment gateway","version":"1.0"},"servers":[{"url":"https://gateway.stage.pay.io","variables":{}}],"paths":{"/v1/merchant/currencies":{"get":{"callbacks":{},"description":"This API endpoint retrieves a list of all enabled cryptocurrencies and tokens for the merchant. The response includes detailed information about each supported currency, including network details, token addresses, and visual assets for UI display.","operationId":"HubwalletPaymentGatewayWeb.Controller.Merchant.Default.supported_currencies","parameters":[],"responses":{"200":{"content":{"application/json":{"schema":{"$ref":"#/components/schemas/Supported_Currencies_Response"}}},"description":"List of supported tokens"},"401":{"content":{"application/json":{"schema":{"$ref":"#/components/schemas/Error_Response"}}},"description":"Unauthorized"}},"summary":"Get the enabled currencies set by the merchant","tags":["merchant"]}}},"components":{"schemas":{"Supported_Currencies_Response":{"description":"List of supported currencies/tokens","properties":{"currencies":{"items":{"properties":{"currency_code":{"description":"Currency code","type":"string"},"currency_icon":{"description":"Currency icon URL","type":"string"},"id":{"description":"Currency ID","format":"uuid","type":"string"},"name":{"description":"Currency name","type":"string"},"network":{"description":"Blockchain network","type":"string"},"network_icon":{"description":"Network icon URL","type":"string"},"network_l1":{"description":"L1 Network name","nullable":true,"type":"string"},"symbol":{"description":"Currency symbol","type":"string"},"token_address":{"description":"Token contract address","nullable":true,"type":"string"}},"required":["id","name","symbol","network","currency_code","currency_icon","network_icon"],"type":"object"},"type":"array"}},"required":["currencies"],"title":"Supported_Currencies_Response","type":"object"},"Error_Response":{"description":"Error response format","properties":{"error":{"description":"Error flag, always true","type":"boolean"},"message":{"description":"Error message describing what went wrong","type":"string"},"request_id":{"description":"Request correlation ID for tracking and debugging","type":"string"},"status":{"description":"Transaction status when a transaction was created before the error (e.g. `\"failed\"` for a withdrawal that was submitted but failed)","nullable":true,"type":"string"},"transaction_uuid":{"description":"Database transaction UUID (only present when a transaction exists)","format":"uuid","nullable":true,"type":"string"}},"required":["error","message","request_id"],"title":"Error_Response","type":"object"}}}}
```
# Get a List of Merchant Transactions
## List all user transactions of merchant
> This API endpoint retrieves a paginated list of all user transactions for merchant. It supports filtering by transaction types, time ranges, and provides cursor-based pagination for efficient data retrieval. The response includes detailed transaction information along with currency metadata and pagination controls.
```json
{"openapi":"3.0.0","info":{"title":"pay.io payment gateway","version":"1.0"},"servers":[{"url":"https://gateway.stage.pay.io","variables":{}}],"paths":{"/v1/merchant/transactions":{"post":{"callbacks":{},"description":"This API endpoint retrieves a paginated list of all user transactions for merchant. It supports filtering by transaction types, time ranges, and provides cursor-based pagination for efficient data retrieval. The response includes detailed transaction information along with currency metadata and pagination controls.","operationId":"HubwalletPaymentGatewayWeb.Controller.Merchant.Default.list_user_merchant_transactions","parameters":[],"requestBody":{"content":{"application/json":{"schema":{"$ref":"#/components/schemas/List_User_Merchant_Transactions_Request"}}},"description":"Transaction list parameters","required":true},"responses":{"200":{"content":{"application/json":{"schema":{"$ref":"#/components/schemas/List_Transactions_Response"}}},"description":"List of user transactions"},"401":{"content":{"application/json":{"schema":{"$ref":"#/components/schemas/Error_Response"}}},"description":"Unauthorized"}},"summary":"List all user transactions of merchant","tags":["merchant"]}}},"components":{"schemas":{"List_User_Merchant_Transactions_Request":{"description":"Request to list transactions","properties":{"after":{"description":"Cursor to paginate after (for forward pagination)","type":"string"},"before":{"description":"Cursor to paginate before (for backward pagination)","type":"string"},"first":{"description":"Number of transactions to return","type":"integer"},"last":{"description":"Return the last N transactions (backward pagination)","type":"integer"},"time_range":{"description":"Time range filter - today, yesterday, this_week, this_month, last_month, last_24hrs","format":"date","type":"string"},"transaction_types":{"description":"Filter by transaction Type Deposit or Payout","items":{"enum":["Deposit","Payout"],"type":"string"},"type":"array"},"user_reference_id":{"description":"User reference identifier","type":"string"}},"required":["user_reference_id"],"title":"List_User_Merchant_Transactions_Request","type":"object"},"List_Transactions_Response":{"description":"Response containing transaction history with edges structure","properties":{"edges":{"items":{"properties":{"cursor":{"description":"Edge cursor for pagination","type":"string"},"inserted_at":{"description":"Edge insertion timestamp (ISO 8601)","format":"date-time","type":"string"},"node":{"properties":{"amount":{"description":"Transaction amount","type":"string"},"amount_usd":{"description":"Transaction amount in USD","nullable":true,"type":"string"},"completed_at":{"description":"Transaction completion timestamp (ISO 8601)","format":"date-time","nullable":true,"type":"string"},"correlation_key":{"description":"Internal tracking identifier","type":"string"},"currency":{"description":"Currency object","properties":{"code":{"description":"Currency code","type":"string"},"currency_icon":{"description":"Currency icon URL","type":"string"},"id":{"description":"Currency ID","format":"uuid","type":"string"},"name":{"description":"Currency name","type":"string"},"network":{"description":"Blockchain network","type":"string"},"network_icon":{"description":"Network icon URL","type":"string"},"symbol":{"description":"Currency symbol","type":"string"},"token_address":{"description":"Token contract address","nullable":true,"type":"string"}},"required":["code","id","name","symbol","network","currency_icon","network_icon"],"type":"object"},"failure_reason":{"description":"Failure reason if transaction failed","nullable":true,"type":"string"},"from_address":{"description":"Source wallet address","nullable":true,"type":"string"},"inserted_at":{"description":"Transaction insertion timestamp (ISO 8601)","format":"date-time","type":"string"},"merchant_status":{"description":"Merchant callback status","type":"string"},"provider_transaction_id":{"description":"Provider transaction identifier","nullable":true,"type":"string"},"provider_wallet_reference":{"description":"Provider wallet reference","nullable":true,"type":"string"},"status":{"description":"Transaction status","enum":["TXN_NEW","TXN_PROVIDER_PROCESSING","TXN_PROVIDER_SUCCEEDED","TXN_PENDING_APPROVAL","TXN_APPROVED","TXN_REJECTED","TXN_PROVIDER_FAILED"],"type":"string"},"to_address":{"description":"Destination wallet address","nullable":true,"type":"string"},"transaction_data":{"additionalProperties":true,"description":"Additional transaction data","type":"object"},"transaction_uuid":{"description":"Transaction UUID","format":"uuid","type":"string"},"trn_provider_ref":{"description":"Transaction provider reference","nullable":true,"type":"string"},"tx_hash":{"description":"Blockchain transaction hash","nullable":true,"type":"string"},"type":{"description":"Type of transaction: Deposit or Payout","enum":["Deposit","Payout"],"type":"string"},"updated_at":{"description":"Transaction update timestamp (ISO 8601)","format":"date-time","type":"string"},"user_ref_id":{"description":"User reference identifier","type":"string"}},"required":["status","type","currency","amount","inserted_at","updated_at","user_ref_id","transaction_uuid","correlation_key","merchant_status","transaction_data"],"type":"object"}},"required":["node","cursor","inserted_at"],"type":"object"},"type":"array"},"page_info":{"description":"Pagination cursor information","properties":{"end_cursor":{"description":"Cursor for the last item in this page","type":"string"},"has_next_page":{"description":"Whether more results are available","type":"boolean"},"has_previous_page":{"description":"Whether previous results are available","type":"boolean"},"start_cursor":{"description":"Cursor for the first item in this page","type":"string"}},"required":["end_cursor","has_next_page","has_previous_page","start_cursor"],"type":"object"},"total_count":{"description":"Total number of transactions","type":"integer"}},"required":["edges","page_info","total_count"],"title":"List_Transactions_Response","type":"object"},"Error_Response":{"description":"Error response format","properties":{"error":{"description":"Error flag, always true","type":"boolean"},"message":{"description":"Error message describing what went wrong","type":"string"},"request_id":{"description":"Request correlation ID for tracking and debugging","type":"string"},"status":{"description":"Transaction status when a transaction was created before the error (e.g. `\"failed\"` for a withdrawal that was submitted but failed)","nullable":true,"type":"string"},"transaction_uuid":{"description":"Database transaction UUID (only present when a transaction exists)","format":"uuid","nullable":true,"type":"string"}},"required":["error","message","request_id"],"title":"Error_Response","type":"object"}}}}
```
# Retry Failed Transaction
## Retry failed transaction
> Retries a previously failed transaction
```json
{"openapi":"3.0.0","info":{"title":"pay.io payment gateway","version":"1.0"},"servers":[{"url":"https://gateway.stage.pay.io","variables":{}}],"paths":{"/v1/merchant/transaction/payout/retry":{"post":{"callbacks":{},"description":"Retries a previously failed transaction","operationId":"HubwalletPaymentGatewayWeb.Controller.Merchant.Default.retry_transaction","parameters":[],"requestBody":{"content":{"application/json":{"schema":{"$ref":"#/components/schemas/Retry_Transaction_Request"}}},"description":"Retry transaction parameters","required":true},"responses":{"200":{"content":{"application/json":{"schema":{"$ref":"#/components/schemas/Retry_Withdraw_Response"}}},"description":"Transaction retried"},"404":{"content":{"application/json":{"schema":{"$ref":"#/components/schemas/Error_Response"}}},"description":"Transaction not found"},"422":{"content":{"application/json":{"schema":{"$ref":"#/components/schemas/Validation_Error_Response"}}},"description":"Validation error - missing required fields or invalid UUID format"}},"summary":"Retry failed transaction","tags":["merchant"]}}},"components":{"schemas":{"Retry_Transaction_Request":{"description":"Request to retry a failed transaction","properties":{"transaction_uuid":{"description":"Transaction identifier","format":"uuid","type":"string"}},"required":["transaction_uuid"],"title":"Retry_Transaction_Request","type":"object"},"Retry_Withdraw_Response":{"description":"Response for retry transaction operations","properties":{"status":{"description":"Status message","nullable":true,"type":"string"}},"required":["status"],"title":"Retry_Withdraw_Response","type":"object"},"Error_Response":{"description":"Error response format","properties":{"error":{"description":"Error flag, always true","type":"boolean"},"message":{"description":"Error message describing what went wrong","type":"string"},"request_id":{"description":"Request correlation ID for tracking and debugging","type":"string"},"status":{"description":"Transaction status when a transaction was created before the error (e.g. `\"failed\"` for a withdrawal that was submitted but failed)","nullable":true,"type":"string"},"transaction_uuid":{"description":"Database transaction UUID (only present when a transaction exists)","format":"uuid","nullable":true,"type":"string"}},"required":["error","message","request_id"],"title":"Error_Response","type":"object"},"Validation_Error_Response":{"description":"Validation error response format","properties":{"error":{"description":"Error message","type":"string"},"errors":{"additionalProperties":{"items":{"type":"string"},"type":"array"},"description":"Field-specific validation errors","type":"object"}},"required":["error","errors"],"title":"Validation_Error_Response","type":"object"}}}}
```
# Refresh API Key
## Refresh API key with grace period
> Refreshes a merchant's API key, generating a new key while keeping the old key valid during a grace period. This allows merchants to rotate their API keys seamlessly without service interruption. Both keys will work during the grace period.
```json
{"openapi":"3.0.0","info":{"title":"pay.io payment gateway","version":"1.0"},"servers":[{"url":"https://gateway.stage.pay.io","variables":{}}],"paths":{"/v1/merchant/api_key/refresh":{"post":{"callbacks":{},"description":"Refreshes a merchant's API key, generating a new key while keeping the old key valid during a grace period. This allows merchants to rotate their API keys seamlessly without service interruption. Both keys will work during the grace period.","operationId":"HubwalletPaymentGatewayWeb.Controller.Merchant.Default.refresh_api_key","parameters":[],"requestBody":{"content":{"application/json":{"schema":{"$ref":"#/components/schemas/Refresh_API_Key_Request"}}},"description":"API key refresh parameters","required":true},"responses":{"200":{"content":{"application/json":{"schema":{"$ref":"#/components/schemas/Refresh_API_Key_Response"}}},"description":"API key refreshed successfully"},"400":{"content":{"application/json":{"schema":{"$ref":"#/components/schemas/Error_Response"}}},"description":"Key already deprecated, expired, or invalid"},"404":{"content":{"application/json":{"schema":{"$ref":"#/components/schemas/Error_Response"}}},"description":"API key not found"},"429":{"content":{"application/json":{"schema":{"$ref":"#/components/schemas/Error_Response"}}},"description":"Rate limit exceeded"},"500":{"content":{"application/json":{"schema":{"$ref":"#/components/schemas/Error_Response"}}},"description":"Unexpected error occurred"}},"summary":"Refresh API key with grace period","tags":["merchant"]}}},"components":{"schemas":{"Refresh_API_Key_Request":{"description":"Request to refresh an existing API key with a grace period","properties":{"api_key":{"description":"The actual API key to refresh","type":"string"},"grace_period_minutes":{"description":"Grace period in minutes during which both old and new API keys are valid (1-60 minutes)","maximum":60,"minimum":1,"nullable":true,"type":"integer"},"name":{"description":"Optional new name for the API key","nullable":true,"type":"string"}},"required":["api_key"],"title":"Refresh_API_Key_Request","type":"object"},"Refresh_API_Key_Response":{"description":"Response for API key refresh operation","properties":{"data":{"properties":{"grace_period":{"properties":{"ends_at":{"description":"ISO8601 timestamp when the grace period ends","format":"date-time","type":"string"},"minutes":{"description":"Duration of the grace period in minutes","type":"integer"}},"required":["minutes","ends_at"],"type":"object"},"message":{"description":"Informational message about the API key refresh","type":"string"},"new_api_key":{"description":"The new API key to use","type":"string"},"new_api_key_hint":{"description":"A hint of the new API key (first and last few characters)","type":"string"},"new_api_key_id":{"description":"The ID of the new API key","type":"string"},"old_api_key_id":{"description":"The ID of the old API key that was replaced","type":"string"}},"required":["new_api_key","new_api_key_id","new_api_key_hint","old_api_key_id","grace_period","message"],"type":"object"},"success":{"description":"Operation success status","type":"boolean"}},"required":["success","data"],"title":"Refresh_API_Key_Response","type":"object"},"Error_Response":{"description":"Error response format","properties":{"error":{"description":"Error flag, always true","type":"boolean"},"message":{"description":"Error message describing what went wrong","type":"string"},"request_id":{"description":"Request correlation ID for tracking and debugging","type":"string"},"status":{"description":"Transaction status when a transaction was created before the error (e.g. `\"failed\"` for a withdrawal that was submitted but failed)","nullable":true,"type":"string"},"transaction_uuid":{"description":"Database transaction UUID (only present when a transaction exists)","format":"uuid","nullable":true,"type":"string"}},"required":["error","message","request_id"],"title":"Error_Response","type":"object"}}}}
```
# Create a Deposit Address
## Get deposit address
> This API endpoint generates or retrieves a unique deposit address for a specific user and currency. The returned address can be used by the user to send funds from personal wallets into the merchant platform.
```json
{"openapi":"3.0.0","info":{"title":"pay.io payment gateway","version":"1.0"},"servers":[{"url":"https://gateway.stage.pay.io","variables":{}}],"paths":{"/v1/user/deposit/address":{"post":{"callbacks":{},"description":"This API endpoint generates or retrieves a unique deposit address for a specific user and currency. The returned address can be used by the user to send funds from personal wallets into the merchant platform.","operationId":"HubwalletPaymentGatewayWeb.Controller.Merchant.Default.deposit","parameters":[],"requestBody":{"content":{"application/json":{"schema":{"$ref":"#/components/schemas/Deposit_Request"}}},"description":"Deposit request parameters","required":true},"responses":{"200":{"content":{"application/json":{"schema":{"$ref":"#/components/schemas/Deposit_Response"}}},"description":"Deposit address generated"},"422":{"content":{"application/json":{"schema":{"$ref":"#/components/schemas/Validation_Error_Response"}}},"description":"Validation error - Invalid currency_id format (must be valid UUID), user_reference_id contains invalid characters (only alphanumeric, hyphens, and underscores allowed), or user_reference_id exceeds 50 character limit"},"500":{"content":{"application/json":{"schema":{"$ref":"#/components/schemas/Error_Response"}}},"description":"Unexpected error occurred"}},"summary":"Get deposit address","tags":["user"]}}},"components":{"schemas":{"Deposit_Request":{"description":"Request to get deposit address","properties":{"currency_id":{"description":"Currency ID, which can be retrieved using supported currencies.","type":"string"},"user_reference_id":{"description":"The unique user reference to identify a user for transaction tracking","type":"string"}},"required":["currency_id","user_reference_id"],"title":"Deposit_Request","type":"object"},"Deposit_Response":{"description":"Response containing deposit address information","properties":{"currency":{"description":"Currency name","type":"string"},"currency_code":{"description":"Currency code","type":"string"},"network":{"description":"Blockchain network","type":"string"},"wallet_address":{"description":"Deposit wallet address","type":"string"}},"required":["network","currency","currency_code","wallet_address"],"title":"Deposit_Response","type":"object"},"Validation_Error_Response":{"description":"Validation error response format","properties":{"error":{"description":"Error message","type":"string"},"errors":{"additionalProperties":{"items":{"type":"string"},"type":"array"},"description":"Field-specific validation errors","type":"object"}},"required":["error","errors"],"title":"Validation_Error_Response","type":"object"},"Error_Response":{"description":"Error response format","properties":{"error":{"description":"Error flag, always true","type":"boolean"},"message":{"description":"Error message describing what went wrong","type":"string"},"request_id":{"description":"Request correlation ID for tracking and debugging","type":"string"},"status":{"description":"Transaction status when a transaction was created before the error (e.g. `\"failed\"` for a withdrawal that was submitted but failed)","nullable":true,"type":"string"},"transaction_uuid":{"description":"Database transaction UUID (only present when a transaction exists)","format":"uuid","nullable":true,"type":"string"}},"required":["error","message","request_id"],"title":"Error_Response","type":"object"}}}}
```
***
# Get a List of User Transactions
## List user transactions
> This API endpoint retrieves a paginated list of transactions for a specific user reference. It supports filtering by transaction types, time ranges, and provides cursor-based pagination for efficient data retrieval. The response includes detailed transaction information along with currency metadata and pagination controls.
```json
{"openapi":"3.0.0","info":{"title":"pay.io payment gateway","version":"1.0"},"servers":[{"url":"https://gateway.stage.pay.io","variables":{}}],"paths":{"/v1/user/transactions":{"post":{"callbacks":{},"description":"This API endpoint retrieves a paginated list of transactions for a specific user reference. It supports filtering by transaction types, time ranges, and provides cursor-based pagination for efficient data retrieval. The response includes detailed transaction information along with currency metadata and pagination controls.","operationId":"HubwalletPaymentGatewayWeb.Controller.Merchant.Default.list_transactions","parameters":[],"requestBody":{"content":{"application/json":{"schema":{"$ref":"#/components/schemas/List_Transactions_Request"}}},"description":"Transaction list parameters","required":true},"responses":{"200":{"content":{"application/json":{"schema":{"$ref":"#/components/schemas/List_Transactions_Response"}}},"description":"Transaction list"},"422":{"content":{"application/json":{"schema":{"$ref":"#/components/schemas/Validation_Error_Response"}}},"description":"Validation error - missing required fields or invalid user_reference_id format (only alphanumeric, hyphens, and underscores allowed)"}},"summary":"List user transactions","tags":["user"]}}},"components":{"schemas":{"List_Transactions_Request":{"description":"Request to list transactions","properties":{"after":{"description":"Cursor to paginate after (for forward pagination)","type":"string"},"before":{"description":"Cursor to paginate before (for backward pagination)","type":"string"},"first":{"description":"Number of transactions to return","type":"integer"},"last":{"description":"Return the last N transactions (backward pagination)","type":"integer"},"time_range":{"description":"Time range filter - today, yesterday, this_week, this_month, last_month, last_24hrs","format":"date","type":"string"},"transaction_types":{"description":"Filter by transaction Type Deposit or Payout","items":{"enum":["Deposit","Payout"],"type":"string"},"type":"array"},"user_reference_id":{"description":"User reference identifier","type":"string"}},"required":["user_reference_id"],"title":"List_Transactions_Request","type":"object"},"List_Transactions_Response":{"description":"Response containing transaction history with edges structure","properties":{"edges":{"items":{"properties":{"cursor":{"description":"Edge cursor for pagination","type":"string"},"inserted_at":{"description":"Edge insertion timestamp (ISO 8601)","format":"date-time","type":"string"},"node":{"properties":{"amount":{"description":"Transaction amount","type":"string"},"amount_usd":{"description":"Transaction amount in USD","nullable":true,"type":"string"},"completed_at":{"description":"Transaction completion timestamp (ISO 8601)","format":"date-time","nullable":true,"type":"string"},"correlation_key":{"description":"Internal tracking identifier","type":"string"},"currency":{"description":"Currency object","properties":{"code":{"description":"Currency code","type":"string"},"currency_icon":{"description":"Currency icon URL","type":"string"},"id":{"description":"Currency ID","format":"uuid","type":"string"},"name":{"description":"Currency name","type":"string"},"network":{"description":"Blockchain network","type":"string"},"network_icon":{"description":"Network icon URL","type":"string"},"symbol":{"description":"Currency symbol","type":"string"},"token_address":{"description":"Token contract address","nullable":true,"type":"string"}},"required":["code","id","name","symbol","network","currency_icon","network_icon"],"type":"object"},"failure_reason":{"description":"Failure reason if transaction failed","nullable":true,"type":"string"},"from_address":{"description":"Source wallet address","nullable":true,"type":"string"},"inserted_at":{"description":"Transaction insertion timestamp (ISO 8601)","format":"date-time","type":"string"},"merchant_status":{"description":"Merchant callback status","type":"string"},"provider_transaction_id":{"description":"Provider transaction identifier","nullable":true,"type":"string"},"provider_wallet_reference":{"description":"Provider wallet reference","nullable":true,"type":"string"},"status":{"description":"Transaction status","enum":["TXN_NEW","TXN_PROVIDER_PROCESSING","TXN_PROVIDER_SUCCEEDED","TXN_PENDING_APPROVAL","TXN_APPROVED","TXN_REJECTED","TXN_PROVIDER_FAILED"],"type":"string"},"to_address":{"description":"Destination wallet address","nullable":true,"type":"string"},"transaction_data":{"additionalProperties":true,"description":"Additional transaction data","type":"object"},"transaction_uuid":{"description":"Transaction UUID","format":"uuid","type":"string"},"trn_provider_ref":{"description":"Transaction provider reference","nullable":true,"type":"string"},"tx_hash":{"description":"Blockchain transaction hash","nullable":true,"type":"string"},"type":{"description":"Type of transaction: Deposit or Payout","enum":["Deposit","Payout"],"type":"string"},"updated_at":{"description":"Transaction update timestamp (ISO 8601)","format":"date-time","type":"string"},"user_ref_id":{"description":"User reference identifier","type":"string"}},"required":["status","type","currency","amount","inserted_at","updated_at","user_ref_id","transaction_uuid","correlation_key","merchant_status","transaction_data"],"type":"object"}},"required":["node","cursor","inserted_at"],"type":"object"},"type":"array"},"page_info":{"description":"Pagination cursor information","properties":{"end_cursor":{"description":"Cursor for the last item in this page","type":"string"},"has_next_page":{"description":"Whether more results are available","type":"boolean"},"has_previous_page":{"description":"Whether previous results are available","type":"boolean"},"start_cursor":{"description":"Cursor for the first item in this page","type":"string"}},"required":["end_cursor","has_next_page","has_previous_page","start_cursor"],"type":"object"},"total_count":{"description":"Total number of transactions","type":"integer"}},"required":["edges","page_info","total_count"],"title":"List_Transactions_Response","type":"object"},"Validation_Error_Response":{"description":"Validation error response format","properties":{"error":{"description":"Error message","type":"string"},"errors":{"additionalProperties":{"items":{"type":"string"},"type":"array"},"description":"Field-specific validation errors","type":"object"}},"required":["error","errors"],"title":"Validation_Error_Response","type":"object"}}}}
```
# Create a User Withdrawal
## User withdrawal
> This API endpoint allows users to initiate a withdrawal request to transfer funds from user account to an personal wallet address. The withdrawal requires specifying the amount, currency type, destination wallet, and user identification for processing.
```json
{"openapi":"3.0.0","info":{"title":"pay.io payment gateway","version":"1.0"},"servers":[{"url":"https://gateway.stage.pay.io","variables":{}}],"paths":{"/v1/user/withdraw":{"post":{"callbacks":{},"description":"This API endpoint allows users to initiate a withdrawal request to transfer funds from user account to an personal wallet address. The withdrawal requires specifying the amount, currency type, destination wallet, and user identification for processing.","operationId":"HubwalletPaymentGatewayWeb.Controller.Merchant.Default.withdraw","parameters":[],"requestBody":{"content":{"application/json":{"schema":{"$ref":"#/components/schemas/Withdraw_Request"}}},"description":"The user attributes","required":true},"responses":{"200":{"content":{"application/json":{"schema":{"$ref":"#/components/schemas/Withdraw_Response"}}},"description":"User withdrawal"},"422":{"content":{"application/json":{"schema":{"$ref":"#/components/schemas/Validation_Error_Response"}}},"description":"Validation error - missing required fields, invalid UUID format, or invalid user_reference_id format (only alphanumeric, hyphens, and underscores allowed)"}},"summary":"User withdrawal","tags":["user"]}}},"components":{"schemas":{"Withdraw_Request":{"description":"Request to withdraw funds","properties":{"amount":{"description":"Amount to withdraw, we support high precision due to certain tokens","format":"decimal","type":"string"},"currency_id":{"description":"Currency ID, which can be retrieved using supported currencies.","type":"string"},"user_reference_id":{"description":"The unique user reference to identify a user for transaction tracking","type":"string"},"wallet_address":{"description":"Destination wallet address for withdrawal","type":"string"}},"required":["amount","currency_id","wallet_address","user_reference_id"],"title":"Withdraw_Request","type":"object"},"Withdraw_Response":{"description":"Response for withdraw request","properties":{"amount":{"description":"Withdrawal amount","type":"string"},"currency":{"description":"Currency name","type":"string"},"message":{"description":"Status explanation, present when status is pending_approval or unresolved","nullable":true,"type":"string"},"requires_approval":{"description":"Whether transaction requires manual approval before processing","type":"boolean"},"status":{"description":"Transaction status. `processing` — submitted to provider; `pending_approval` — awaiting manual approval.","enum":["processing","pending_approval","unresolved"],"type":"string"},"transaction_uuid":{"description":"Transaction identifier for tracking","format":"uuid","type":"string"},"wallet_address":{"description":"Destination wallet address","type":"string"}},"required":["transaction_uuid","currency","wallet_address","status","amount"],"title":"Withdraw_Response","type":"object"},"Validation_Error_Response":{"description":"Validation error response format","properties":{"error":{"description":"Error message","type":"string"},"errors":{"additionalProperties":{"items":{"type":"string"},"type":"array"},"description":"Field-specific validation errors","type":"object"}},"required":["error","errors"],"title":"Validation_Error_Response","type":"object"}}}}
```
# Create a Payment Session
{% hint style="info" %}
**New endpoint available**
**`POST /v1/user/payments`** is now the recommended way to create onramp sessions.
The previous endpoint **`POST /v1/user/onramp/get_url`** remains available but for new integrations should use **`POST /v1/user/payments`**.
{% endhint %}
## Create a payment session
> Creates a payment session. ON\_RAMP returns a hosted widget link; OFF\_RAMP is accepted in the contract but returns 501 in Phase 1. country and currency\_id are always mandatory. For ON\_RAMP, amount, fiat\_currency and redirect\_url are also mandatory and are locked into the hosted widget. custom\_wallet\_address requires the merchant's allow\_custom\_external\_wallet flag.
```json
{"openapi":"3.0.0","info":{"title":"pay.io payment gateway","version":"1.0"},"servers":[{"url":"https://gateway.stage.pay.io","variables":{}}],"paths":{"/v1/user/payments":{"post":{"callbacks":{},"description":"Creates a payment session. ON_RAMP returns a hosted widget link; OFF_RAMP is accepted in the contract but returns 501 in Phase 1. country and currency_id are always mandatory. For ON_RAMP, amount, fiat_currency and redirect_url are also mandatory and are locked into the hosted widget. custom_wallet_address requires the merchant's allow_custom_external_wallet flag.","operationId":"HubwalletPaymentGatewayWeb.Controller.Merchant.Default.payment_sessions","parameters":[],"requestBody":{"content":{"application/json":{"schema":{"$ref":"#/components/schemas/Payment_Session_Request"}}},"description":"Payment session attributes","required":true},"responses":{"200":{"content":{"application/json":{"schema":{"$ref":"#/components/schemas/Payment_Session_Response"}}},"description":"Created payment session"},"403":{"content":{"application/json":{"schema":{"$ref":"#/components/schemas/Error_Response"}}},"description":"Custom wallet not allowed for merchant"},"422":{"content":{"application/json":{"schema":{"$ref":"#/components/schemas/Validation_Error_Response"}}},"description":"Validation error"},"501":{"content":{"application/json":{"schema":{"$ref":"#/components/schemas/Error_Response"}}},"description":"Payment type not available in Phase 1"}},"summary":"Create a payment session","tags":["user"]}}},"components":{"schemas":{"Payment_Session_Request":{"description":"Request to create a payment session (ON_RAMP today; OFF_RAMP returns 501)","properties":{"amount":{"description":"Required for ON_RAMP; locked in the widget.","format":"decimal","type":"string"},"country":{"description":"ISO 3166-1 alpha-2 country code. REQUIRED — no default.","type":"string"},"currency_id":{"description":"Target currency id.","format":"uuid","type":"string"},"custom_wallet_address":{"description":"Self-custody destination. Only honoured when the merchant flag is on.","type":"string"},"fiat_currency":{"description":"ISO 4217 fiat currency (3-letter). Required for ON_RAMP; locked in the widget.","type":"string"},"metadata":{"description":"Free-form merchant metadata.","type":"object"},"payment_type":{"description":"ON_RAMP returns a hosted widget link. OFF_RAMP is accepted but returns 501 in Phase 1.","enum":["ON_RAMP","OFF_RAMP"],"type":"string"},"redirect_url":{"description":"URL the hosted widget redirects the user to on completion. Required for ON_RAMP; must start with http:// or https://.","type":"string"},"session_reference":{"description":"Merchant's own id for this session; echoed back in webhooks.","type":"string"},"theme":{"default":"dark","description":"Widget theme. Optional; defaults to dark.","enum":["light","dark"],"type":"string"},"user_reference_id":{"description":"Merchant's stable player id. Required unless custom_wallet_address is supplied.","type":"string"}},"required":["payment_type","country","currency_id"],"title":"Payment_Session_Request","type":"object"},"Payment_Session_Response":{"description":"A created payment session","properties":{"correlation_key":{"description":"Server-generated key, also the provider's externalSessionId.","type":"string"},"expires_at":{"description":"Link expiry. Null until a self-imposed TTL is introduced.","format":"date-time","nullable":true,"type":"string"},"link":{"description":"Provider-hosted URL the user is sent to.","type":"string"}},"required":["link","correlation_key"],"title":"Payment_Session_Response","type":"object"},"Error_Response":{"description":"Error response format","properties":{"error":{"description":"Error flag, always true","type":"boolean"},"message":{"description":"Error message describing what went wrong","type":"string"},"request_id":{"description":"Request correlation ID for tracking and debugging","type":"string"},"status":{"description":"Transaction status when a transaction was created before the error (e.g. `\"failed\"` for a withdrawal that was submitted but failed)","nullable":true,"type":"string"},"transaction_uuid":{"description":"Database transaction UUID (only present when a transaction exists)","format":"uuid","nullable":true,"type":"string"}},"required":["error","message","request_id"],"title":"Error_Response","type":"object"},"Validation_Error_Response":{"description":"Validation error response format","properties":{"error":{"description":"Error message","type":"string"},"errors":{"additionalProperties":{"items":{"type":"string"},"type":"array"},"description":"Field-specific validation errors","type":"object"}},"required":["error","errors"],"title":"Validation_Error_Response","type":"object"}}}}
```
# Add On-Ramping To Your Site
This guide gives an overview on how to implement the On-Ramping functionality using Pay.io's Payment Gateway and User Payment API. \
\
Learn more about the feature and benefits in [On-Ramping: Buying Crypto with Fiat](/on-ramping-buying-crypto-with-fiat).
{% hint style="info" %}
**API endpoint used in this guide ->** [**Create a Payment Session**](/api-reference/user-payment-api/create-a-payment-session)
{% endhint %}
## Integration Flow
The integration relies on a **single** **backend** **API** **call** to generate a unique **URL**, which is then rendered on your frontend within an iframe.
```mermaid
sequenceDiagram
participant User as End User
participant Frontend as Merchant Cashier UI
participant Backend as Merchant Backend
participant PayIO as Pay.io API
participant Provider as Onramp Provider
User->>Frontend: Clicks "Buy Crypto" button
Frontend->>Backend: Request onramp session
Backend->>PayIO: POST /v1/user/payments
PayIO-->>Backend: Returns secure URL (link)
Backend-->>Frontend: Passes URL to UI
Frontend->>Frontend: Renders URL inside iFrame
User->>Provider: Completes KYC & buys crypto via Fiat
Provider-->>PayIO: Executes crypto transfer to user wallet
PayIO-->>Frontend: Balance updated (Standard Deposit)
```
## **Generate the On Ramp URL (Backend)**
To initiate the flow, your backend must call the Pay.io User Payments API to generate a unique, user-specific URL.
**Endpoint**: [`POST /v1/user/payments`](/api-reference/user-payment-api/create-a-payment-session)
**Authentication**: API Key (`Bearer YOUR_API_KEY` in the header)
{% code title="Request payload example" %}
```json
{
"payment_type": "ON_RAMP", // required
"country": "GB", // required — ISO 3166-1 alpha-2
"currency_id": "123e4567-e89b-12d3-a456-426614174000", // required
"user_reference_id": "player_98765", // required unless custom_wallet_address is set
"custom_wallet_address": "0xabc123...", // optional — self-custody destination
"amount": "100", // required for ON_RAMP
"fiat_currency": "GBP", // required for ON_RAMP
"redirect_url": "https://yourcasino.io/deposit-complete", // required
"session_reference": "order_9981", // optional
"metadata": {} // optional
}
```
{% endcode %}
**Key Parameters**
* `country` - The user's ISO 3166-1 alpha-2 country code (e.g.`GB`,`DE`). Required, no default — dictates which payment methods (like Apple Pay) are displayed in the widget, and is locked into the widget once set.
* `currency_id` - UUID of the target cryptocurrency the user is buying. Must be a currency your merchant account has enabled with the provider.
* `user_reference_id` - Your platform's stable, unique player ID. Required *unless* `custom_wallet_address` is supplied — used to attribute the session to a system-custody wallet and is echoed back in webhooks as the customer identifier.
* `custom_wallet_address` - The user's own (self-custody) wallet address to receive funds instead of your platform's managed wallet. Optional.\
Only honoured if your merchant account has the custom-external-wallet flag enabled — otherwise the request is rejected with `403 custom_wallet_not_allowed_for_merchant`. Contact your account manager to enable it.
* `amount`/`fiat_currency` - The fiat amount and 3-letter ISO 4217 currency the user is paying with. Both required for ON\_RAMP and locked into the widget, so the user can't change them mid-flow.
* `redirect_url` - Where the widget sends the user after completing (or abandoning) the flow. Must start with `http://` or `https://`.
* `session_reference`*(optional) -* Your own idempotency/tracking ID for this session. Echoed back in webhooks alongside `correlation_key`.
{% code title="Response example" %}
```json
{
"link": "https://onramp.example.com/session/abc123...",
"correlation_key": "f47ac10b-58cc-4372-a567-0e02b2c3d479:order_9981",
"expires_at": null
}
```
{% endcode %}
## **Render the iframe (Frontend)**
Once your backend receives the `link` from the API, pass it to your frontend. You will need to embed this URL seamlessly into your Cashier UI, so the user does not feel like they are leaving your site.
{% hint style="info" %}
**Best Practices**
* Ensure the iframe width is 100% of its container, especially for mobile users.
* Give the iframe a sufficient minimum height (e.g., `600px` to `700px`) to prevent awkward inner scrolling during the KYC steps.
* Remove default borders to make the widget look native to your platform.
{% endhint %}
{% code title="Example for frontend HTML for the Iframe" %}
```html
```
{% endcode %}
{% hint style="info" %}
The `allow="camera; microphone"` attributes are crucial, as users may need their device camera to upload ID documents for the **KYC** **verification** **step**.
{% endhint %}
# Payment Gateway Integration Guide
The Pay.io **Payment Gateway API** allows merchants to build a cashier solution directly into their site or app. With a single integration, you can:
* List currencies available for deposits and withdrawals.
* Generate deposit addresses for users.
* Trigger withdrawals securely.
* Display real-time transaction history.
This guide walks you through the **full cashier flow** step by step, using the Payment Gateway API.
***
### Prerequisites
Before you start:
1. **Complete merchant onboarding.** Contact Pay.io to complete onboarding and configure which currencies you want to support.
2. **Merchant Console access.** Obtain your API key and upload your public key.
3. **Ensure you have authorization headers**
| Header | Description |
| ----------------- | --------------------------------------------------------------------------------------------------------------------------------------------- |
| `X-API-Key` | Your merchant API key (from Merchant Console or provided by support). |
| `X-API-Nonce` | A unique identifier (UUID) for each request. Prevents replay attacks. |
| `X-API-Signature` | Signature generated with your private key. See [Authorisation](/api-reference/core-concepts/authorisation#creating-a-public-and-private-key). |
### Step 1: List of Available Currencies
Your cashier first needs to display the currencies available for transactions. For this, you'll need to call [GET v1/merchant/currencies](/api-reference/merchant-console-api/get-a-list-of-available-currencies#get-v1-merchant-currencies) endpoint.
**Request:**
```bash
curl --location 'https://pgw.stage.pay.io/v1/merchant/currencies' \
--header 'X-API-Key: ' \
--header 'X-API-Nonce: ' \
--header 'X-API-Signature: '
```
**Response (example):**
```json
[
{
"id": "c872e749-fd56-533e-b01f-de87ae38e7f1",
"name": "USD Coin",
"symbol": "$",
"currency_code": "USDC",
"network": "Base Chain"
},
{
"id": "123abc45-fd56-533e-b01f-de87ae38e7f1",
"name": "Tether",
"symbol": "₮",
"currency_code": "USDT",
"network": "Ethereum"
}
]
```
Your frontend can now render a currency picker for users.
***
### Step 2: Get a Deposit Address
When a user selects a currency and wants to deposit, your cashier front-end needs to request a **deposit address**. For this, you'll need to call the [POST /v1/user/deposit/address](/api-reference/user-payment-api/create-a-deposit-address#post-v1-user-deposit-address) endpoint or [POST /v1/user/deposit/link\_external\_wallet](/api-reference/user-payment-api/create-a-deposit-address#post-v1-user-deposit-link_external_wallet) endpoint for depositing to an external service provider's wallet.
**Request:**
```bash
curl --location 'https://pgw.stage.pay.io/v1/user/deposit/address' \
--header 'X-API-Key: ' \
--header 'X-API-Nonce: ' \
--header 'X-API-Signature: ' \
--header 'Content-Type: application/json' \
--data '{
"currency_id": "007-007-id-currency",
"user_reference": "john007"
}'
```
**Response (example):**
```json
{
"address": "007ca007ee9782300",
"currency": "USDC",
"network": "Base Chain"
}
```
You can now display this wallet address, and a QR code if desired, to the user.
***
### Step 3: Support Withdrawal of Funds
For withdrawals, your cashier must collect the amount and destination address from the user, then call the [**Withdrawals API**](/api-reference/user-payment-api/create-a-user-withdrawal).
**Request:**
```bash
curl --location 'https://pgw.stage.pay.io/v1/user/withdraw' \
--header 'X-API-Key: ' \
--header 'X-API-Nonce: ' \
--header 'X-API-Signature: ' \
--header 'Content-Type: application/json' \
--data '{
"currency_id": "c872e749-fd56-533e-b01f-de87ae38e7f1",
"amount": "2",
"wallet_address": "0xabf7920042335cB1FD9e7C688F99822a1D879445",
"user_reference_id": "john007"
}'
```
**Response (example):**
```json
{
"amount": "2",
"currency": "USDC",
"requires_approval": false,
"status": "Processing",
"wallet_address": "0x1234567890123456789012345678901234567890"
}
```
***
### Step 4: List User Transactions
You can display a user’s deposit and withdrawal history using the [**User Transactions API**](/api-reference/user-payment-api/get-a-list-of-user-transactions).
**Request:**
```bash
curl --location 'https://pgw.stage.pay.io/v1/user/transactions' \
--header 'X-API-Key: ' \
--header 'X-API-Nonce: ' \
--header 'X-API-Signature: '
--header 'Content-Type: application/json' \
--data '{
"first": 5,
"time_range": "today",
"transaction_types": [
"Deposit",
"Payout"
],
"user_reference_id": "john007"
}
'
```
**Response (example):**
```json
{
"edges": [
{
"cursor": "MjAyNS0wOC0xNFQxNToyNDo1OVp8MzkwNmZjM2EtODk4My00OWY0LTk3OWMtYzhiYmYzZDhhMDJi",
"inserted_at": "2025-08-14T15:24:59Z",
"node": {
"amount": "1.000000000000000000000000000000",
"amount_usd": "0.989822010805417845",
"completed_at": "2025-08-14T15:24:58Z",
"correlation_key": "d2c2a8bd-4473-4ee8-8d09-7f072162aae3",
"currency": {
"code": "USDC",
"currency_icon": "https://cdn.hub88.io/hub-wallet/USDC-ic.svg",
"id": "c872e749-fd56-533e-b01f-de87ae38e7f1",
"name": "USD Coin",
"network": "Base Chain",
"network_icon": "https://cdn.hub88.io/hub-wallet/BASE-ic.svg",
"symbol": "$",
"token_address": "0x833589fCD6eDb6E08f4c7C32D4f71b54bdA02913"
},
"failure_reason": null,
"from_address": "0x09b8c5b24bcdd91af5a7d32f6a4ae9fa4183d4f4",
"inserted_at": "2025-08-14T15:24:59Z",
"merchant_status": "CALLBACK_SUCCEEDED",
"provider_transaction_id": "pay_31HdZ4DBbvrlttqdBixdsOcGJaq",
"provider_wallet_reference": "d2c2a8bd-4473-4ee8-8d09-7f072162aae3",
"status": "TXN_PROVIDER_SUCCEEDED",
"to_address": "0x1817BCc039175F7e8bc629aB33c927381dAC8788",
"transaction_data": {
"amount": "1",
"amount_usd": "0.989822010805417845",
"chain_id": 8453,
"created_at": "2025-08-14T15:23:03.043Z",
"crypto_transaction": {
"chain_id": 8453,
"created_at": "2025-08-14T15:23:05.807Z",
"payment_id": "pay_31HdZ4DBbvrlttqdBixdsOcGJaq",
"status": "Success",
"transaction_hash": "0x9c1583bacf1ec0a76ea9754e562abb008b80fa0ebd75f735e7f2674e866393ff",
"type": "Withdraw",
"updated_at": "2025-08-14T15:23:05.807Z"
},
"currency": "USDC",
"event": "Payment.Updated"
},
"transaction_uuid": "3906fc3a-8983-49f4-979c-c8bbf3d8a02b",
"trn_provider_ref": "BoomFi",
"tx_hash": "0x9c1583bacf1ec0a76ea9754e562abb008b80fa0ebd75f735e7f2674e866393ff",
"type": "Payout",
"updated_at": "2025-08-14T15:24:59",
"user_ref_id": "hub_player_2"
}
},
{
"cursor": "MjAyNS0wOC0xNFQxNToyMzowMlp8MmVmMjgyODEtYWY1Zi00MGNkLTg3YTMtMWViZDkzNjE1OGNk",
"inserted_at": "2025-08-14T15:23:02Z",
"node": {
"amount": "1.000000000000000000000000000000",
"amount_usd": null,
"completed_at": null,
"correlation_key": "d2c2a8bd-4473-4ee8-8d09-7f072162aae3",
"currency": {
"code": "USDC",
"currency_icon": "https://cdn.hub88.io/hub-wallet/USDC-ic.svg",
"id": "c872e749-fd56-533e-b01f-de87ae38e7f1",
"name": "USD Coin",
"network": "Base Chain",
"network_icon": "https://cdn.hub88.io/hub-wallet/BASE-ic.svg",
"symbol": "$",
"token_address": "0x833589fCD6eDb6E08f4c7C32D4f71b54bdA02913"
},
"failure_reason": null,
"from_address": null,
"inserted_at": "2025-08-14T15:23:02Z",
"merchant_status": "CALLBACK_PENDING",
"provider_transaction_id": null,
"provider_wallet_reference": null,
"status": "TXN_NEW",
"to_address": "0x1817BCc039175F7e8bc629aB33c927381dAC8788",
"transaction_data": {},
"transaction_uuid": "2ef28281-af5f-40cd-87a3-1ebd936158cd",
"trn_provider_ref": null,
"tx_hash": null,
"type": "Payout",
"updated_at": "2025-08-14T15:23:02",
"user_ref_id": "hub_player_2"
}
}
],
"page_info": {
"end_cursor": "dHJhbnNhY3Rpb246MjAyNS0wOC0xNFQxNToyMzowMnwyZWYyODI4MS1hZjVmLTQwY2QtODdhMy0xZWJkOTM2MTU4Y2Q=",
"has_next_page": false,
"has_previous_page": false,
"start_cursor": "dHJhbnNhY3Rpb246MjAyNS0wOC0xNFQxNToyNDo1OXwzOTA2ZmMzYS04OTgzLTQ5ZjQtOTc5Yy1jOGJiZjNkOGEwMmI="
},
"total_count": 2
}
```
This endpoint allows you to show users their full transaction history in your cashier UI.
***
### Keeping in Sync
For **real-time transaction updates**, use [Event Notifications & Webhooks](/api-reference/core-concepts/event-notifications-and-webhooks#event-types-for-webhooks). This ensures you can instantly reflect deposit confirmations and completed withdrawals in your cashier.
### Keep in Mind
* Always verify API signatures using your private key.
* Use UUIDs for `user_reference` to ensure uniqueness.
* Display both “processing” and “confirmed” statuses to set correct user expectations.
* Pair the Transactions API with webhooks for reliability and reconciliation.
***


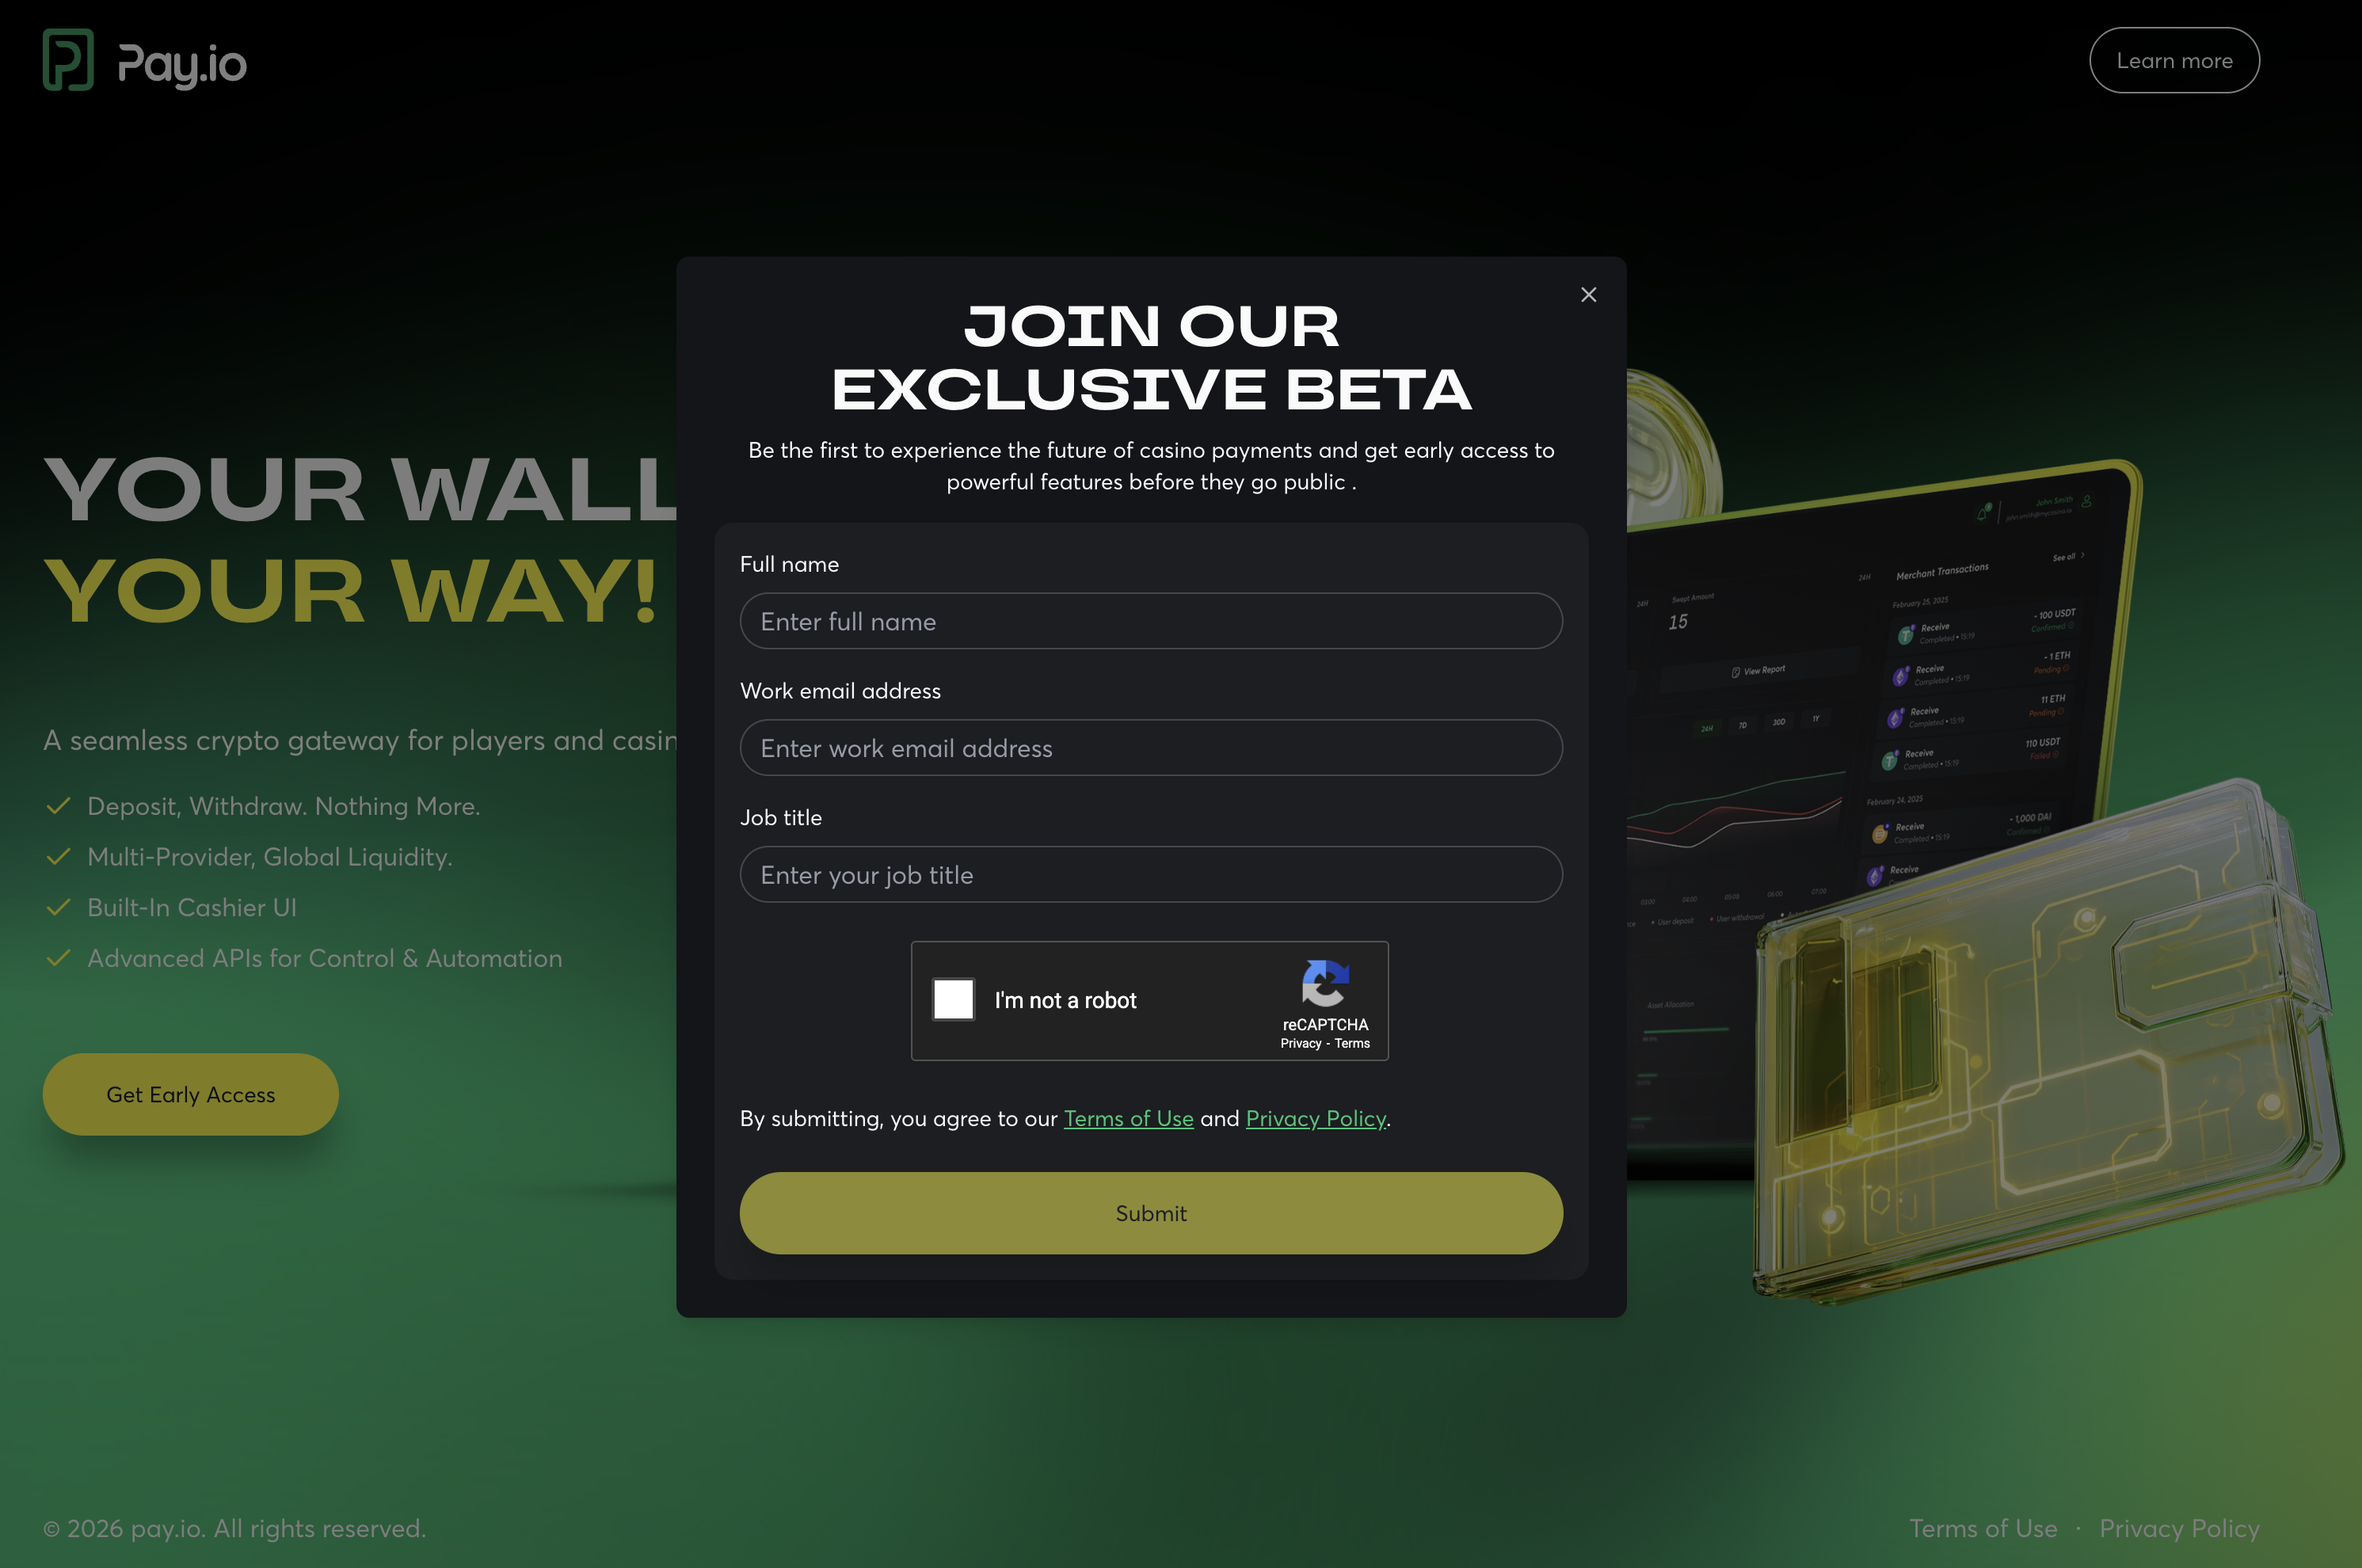
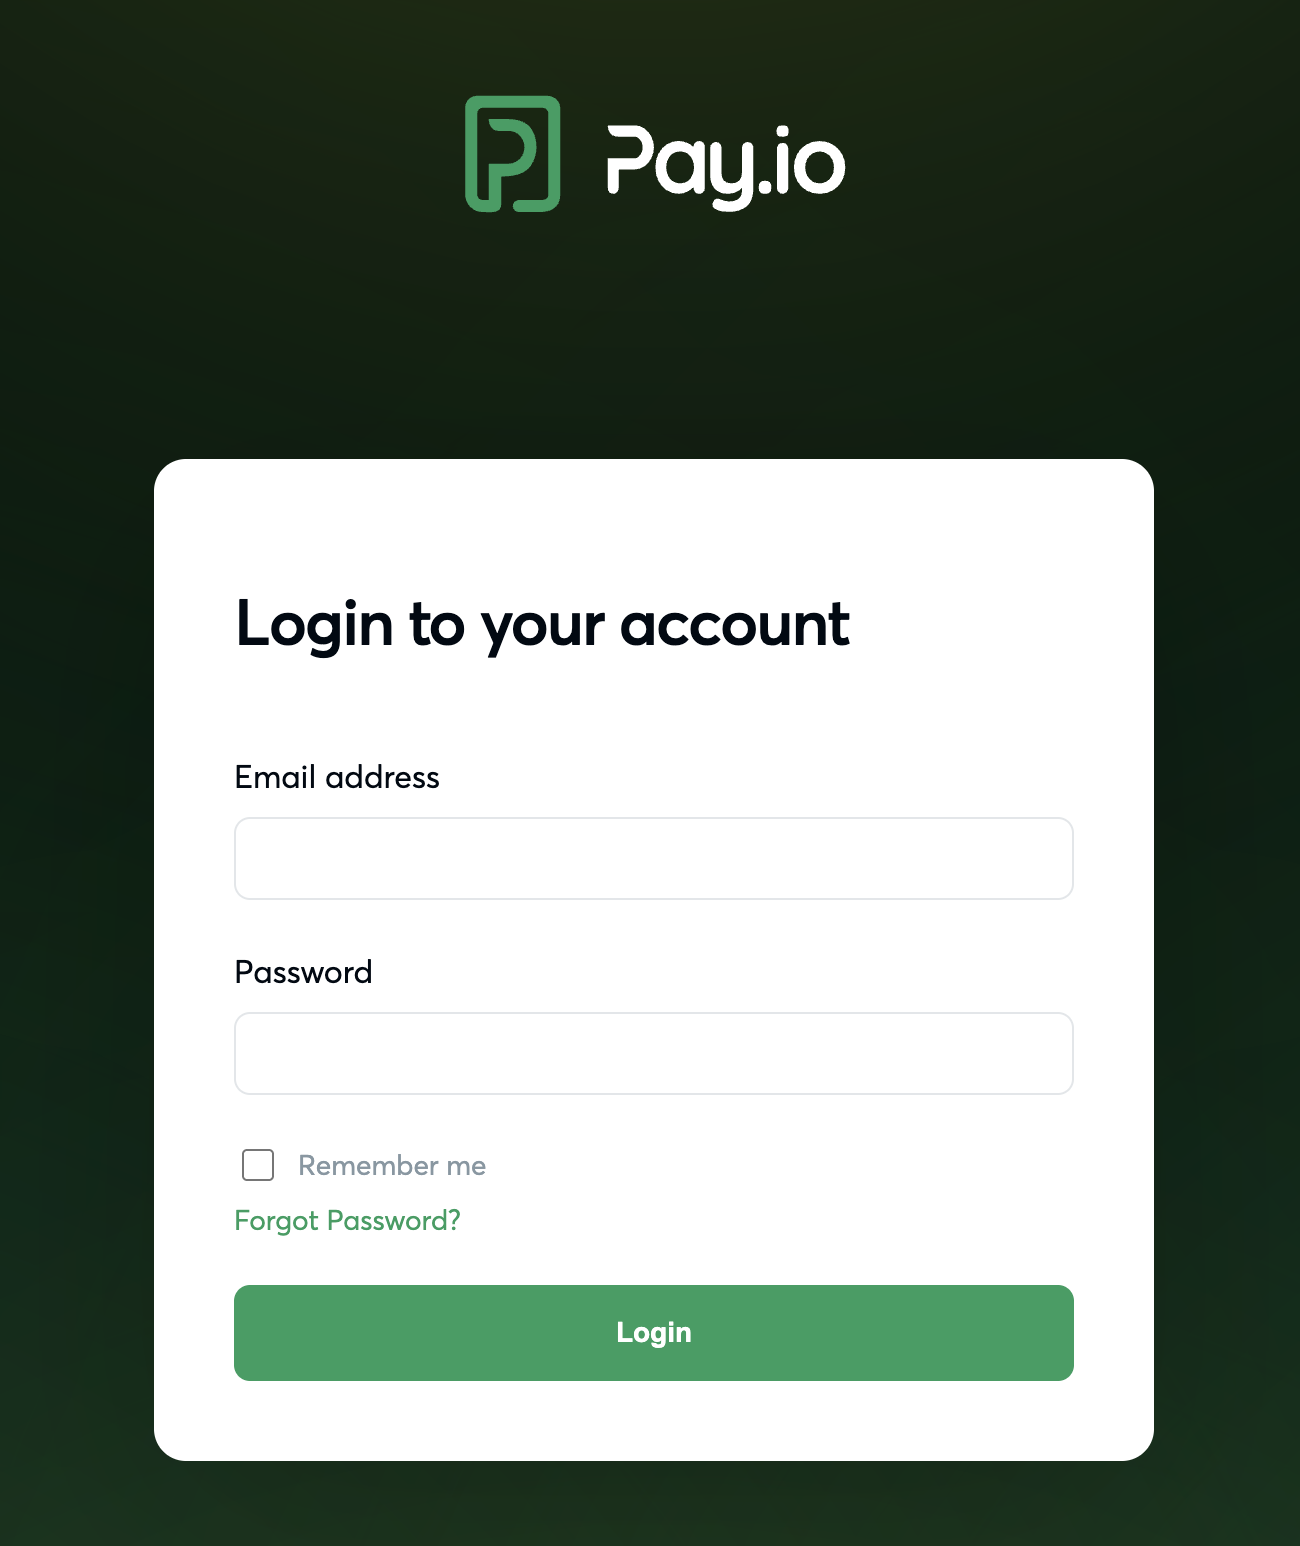
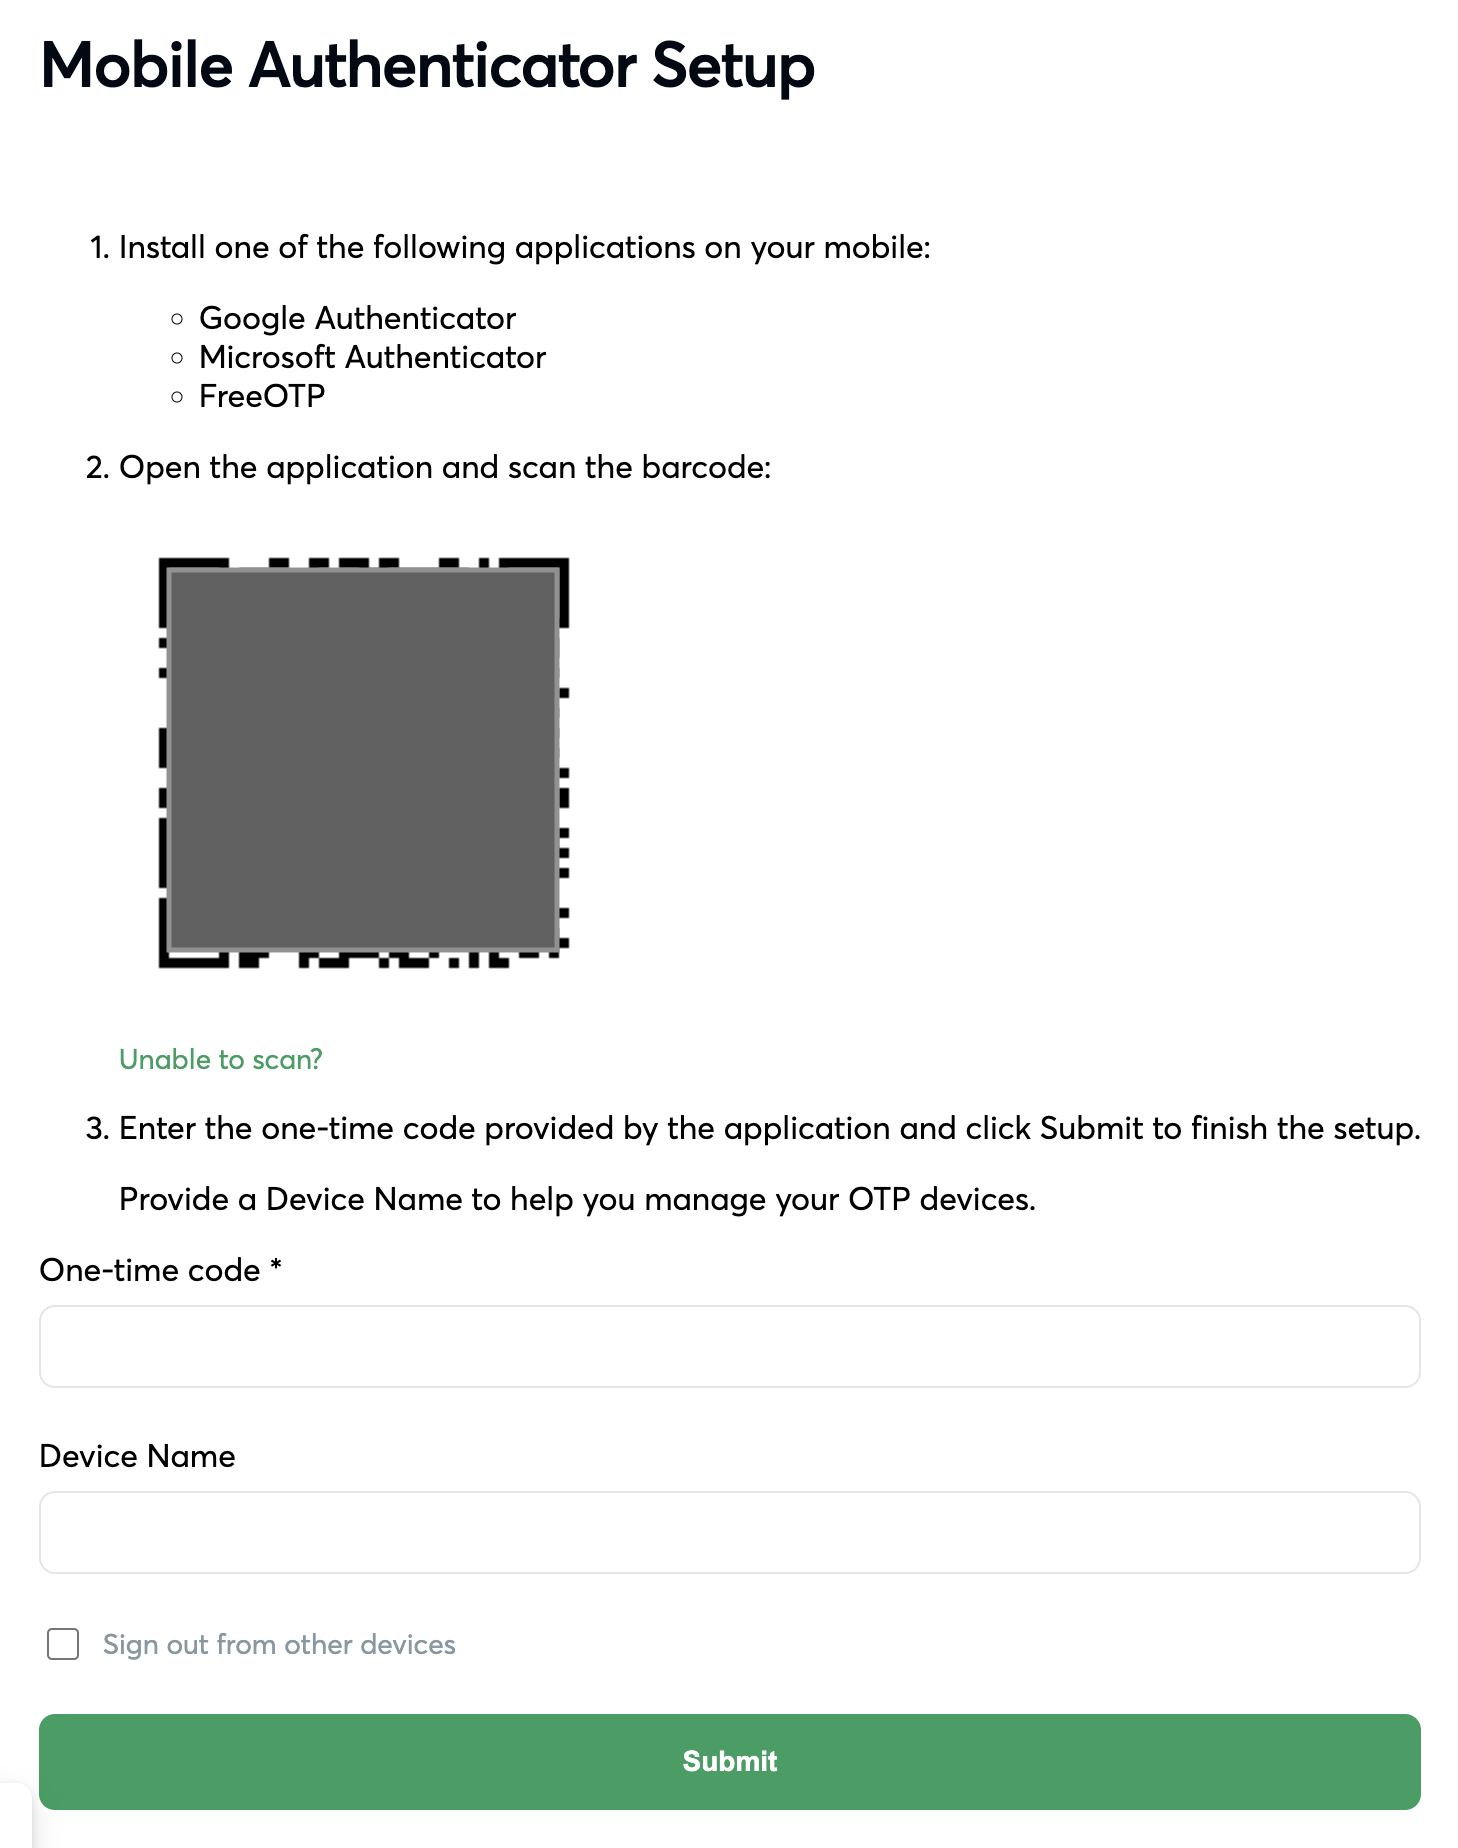
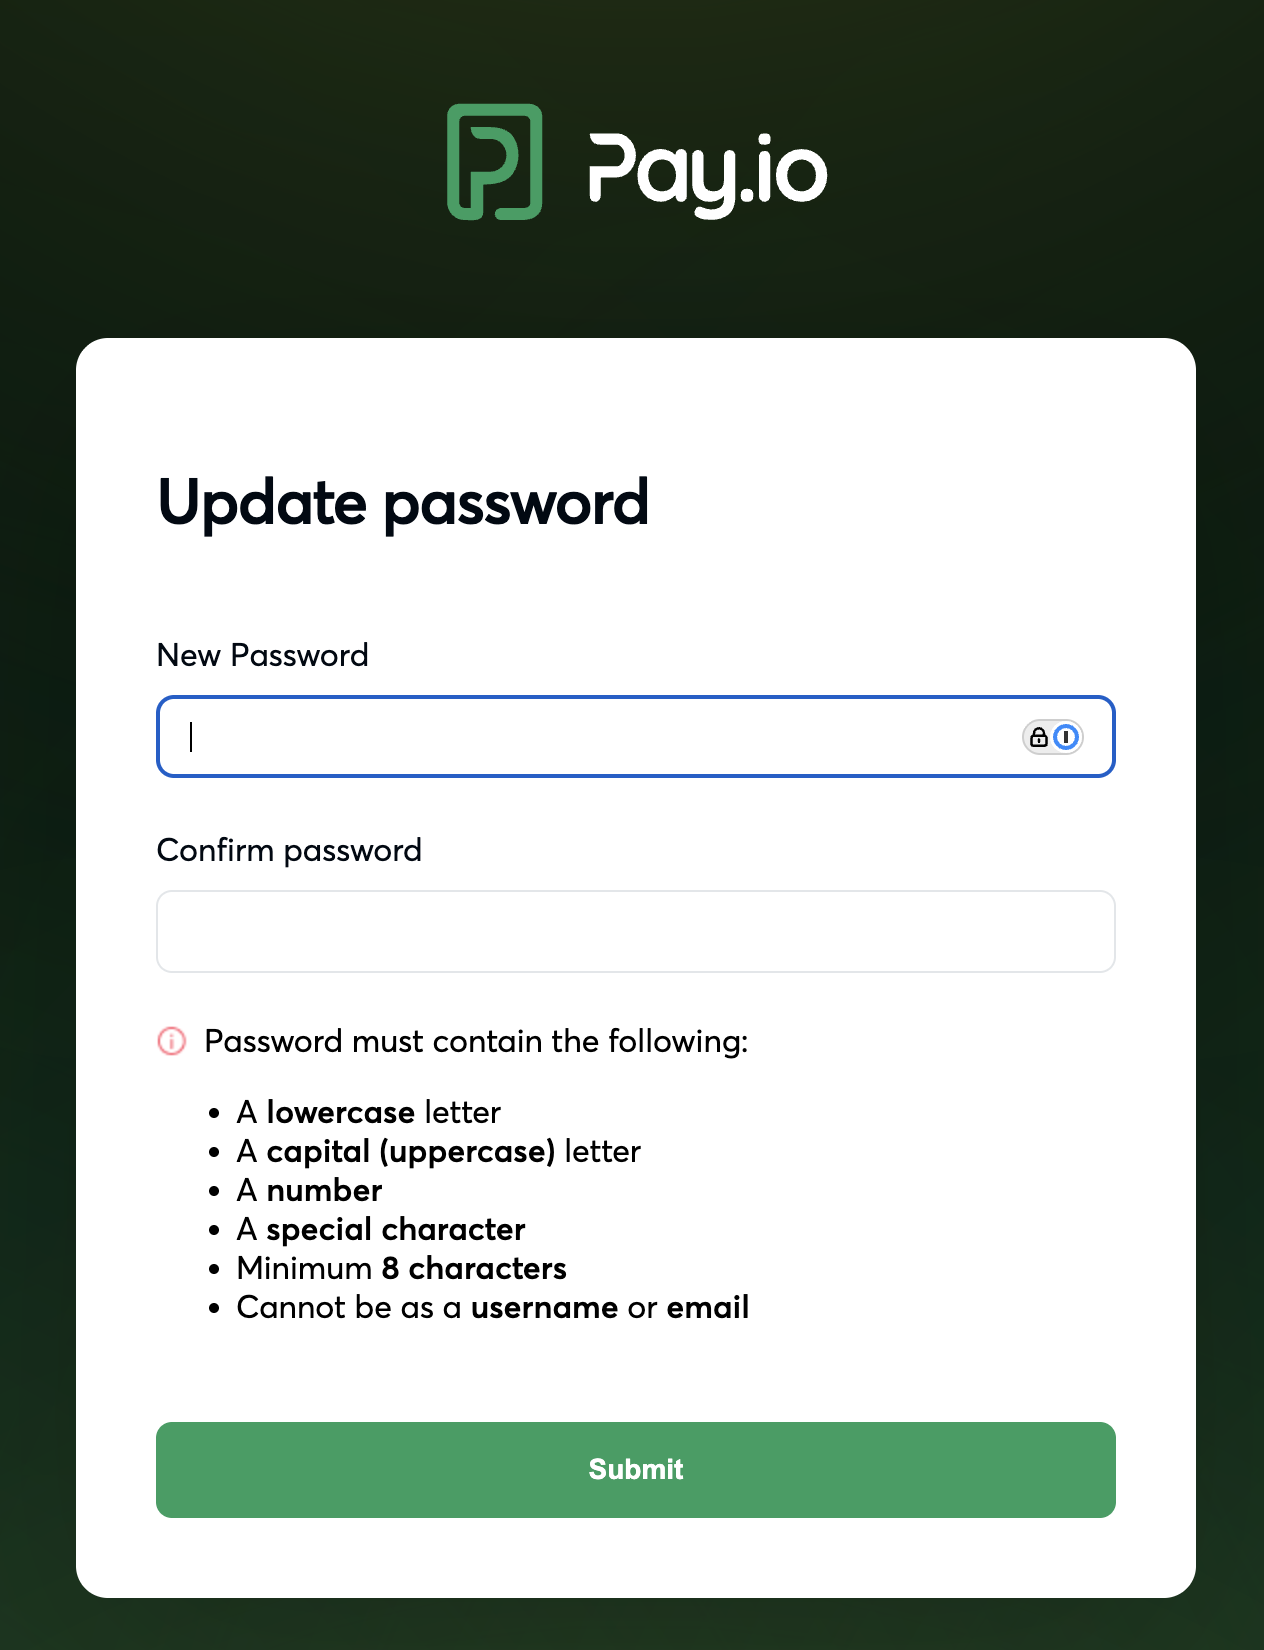
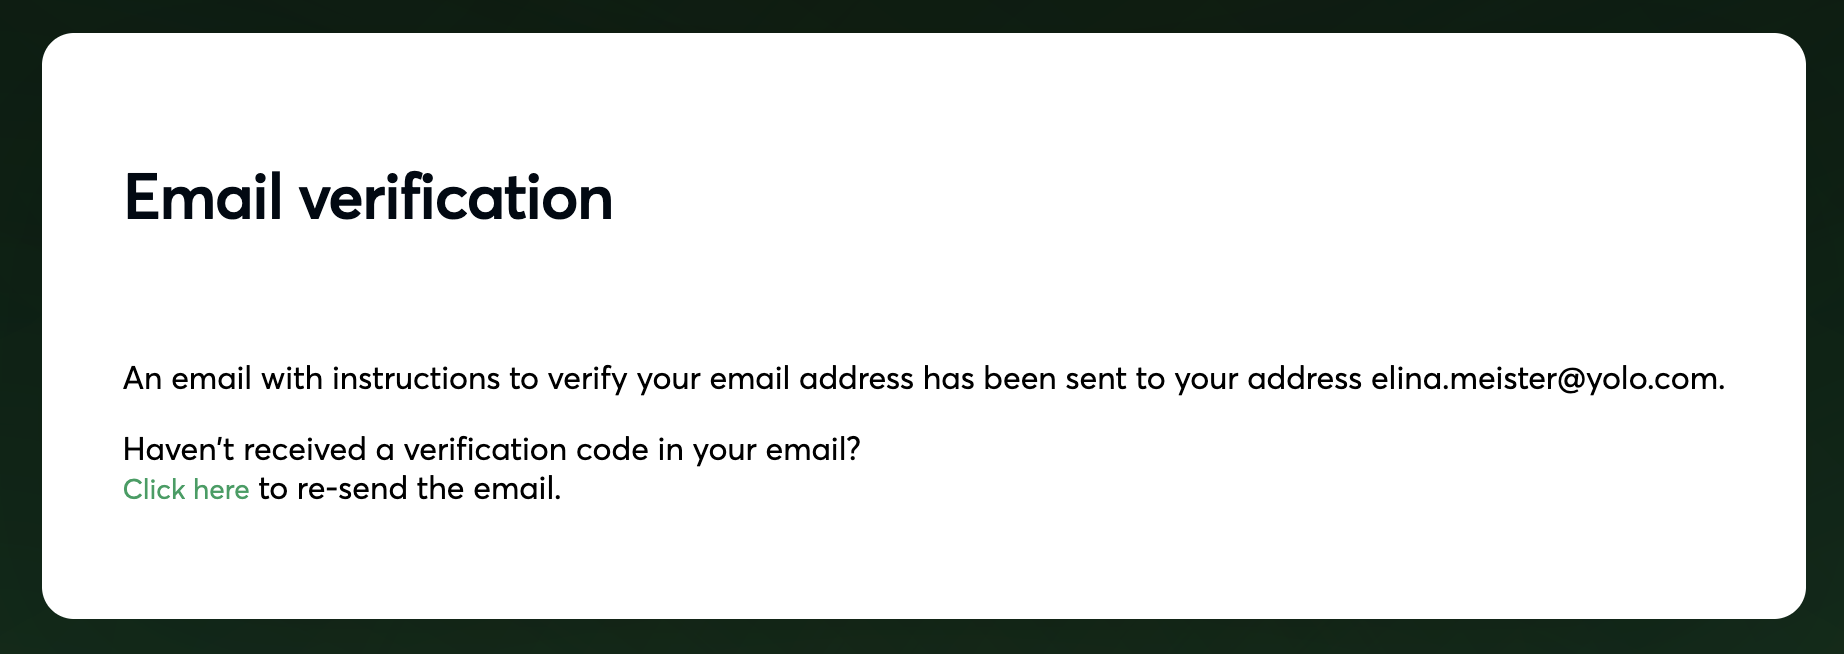
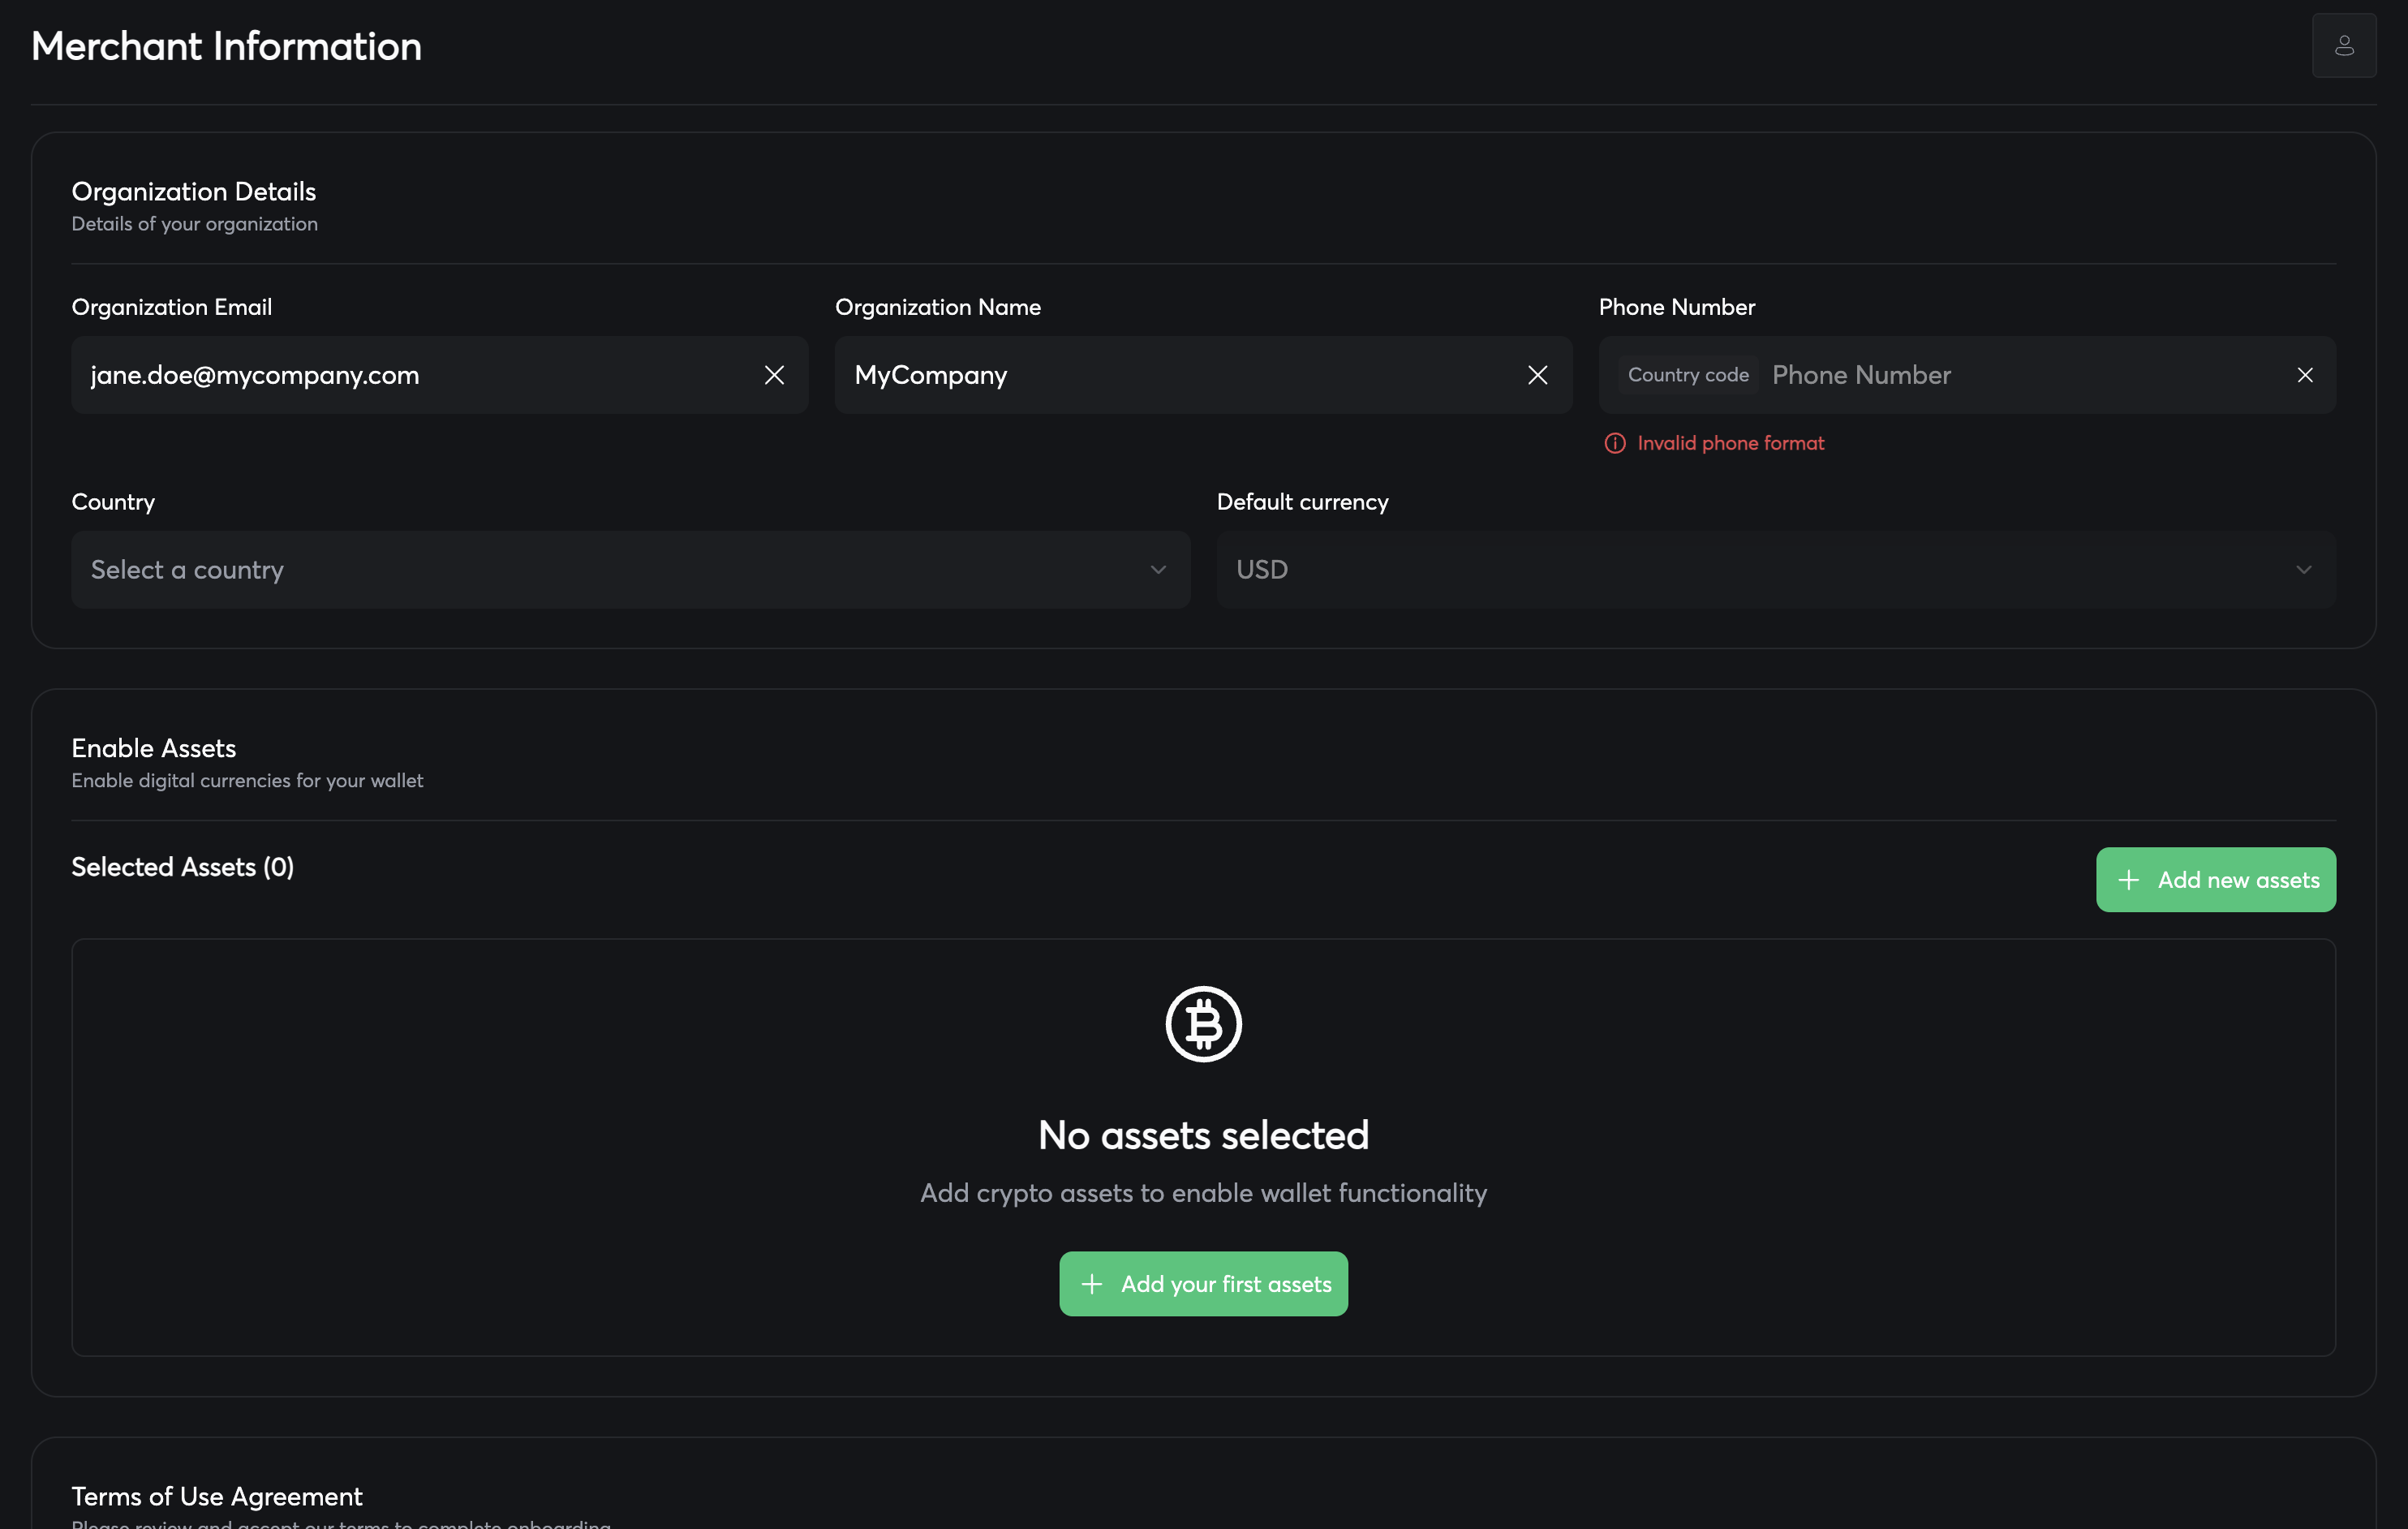
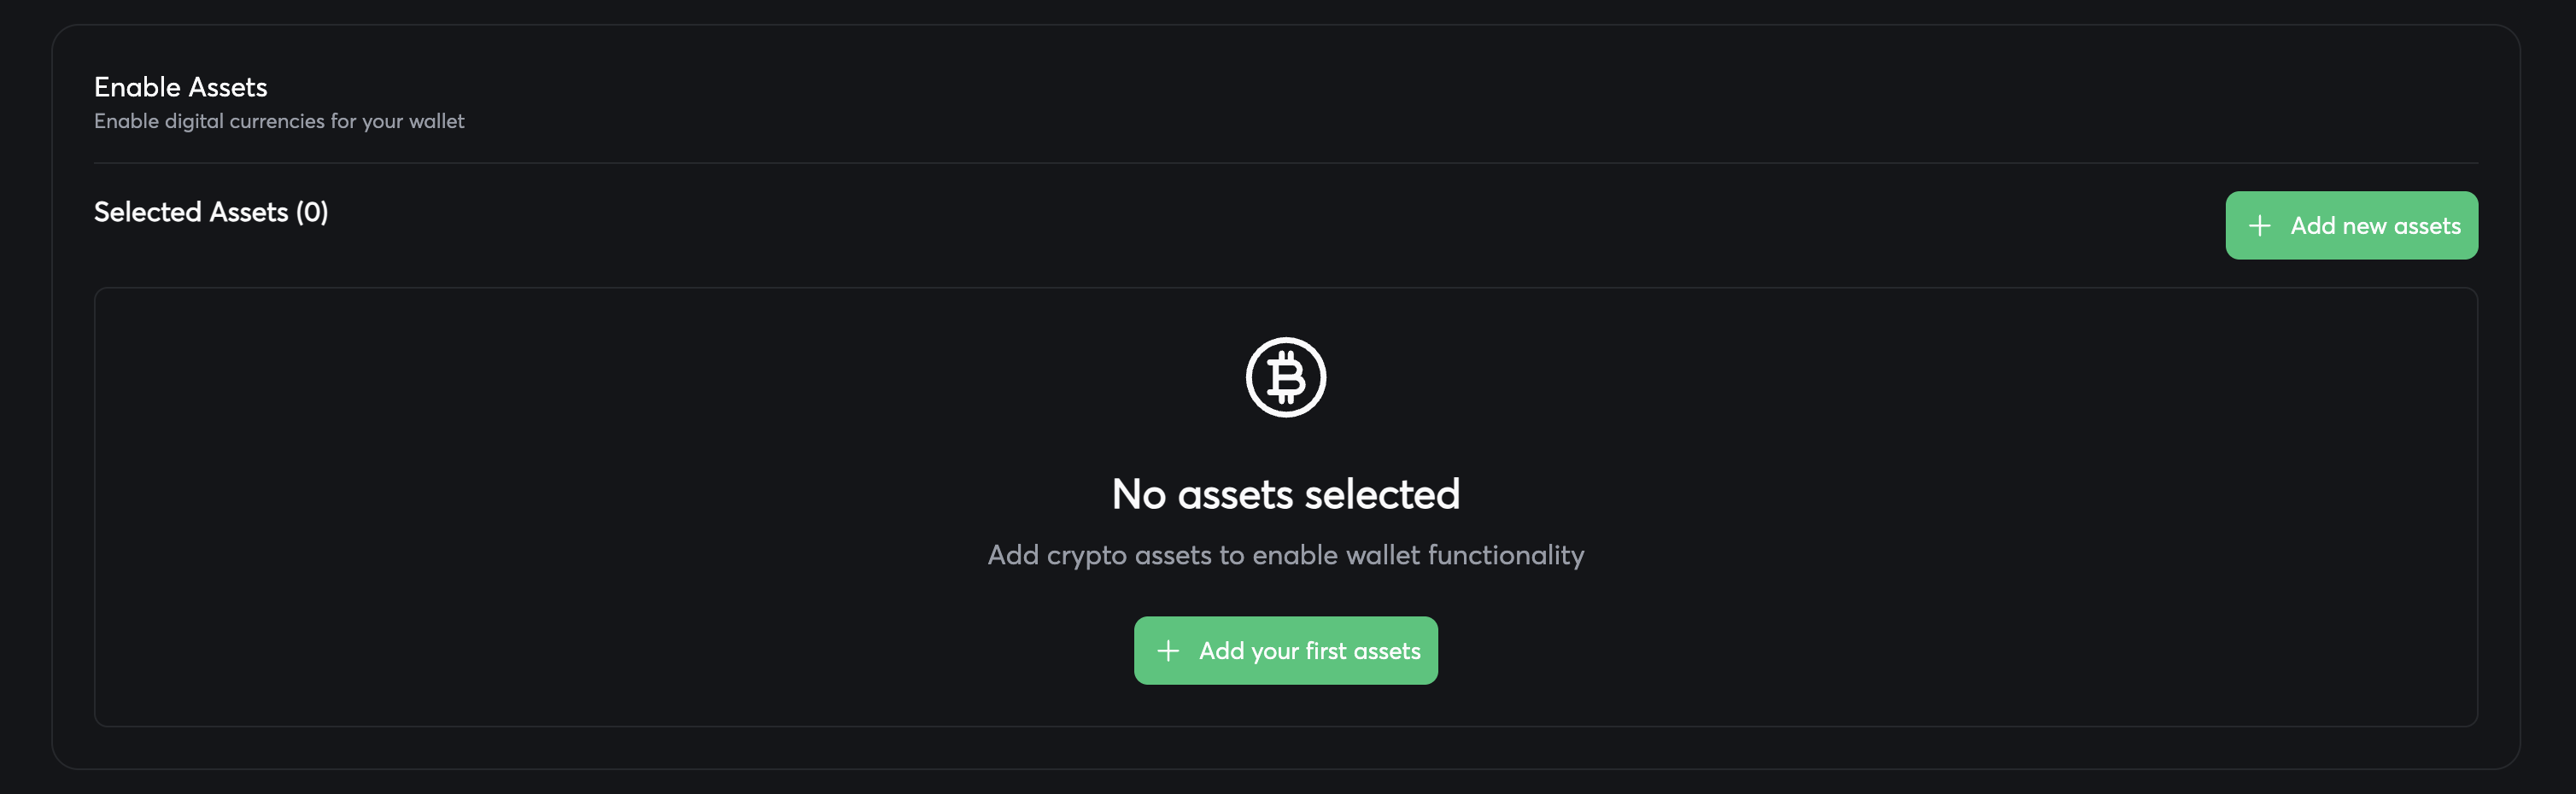
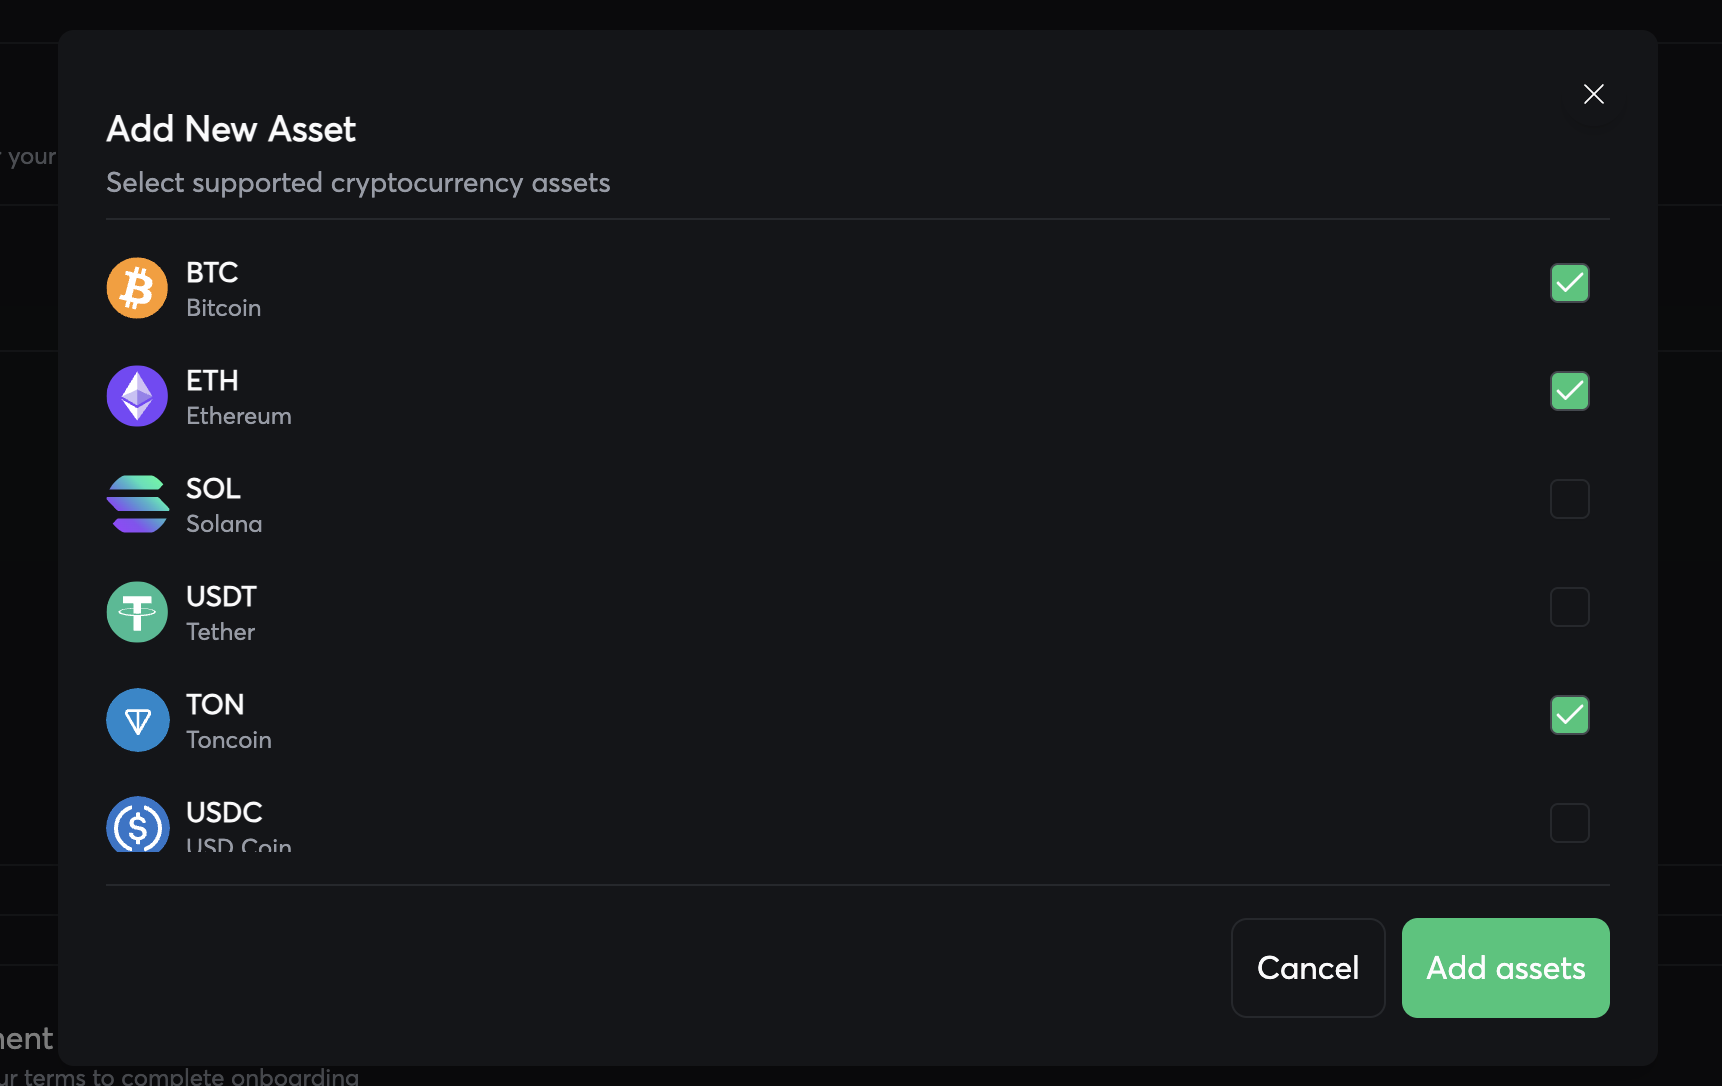
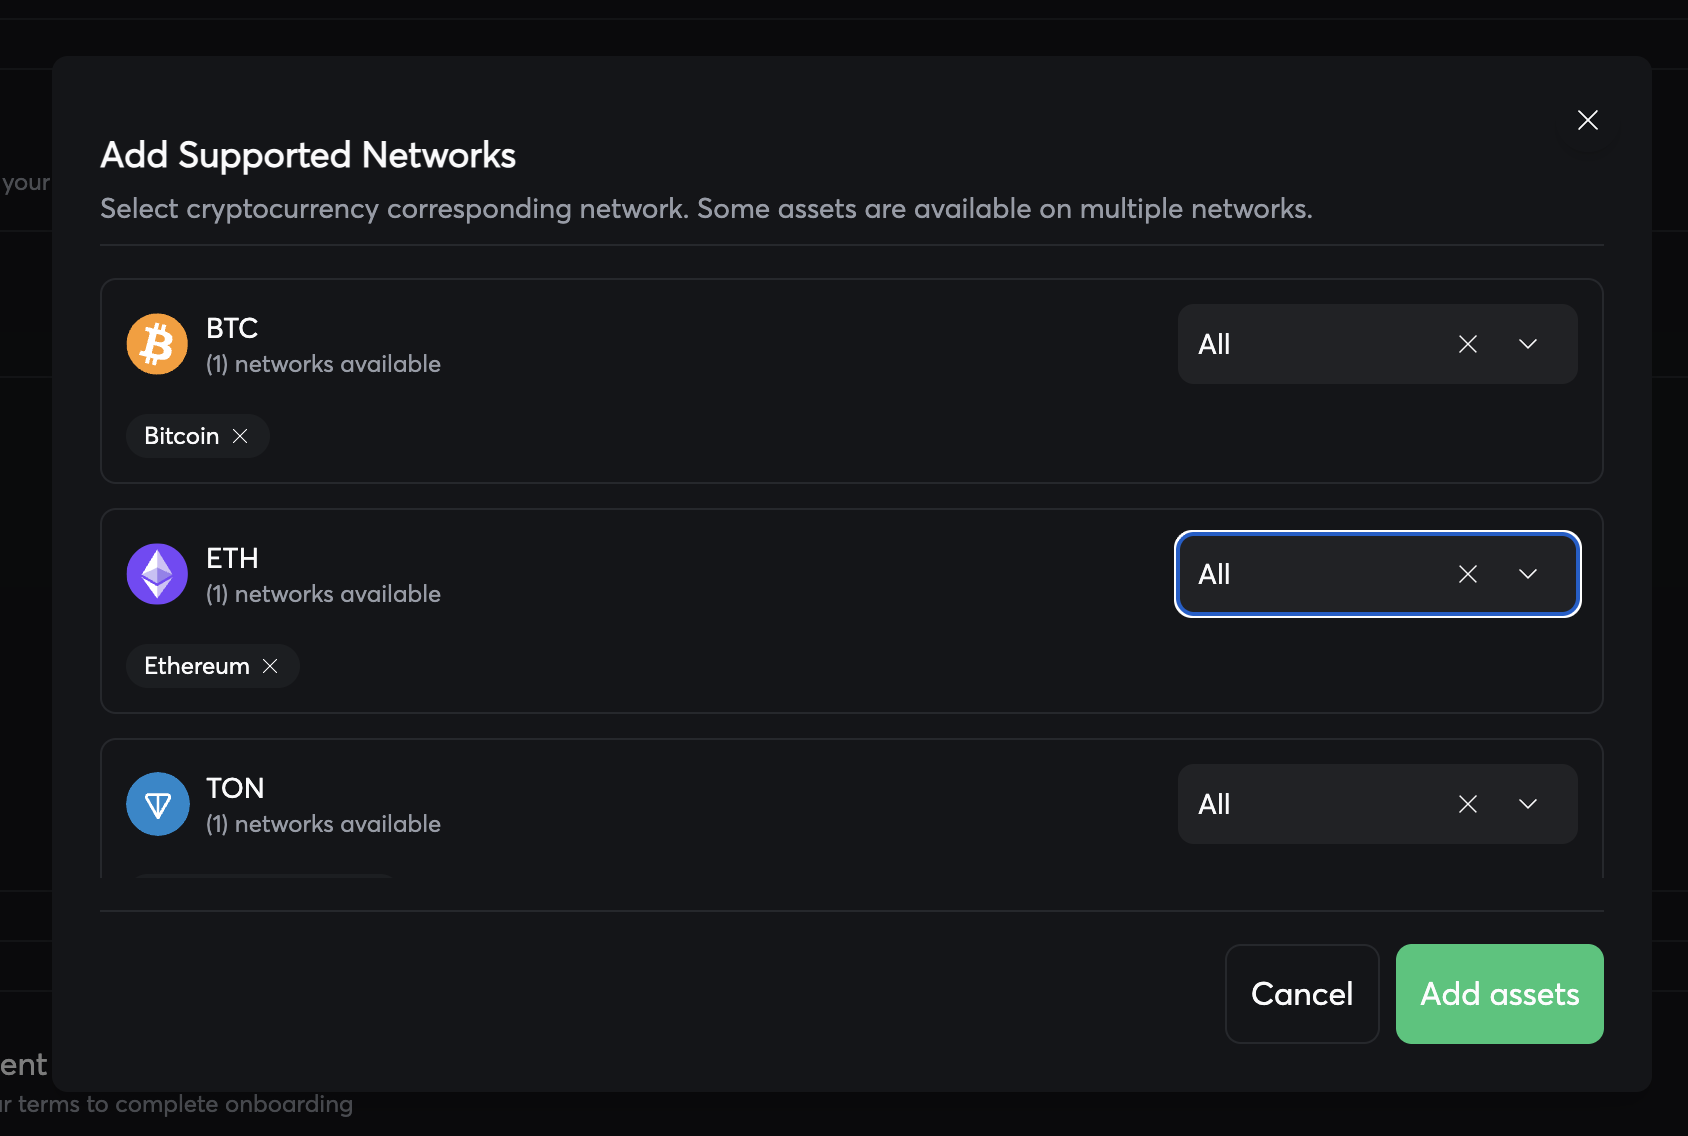
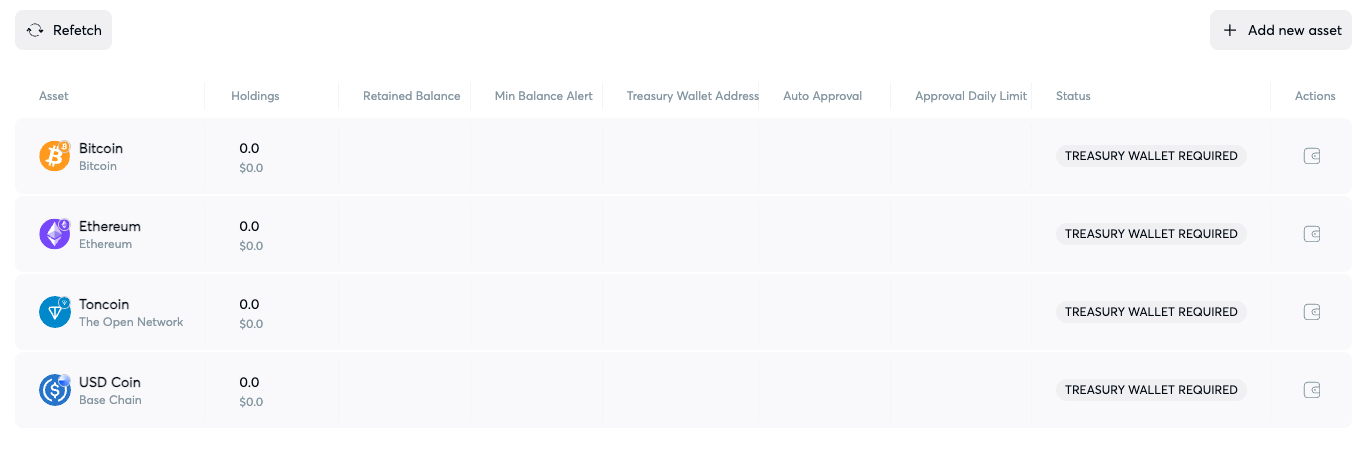
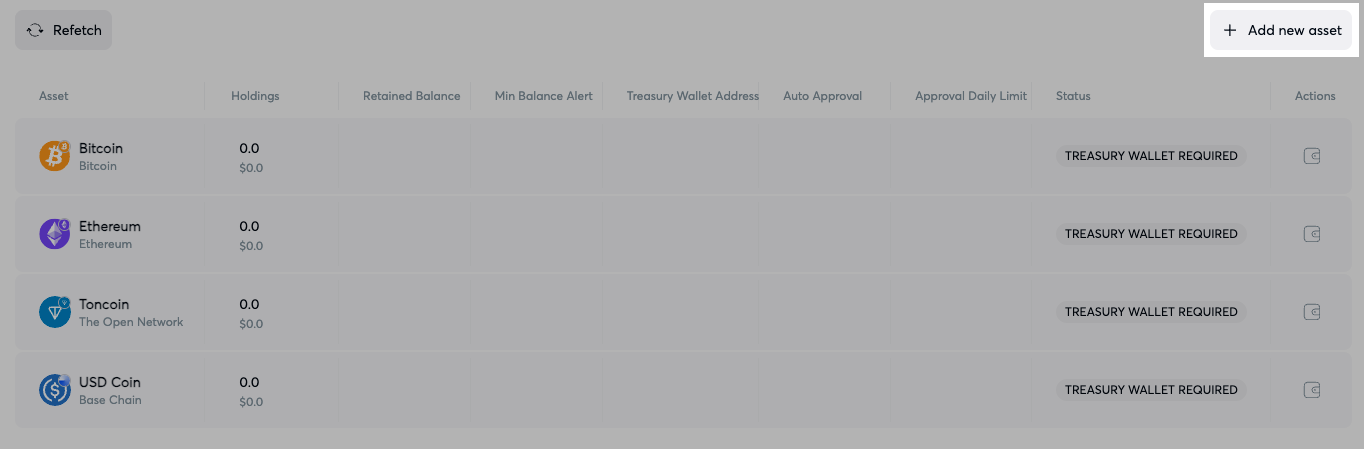
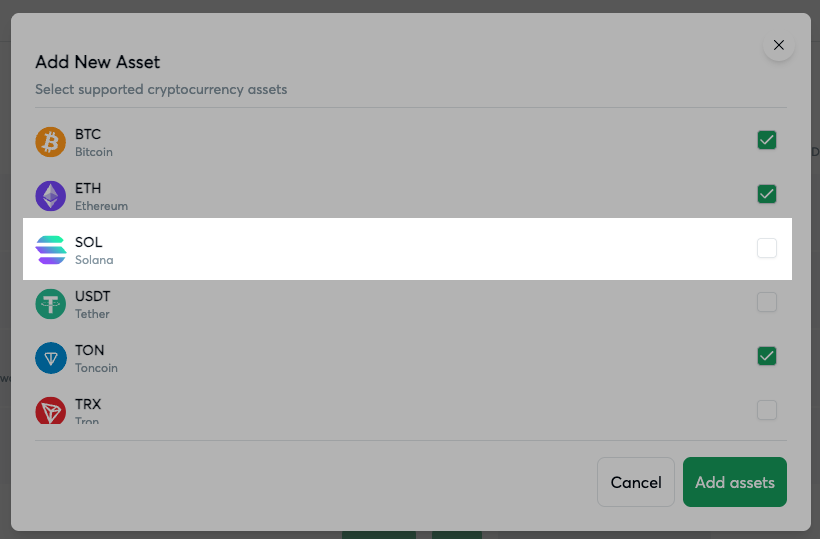
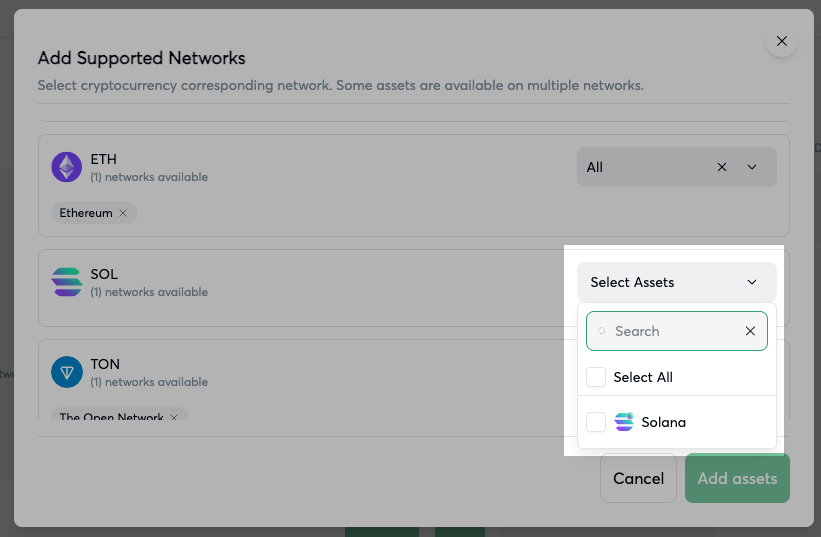
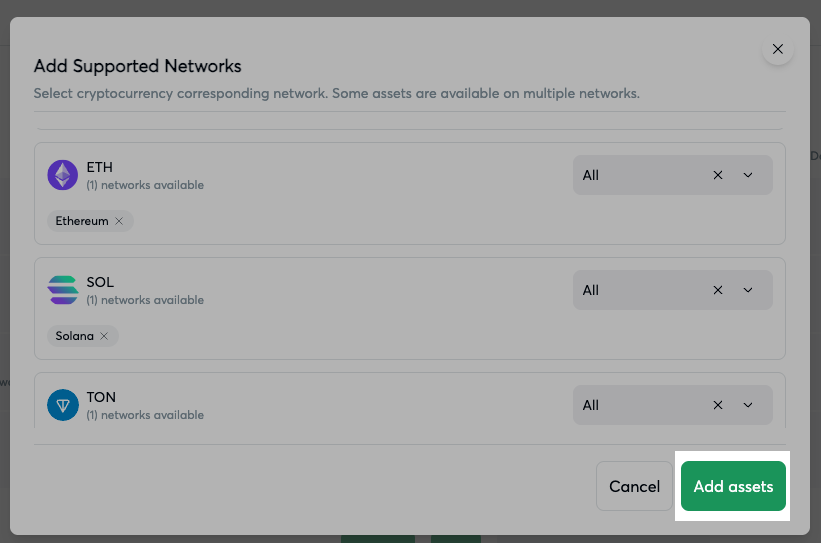
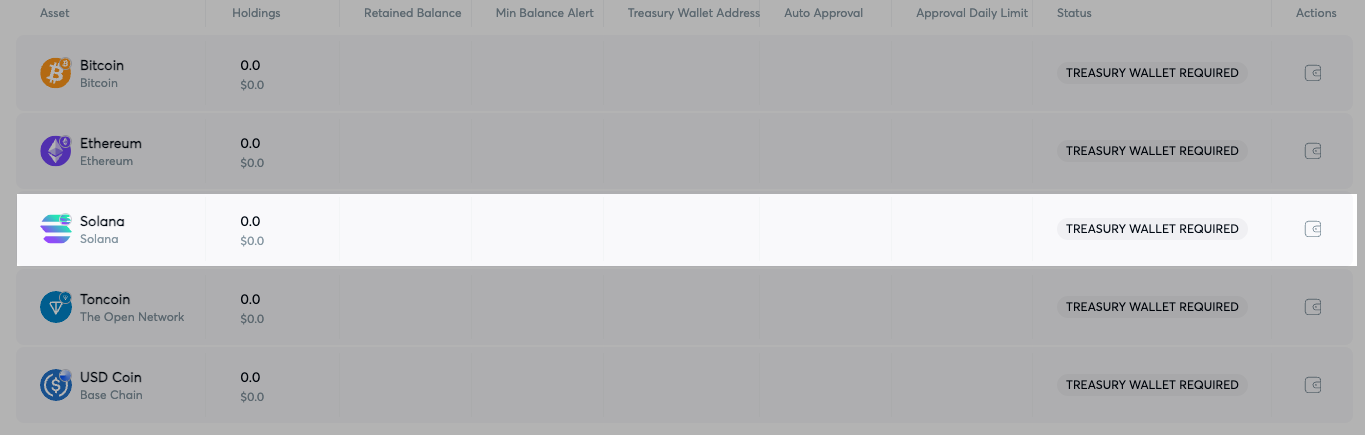

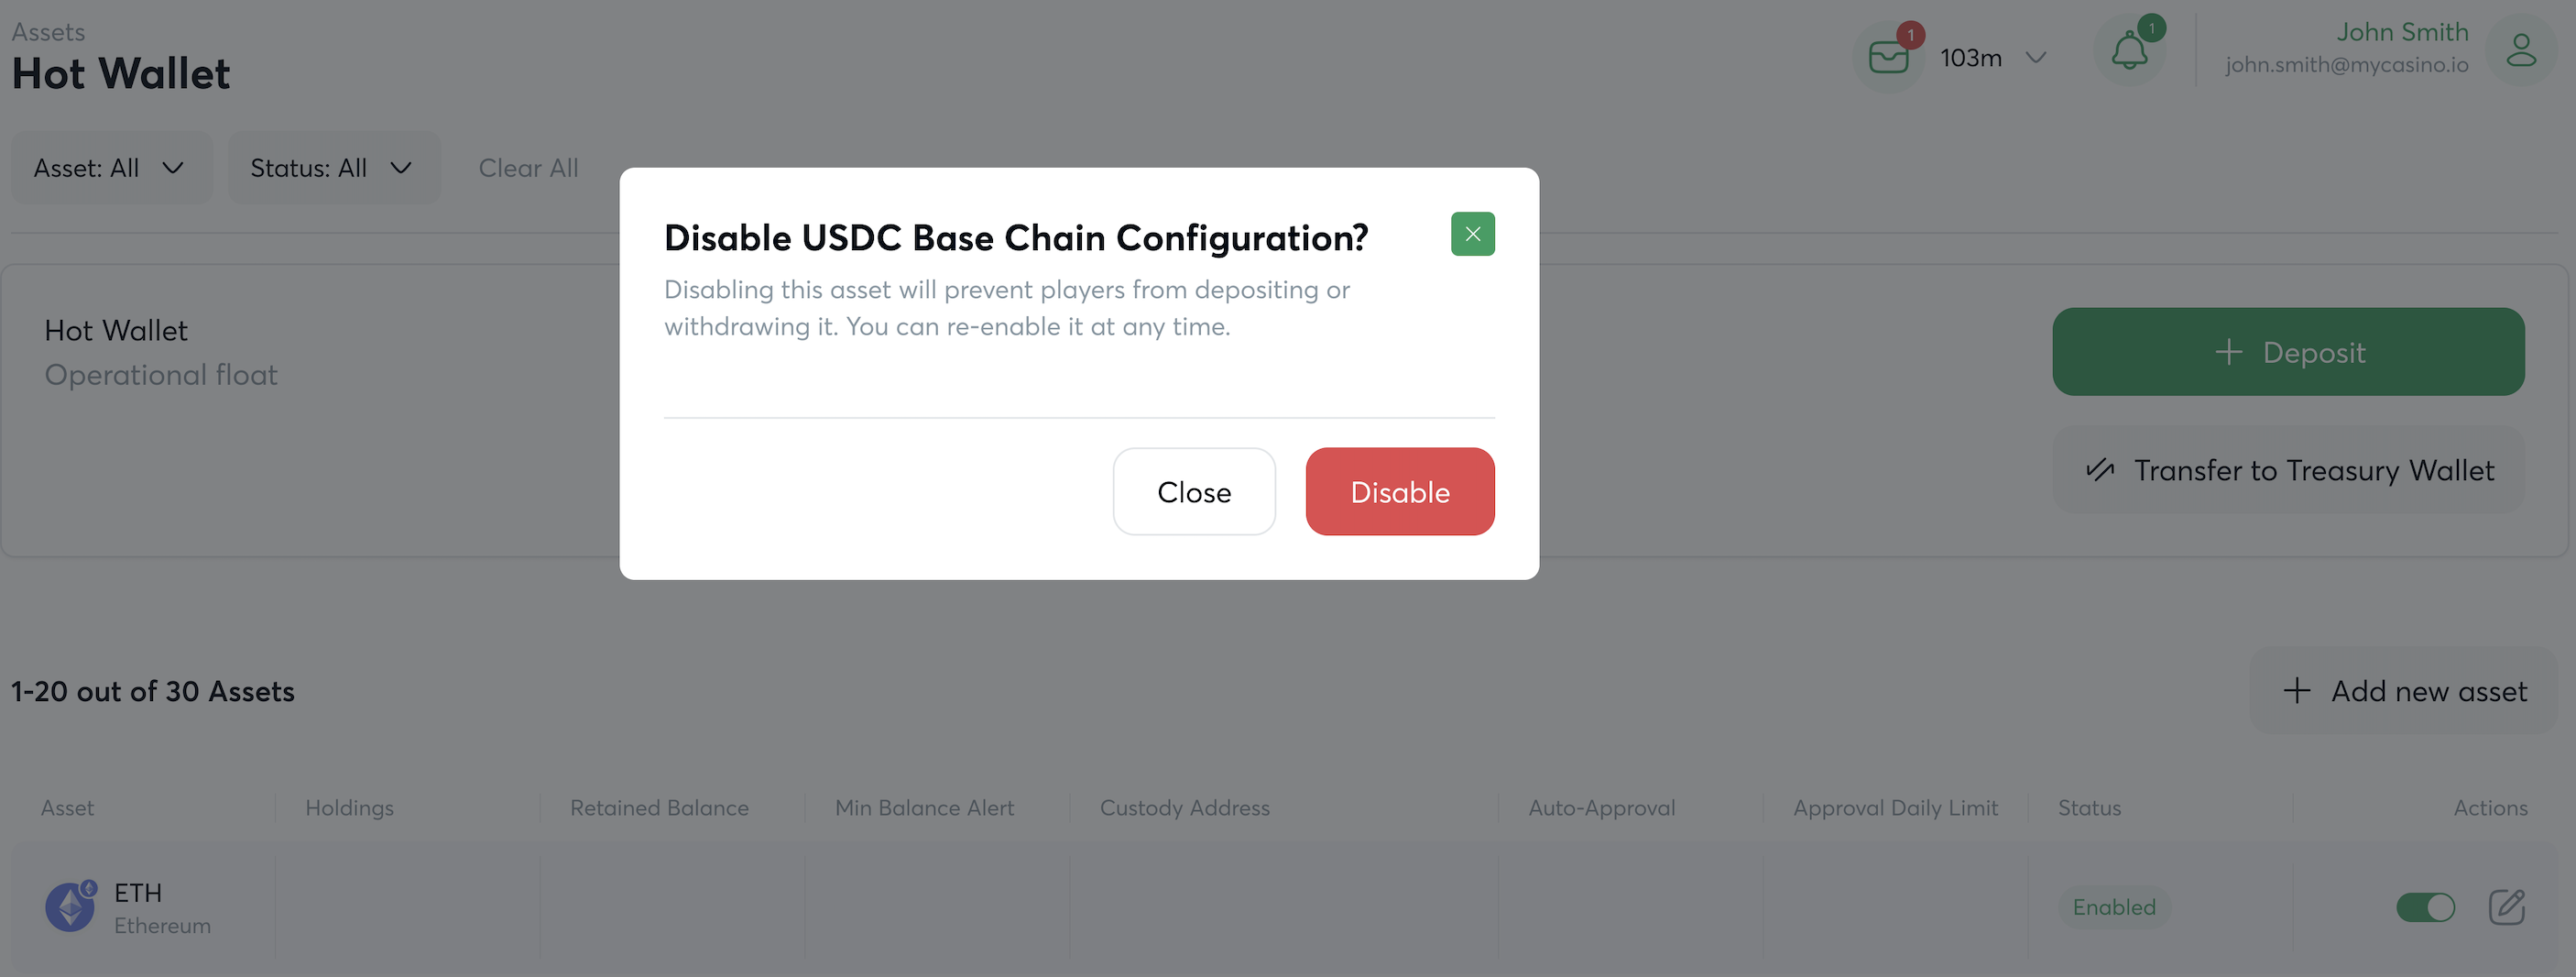
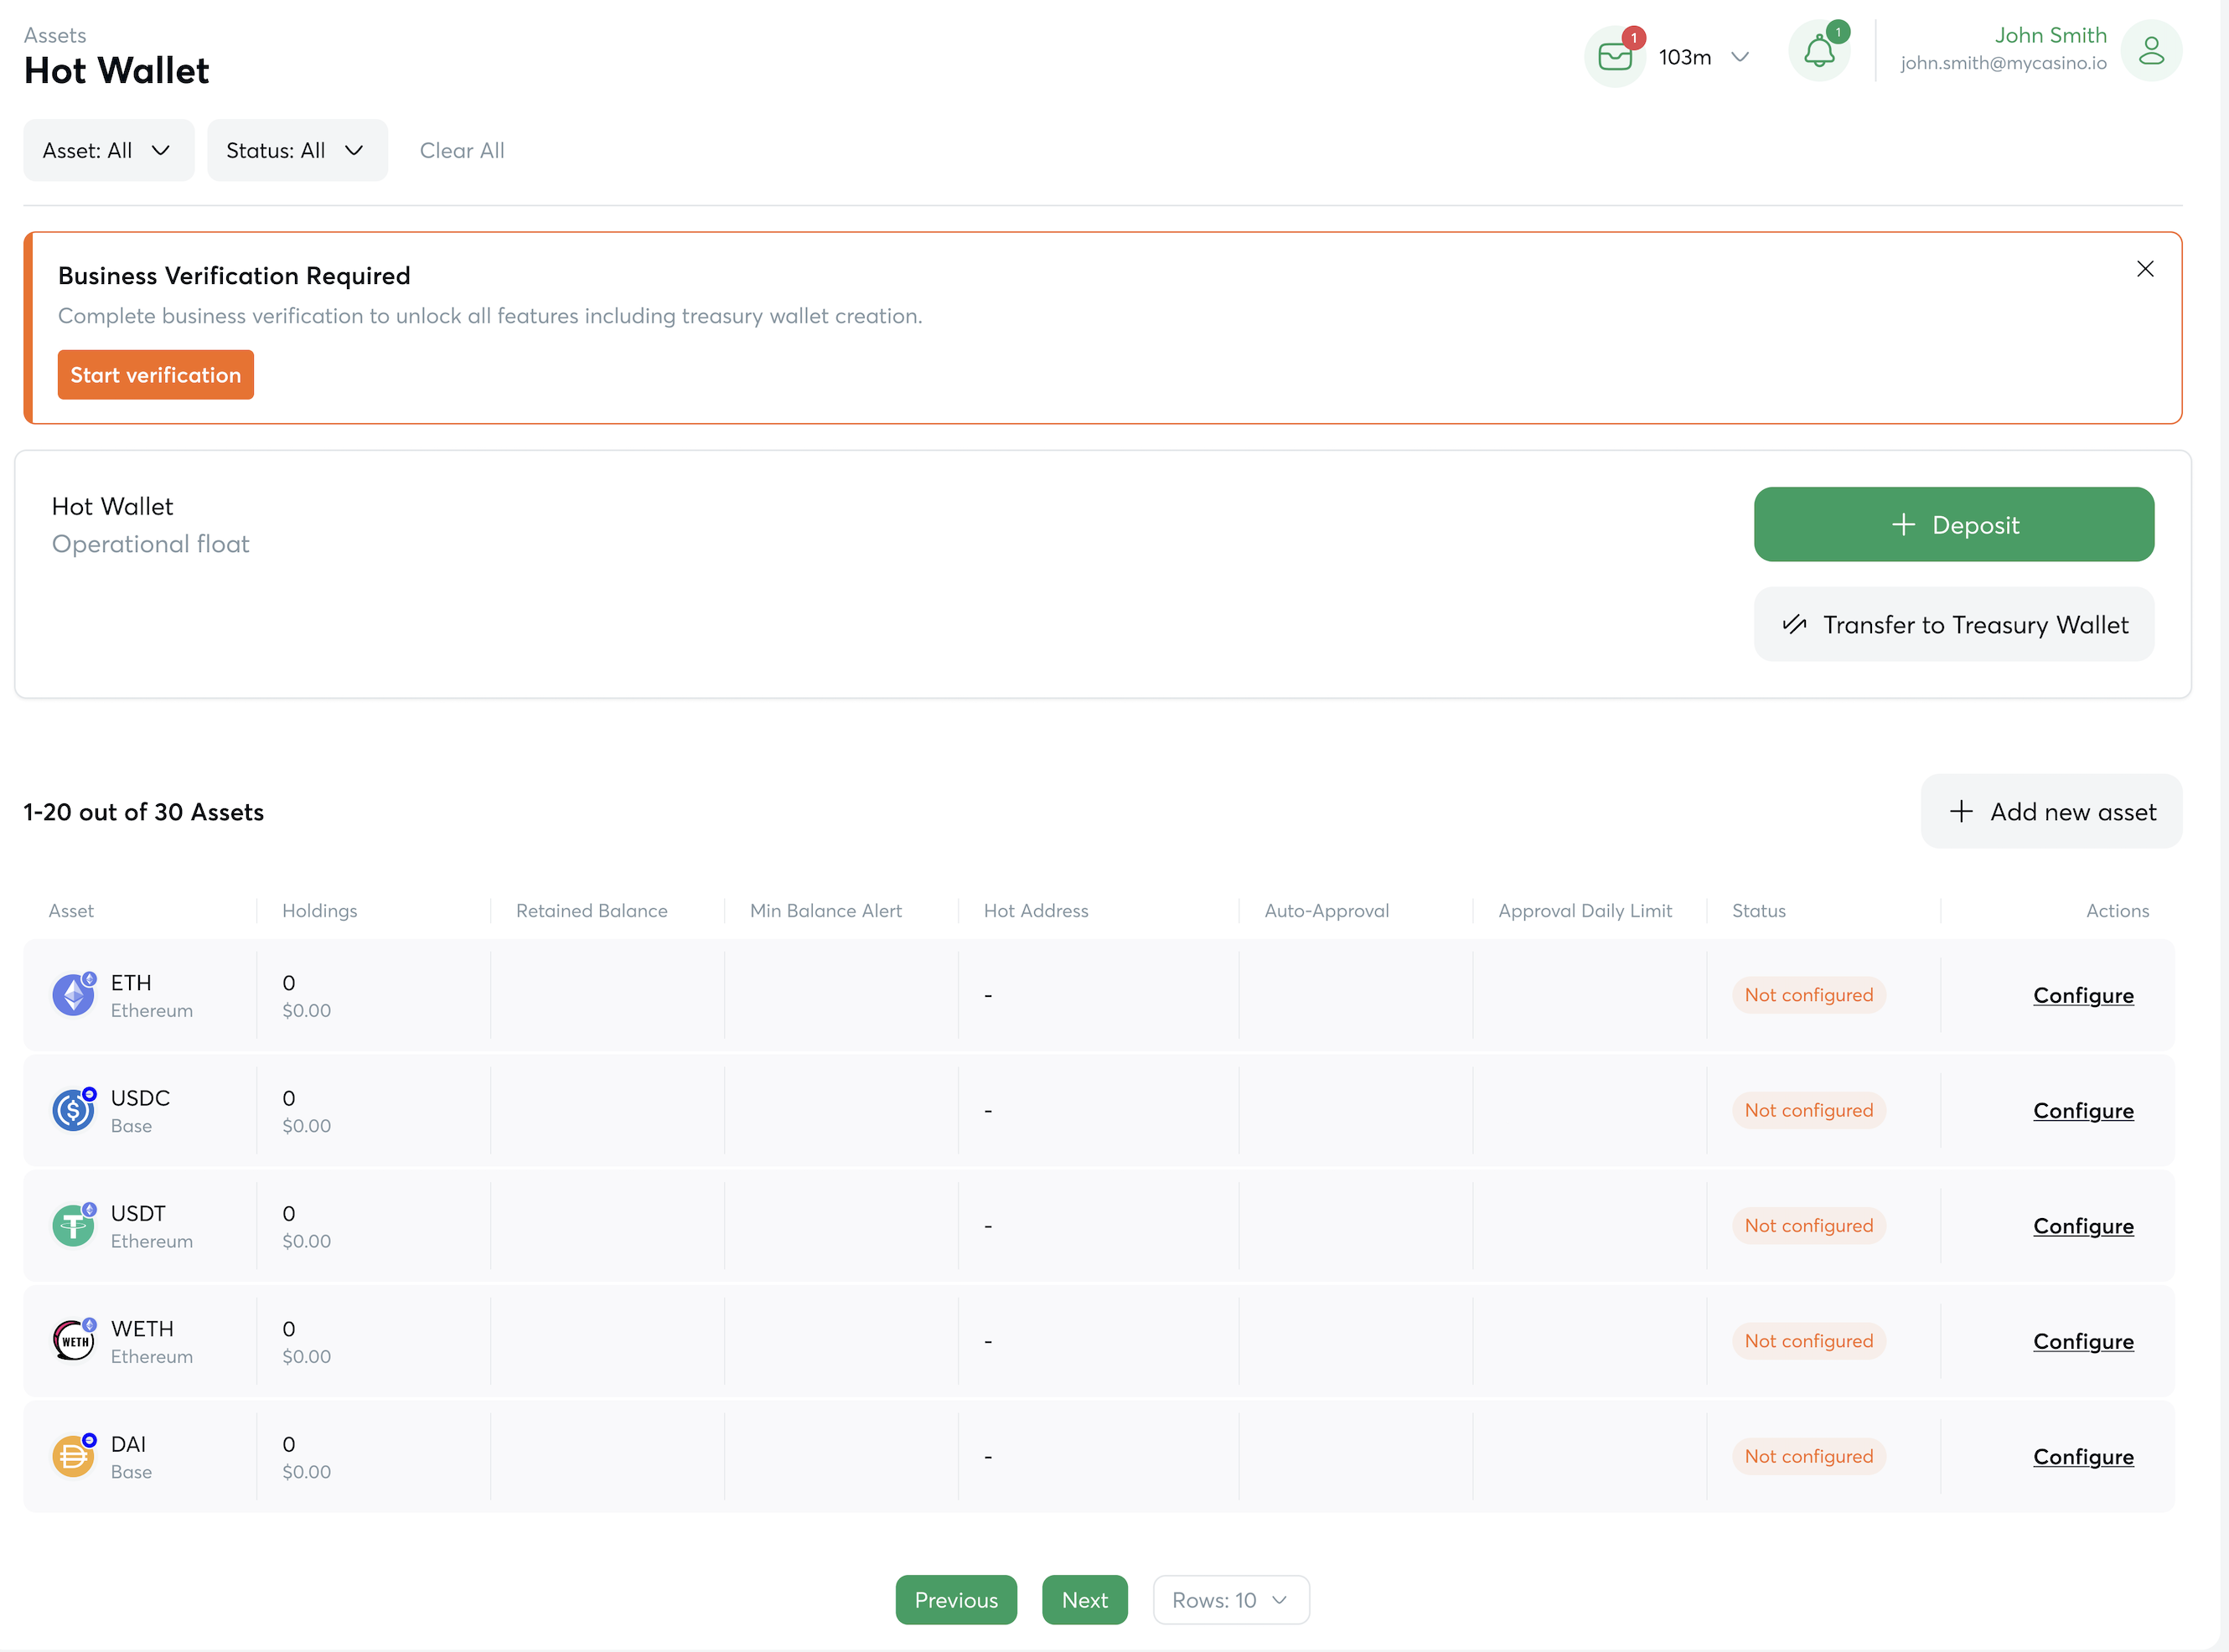
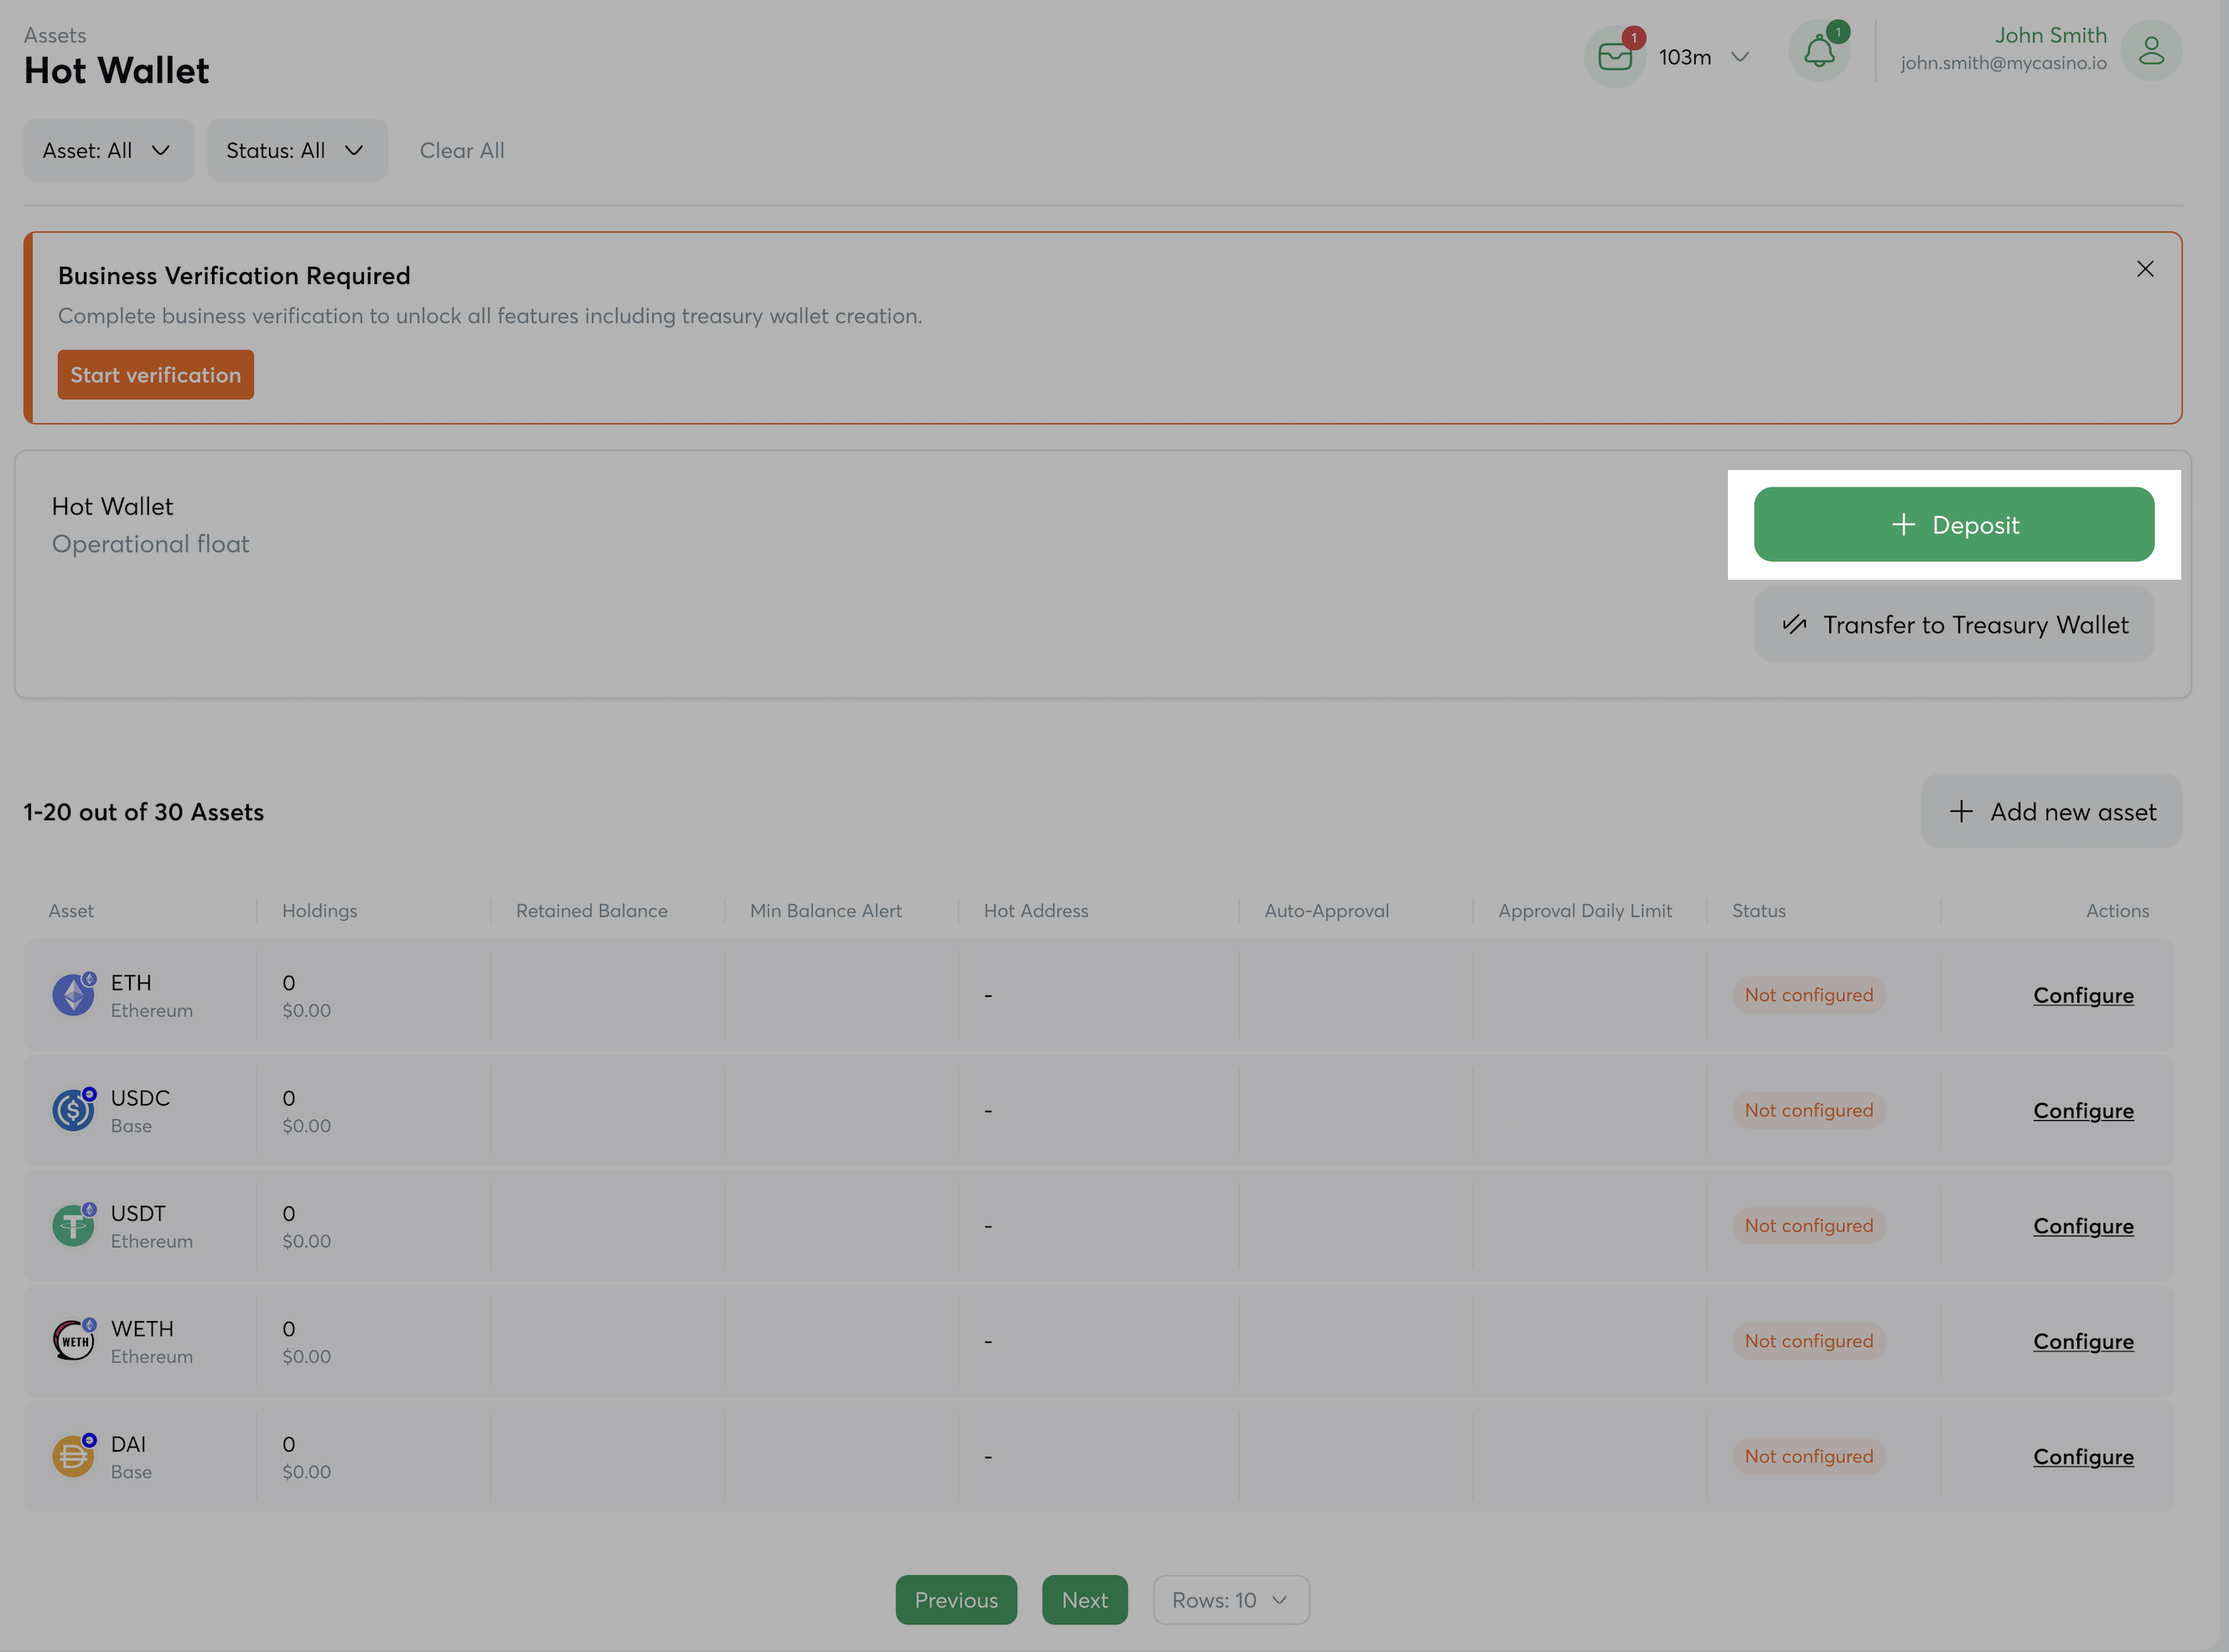
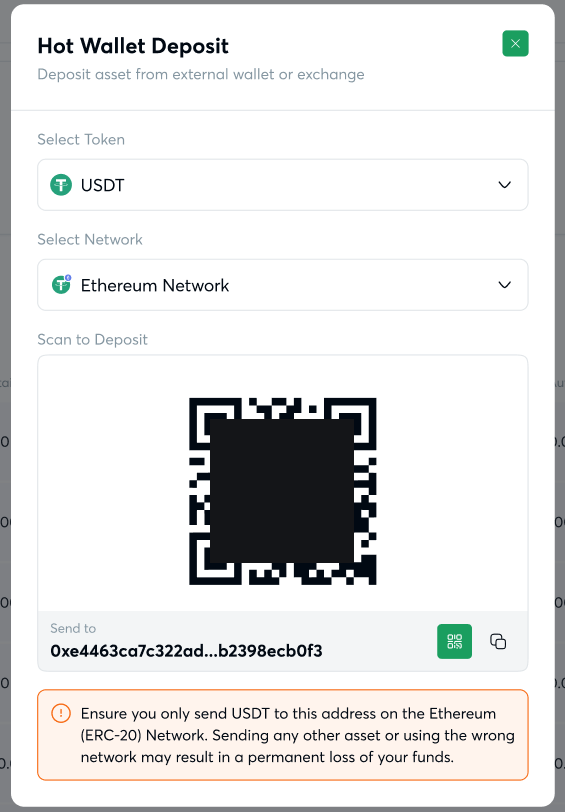


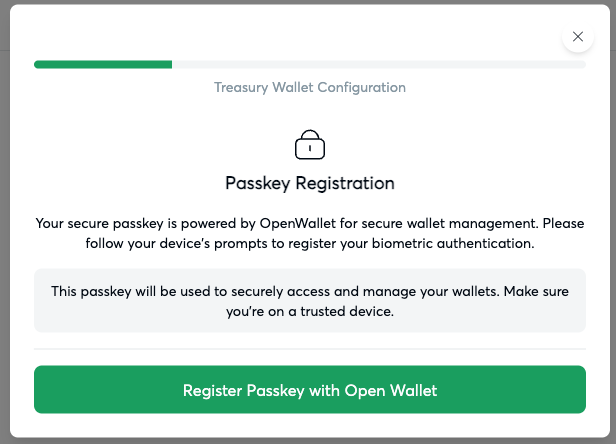

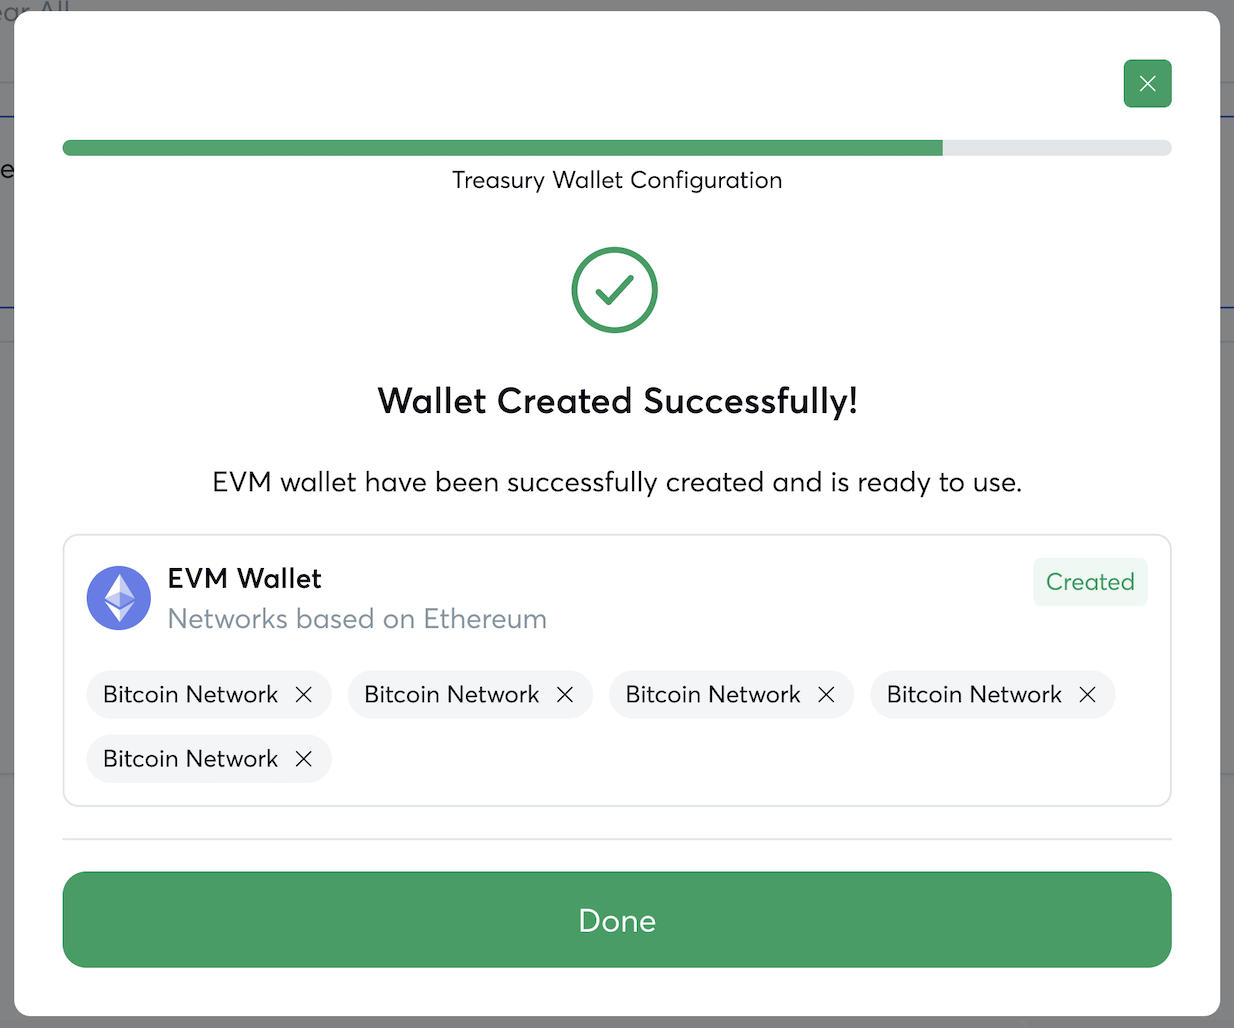


.png?alt=media&token=c922953d-cd42-4674-9def-1a80abd43d04)